Mastering the Form: 21 Human Anatomy Drawing Tutorials and References – How to Draw Feet and More
Are you eager to enhance your artistic skills and bring more realism to your figures? This comprehensive guide on 21 Human Anatomy Drawing Tutorials and References – How to Draw Feet and other crucial body parts is your ultimate resource. Drawing the human form is one of the most rewarding yet challenging aspects of art. Whether you’re a beginner struggling with proportions or an experienced artist seeking fresh inspiration for dynamic poses, understanding anatomy is key. Dive into this collection of insightful references and tutorials that break down the complexities of the human body, from skeletal structures to muscle groups and subtle gestures. We’ll explore everything from fundamental proportions to the intricate details of hands and feet, providing actionable tips to elevate your sketching practice. Let’s unlock the secrets to drawing compelling and lifelike human figures!
Materials, Tools & Supplies / Project Snapshot
Embarking on your human anatomy drawing journey requires only a few essential tools to get started, making it an accessible art form for everyone. A good quality sketchbook (acid-free paper, minimum 80gsm) will be your primary canvas for practice. For drawing, a range of graphite pencils (H for light lines, HB for general sketching, and B to 4B for darker tones and shading) is indispensable. Don’t forget a reliable kneaded eraser for lifting graphite without damaging the paper and a vinyl eraser for sharper corrections. A blending stump or tortillon can help achieve smooth transitions and subtle shading effects, giving your anatomical studies depth. Optional but highly recommended are a small ruler for measuring proportions, a clear protractor for angle assessments, and a few good reference books on human anatomy for artists. This setup will equip you to tackle all the tutorials and references outlined below, helping you build a solid foundation in figure drawing.
Male and Female Anatomy
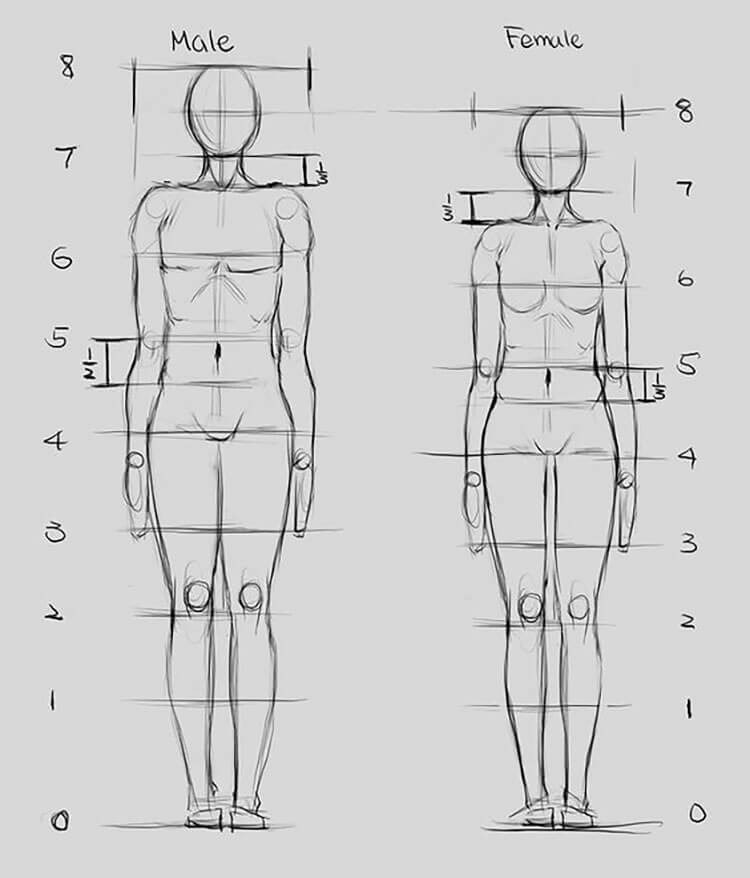
Understanding the fundamental differences and similarities in male and female anatomy is crucial for accurate figure drawing. This initial reference provides a simplified yet insightful comparison of body proportions, skeletal structures, and muscle distribution unique to each gender. Focus on the contrasting shoulder-to-hip ratios, the nuances in rib cage and pelvis shapes, and the varying lengths of limbs relative to the torso. Artists often find it helpful to start with stick figures or basic geometric shapes to block out these foundational proportions before adding anatomical detail. Pay close attention to how the center of gravity and overall silhouette differ, as these elements profoundly impact the pose and natural movement of your figures. Practicing these basic distinctions will lay a strong groundwork for more complex anatomical studies.
Muscular Male Anatomy
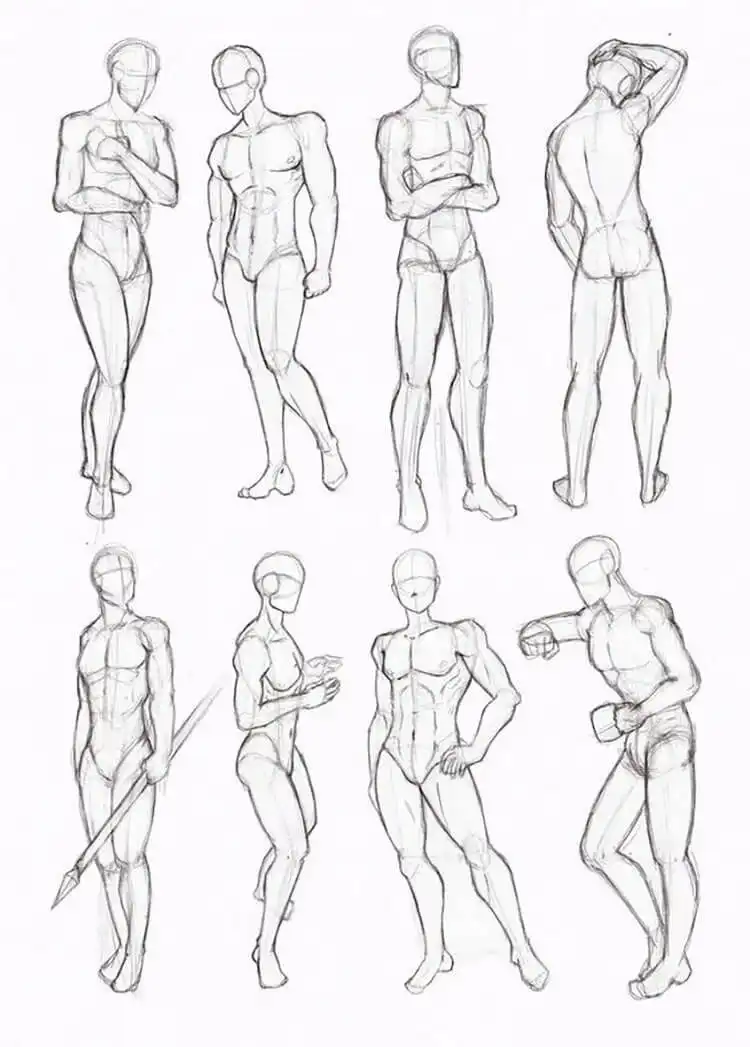
Delve deeper into the robust structure of the male form with these detailed muscular anatomy sketches. This section highlights key muscle groups and their interplay, essential for conveying strength and definition in your male figures. Observe how muscles like the pectorals, deltoids, biceps, and quadriceps contribute to the overall shape and contours of the body. The dynamic poses, often incorporating props like a coffee mug or a spear, serve as excellent case studies for how muscles flex and stretch under tension. When drawing, visualize the origin and insertion points of each major muscle and how they connect to the bone structure. Don’t just copy the outlines; try to understand the underlying forms. Use varied line weights – lighter lines for subtle contours and darker, bolder strokes to emphasize prominent muscle bellies and shadows – to create a sense of three-dimensionality and power in your renditions.
Human Proportion Guide
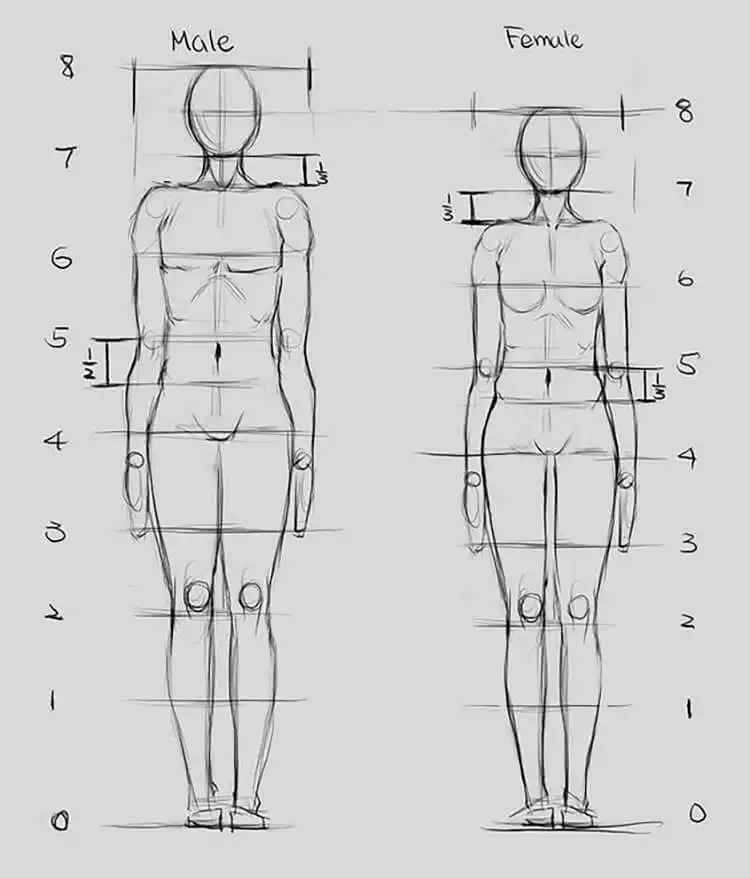
Proportion is the bedrock of realistic figure drawing, and this guide offers an invaluable resource for mastering it. Presenting a clear comparison of male and female proportions, it uses standard measurement units (often head-lengths) to delineate the relative sizes of different body parts. For instance, the classic “eight heads tall” method is a common starting point, with variations for gender, age, and individual characteristics. Study the differences in torso length, limb proportions, and head size relative to the rest of the body for both sexes. Practice measuring these proportions on your own references and apply them to your sketches. Consistency in proportion ensures your figures appear balanced and anatomically sound, preventing common errors like disproportionately long limbs or an undersized head. This foundational practice will greatly accelerate your progress in drawing the human form.
Muscular Anatomy
This imaginative and detailed muscular anatomy reference goes beyond basic definitions, presenting a creative approach to visualizing the human musculature. It emphasizes not just the individual muscles but their interconnectedness and how they create the overall form. Instead of dry textbook diagrams, these illustrations often depict muscles in dynamic states, showing how they bunch, stretch, and define the body’s surface during movement. Use this reference to gain a deeper appreciation for the complex “architecture” of the human body. As you sketch, think about the three-dimensional volume of each muscle group and how they overlap and influence each other. Experiment with cross-contour lines to illustrate the form and direction of muscle fibers. This will help you transition from flat outlines to drawings that convey palpable mass and structure.
Different Parts of the Body
To truly improve your human drawing skills, a focused approach on individual body parts is essential. This section highlights the importance of breaking down the intimidating task of drawing a full figure into manageable components. Each part – from the torso and limbs to the head, hands, and feet – presents its own unique anatomical challenges and artistic opportunities. Dedicate specific practice sessions to each element, understanding its bone structure, muscle groups, and range of motion. For example, sketching hands and feet from multiple angles will yield far greater improvement than only attempting full figures. Consider using a variety of drawing mediums for these studies, such as charcoal for broad strokes or fine liners for intricate details, to explore different textures and effects. This methodical approach builds a strong visual vocabulary that you can then integrate into complete, dynamic figures. Focusing on these isolated elements is a fantastic way to identify and overcome specific weaknesses in your anatomical drawing. If you’re also interested in other artistic subjects, exploring different forms, like those in 24 Watercolor Animal Painting Ideas – How to Draw a Cat, can further diversify your skills.
Leg Anatomy
The legs are a marvel of biomechanical engineering, responsible for movement, balance, and weight bearing. This set of drawings offers an in-depth look at leg anatomy, presenting the lower half of the body from various angles and in diverse poses. Pay close attention to the large muscle groups like the quadriceps, hamstrings, and calves, as well as the intricate ankle and foot structures. Study how the muscles interact and change form during actions such as standing, walking, running, or kicking. The dynamic interplay between the bones (femur, tibia, fibula) and muscles dictates the leg’s contours and movements. Focus on capturing the natural flow and curve of the leg, avoiding stiffness. Use shading to indicate muscle volume and definition, paying attention to the way light falls on the complex forms. Drawing the legs requires understanding their function, so visualize the forces at play in each pose.
Woman’s Body in Motion
Capturing the female body in motion brings a sense of life and dynamism to your artwork. This sketch provides excellent references for understanding how the female form articulates during various actions. The natural curves and softer muscle definition of the female anatomy are beautifully highlighted as the body twists, bends, and stretches. Observe how the rib cage, pelvis, and limbs shift and rotate, creating elegant lines and interesting negative spaces. Focus on the rhythm and flow of the movement, identifying the key points of articulation and the implied energy of the pose. Use gesture drawing techniques – quick, loose sketches – to capture the essence of the motion before committing to detailed anatomy. Understanding how clothing would drape over these moving forms can also add another layer of realism to your figure drawings.
Foot Anatomy
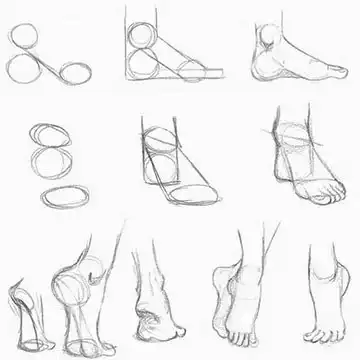
Often considered one of the most challenging parts of the body to draw, the foot is a complex structure of bones, muscles, and tendons. This particular sketch is incredibly helpful for artists aiming to master foot anatomy. It systematically breaks down the foot from multiple perspectives: front, side, and even a detailed view of the foot on its toes. Pay close attention to the arch, the distinct bone structures of the tarsals and metatarsals, and the phalanges of the toes. Notice how the Achilles tendon connects to the heel and the way the foot flexes and extends. When drawing, think of the foot as a series of connected blocks and wedges initially, then refine these into organic forms. Understanding the weight distribution and the pressure points when the foot is standing or flexing is vital for realistic representation. Practice capturing the subtle creases and folds of the skin, especially around the ankle and toe joints, to convey texture and realism. Mastering the foot is a significant step towards creating believable and grounded figures.
Facial Viewpoints
The human face is a focal point of expression and identity, and mastering its various viewpoints is crucial for portraiture and character design. This drawing beautifully illustrates how to render the face from a wide array of angles, including the frontal view, profile, three-quarter view, and even from above and below. Each perspective alters the perceived proportions and contours of the facial features – the eyes, nose, mouth, and ears. Study how the skull’s underlying structure dictates these changes. For instance, in a three-quarter view, the eye closer to the viewer will appear wider than the one receding into the distance. Use construction lines, like the central axis and eye line, to maintain symmetry and correct placement of features across different angles. Practicing these diverse viewpoints will give your characters a greater sense of dimension and emotional depth, allowing you to convey nuanced expressions. For those interested in diverse character designs, exploring resources like How to Draw Locs – 50 Beautiful Female Character Sketch Ideas can offer additional inspiration.
Belly Dancer Anatomy
Capturing the fluidity and grace of a belly dancer’s anatomy offers a unique challenge and opportunity for artists. This reference focuses on how the female body articulates during this expressive dance form, emphasizing the undulating movements of the torso, hips, and arms. Observe the intricate muscular contractions and extensions that create the signature isolations and shimmies. Pay particular attention to the abdominal muscles, the flexibility of the spine, and how the shoulders and hips move independently yet harmoniously. Sketching dynamic poses from real-life references, such as YouTube videos of belly dancers, can help you grasp the rhythm and energy of the movement. Focus on the flow of the form and the implied lines of motion, using long, gestural strokes to convey the dancer’s elegance and power. This study will deepen your understanding of dynamic female anatomy and figure drawing.
Male Physique
Developing your ability to sketch the male physique is fundamental for artists aiming to depict strong and masculine figures. This section offers references specifically tailored to improving your drawing techniques for the male body form. It typically showcases various body types, from lean to heavily muscled, allowing you to study how different levels of definition affect the overall silhouette and individual muscle groups. Focus on the broader shoulders, narrower hips, and more pronounced musculature compared to the female form. Understand the visible landmarks created by bones and tendons, such as the collarbones, sternum, and various joints. Practice rendering the male torso, arms, and legs, paying attention to the specific ways muscles bulge and recess. Use chiaroscuro – strong contrasts between light and shadow – to accentuate the contours and mass of the muscles, giving your drawings a sense of power and solidity.
Gymnastics
This anatomy drawing reference is a testament to creativity, depicting a woman performing gymnastics. Such dynamic poses are incredibly challenging but immensely rewarding for artists. Gymnastics showcases the human body at its peak flexibility, strength, and balance, offering an unparalleled opportunity to study extreme contortions and powerful muscular engagement. Observe how the body’s center of gravity shifts, how limbs extend and bend beyond typical ranges, and how muscles are intensely engaged to maintain a pose. Focus on the tension in the core, the stretched lines of the limbs, and the compression in joints. Breaking down the pose into simpler geometric forms first can help you capture the overall action before refining the anatomical details. These types of references are excellent for developing your understanding of foreshortening and dynamic composition, bringing a thrilling energy to your figure drawings.
Muscle Drawing
For those new to rendering muscles on the human body, this beginner-friendly reference is an invaluable starting point. It simplifies complex anatomical structures into more digestible forms, making it easier to grasp the fundamentals without being overwhelmed. The focus here is on identifying the major muscle groups and understanding their basic shapes, rather than excruciating detail. Learn to recognize the common “landmarks” on the body where muscles attach and create visible bumps or depressions. Practice drawing simplified versions of the biceps, triceps, deltoids, and major leg muscles. Think of them as overlapping masses and cylinders rather than flat shapes. This introductory approach will help you build confidence and a foundational understanding of muscle anatomy, preparing you for more advanced studies and dynamic figure drawing. Consistent practice with these simplified forms is key to internalizing the muscle structure.
Hand Anatomy
Drawing hands is notoriously difficult for many artists, but consistent practice with dedicated references like this one is the path to improvement. The hand is an incredibly expressive and intricate structure, comprising 27 bones, numerous muscles, and delicate tendons. This reference provides various hand poses, focusing on the palm, back of the hand, and individual fingers. Pay close attention to the proportions of the palm relative to the fingers, the distinct knuckles, and the way the thumb articulates independently. Study how the skin creases and folds around the joints during different gestures, conveying age and movement. Begin by blocking out the hand as a simplified box or paddle shape, then add the thumb and fingers as cylinders or wedges before refining the details. Understanding the underlying skeletal structure will empower you to draw convincing hands in any position, adding significant emotional depth to your figures.
Female Body Form
These female body forms are designed to be relatively simple to draw, making them excellent references for beginners. They focus on capturing the graceful curves and general proportions of the female figure without getting bogged down in overly complex muscular details. The emphasis is on understanding the overall silhouette, the natural flow of the spine, and the subtle contours created by fat distribution and underlying bone structure. Observe the elegance of the neck and shoulders, the gentle slope of the hips, and the soft tapering of the limbs. Use long, flowing lines to sketch the figure, aiming for a sense of fluidity rather than stiffness. These references are perfect for building confidence in gesture drawing and establishing accurate foundational proportions before advancing to more detailed anatomical studies. They provide a safe space to explore and refine your approach to the female form.
Eyes, Nose, and Mouth
If you find yourself struggling with the nuanced features of the face, this step-by-step tutorial for eyes, nose, and mouth will be incredibly helpful. It breaks down each feature into manageable stages, guiding you from basic shapes to intricate details. For eyes, learn about the tear duct, eyelid folds, and how the eyeball sits within the socket. For the nose, understand the planes of the bridge, nostrils, and tip. For the mouth, observe the philtrum, cupid’s bow, and the musculature around the lips that dictates expression. Each step builds upon the last, allowing you to develop a systematic approach. Focus on the subtle shifts in value and form that give each feature its unique character and contribute to the overall expression of the face. Consistent practice with these elements, following a structured tutorial, will lead to significant improvements in your portraiture skills.
How to Draw Eyes
For many artists, the eyes are the “windows to the soul,” conveying emotion and drawing the viewer in. This dedicated eye study is invaluable if you’re new to drawing eyes or consistently struggle with them. It goes beyond simple outlines, showing you the basic eye shape, the complex structure of the eyelids, the iris, pupil, and crucially, the way light interacts with the spherical form of the eye. Pay close attention to the reflections and highlights that bring life and wetness to the eye. Understand how the eyebrows sit above the eye socket and influence its appearance. Practice drawing eyes from different angles and with various expressions. The goal is to make the eyes appear three-dimensional and alive, not flat. Experiment with different shading techniques to add depth and realism, making your characters’ gazes truly compelling.
Nose Studies
The nose, though often overlooked, is a critical element in defining a face’s character and structure. These nose studies, while not a step-by-step tutorial, offer a rich collection of differently shaped noses viewed from the front, side, and three-quarter angles. This reference is fantastic for expanding your visual library of nose types and understanding their anatomical variations. Observe how the bridge, tip, and nostrils differ in prominence, length, and width across various individuals. Focus on the distinct planes that make up the nose and how they catch light and cast shadows. Think of the nose as a series of geometric forms – a wedge for the bridge, a sphere for the tip, and cylinders for the nostrils – which can then be refined into organic shapes. While this is a good start, remember that the diversity of nose shapes is vast, and continued observation from life and other references will further enhance your ability to draw unique and realistic noses.
Eyes, Nose, Mouth, and Ears
This comprehensive reference brings together the four major facial features – eyes, nose, mouth, and ears – and shows how to sketch them cohesively from different angles. It illustrates the front view, the three-quarters view, and the side (profile) view, providing a holistic understanding of how these elements relate to each other on the skull. The key here is not just drawing individual features, but understanding their proportional placement and how they align across the face. For instance, notice how the bottom of the nose often aligns with the top of the ear, and the corner of the mouth often aligns with the pupil in a frontal view (though these are guidelines, not strict rules). Practice drawing the entire head and then meticulously placing and refining each feature according to the perspective. This integrated approach ensures your facial features are harmonious and contribute to a believable and expressive face, enhancing the overall impact of your figure drawings.
Expert Pro Tips for Flawless Results
- Start with Gesture: Before diving into details, always begin with loose, rapid gesture drawings. These quick sketches capture the pose’s energy, movement, and overall rhythm, preventing your figures from looking stiff. Focus on the spine and the line of action.
- Understand the Skeleton First: Muscles attach to bones, and movement is dictated by joints. A foundational understanding of the human skeleton will greatly inform your anatomical drawings, helping you place muscles correctly and understand proportions from the inside out.
- Use Construction Lines: Employ light, geometric construction lines (circles for joints, cylinders for limbs, boxes for torso/pelvis/head) to block out your figure’s form and proportions before adding organic shapes and muscle definition. This provides a solid framework.
- Practice Daily & Vary Your References: Consistency is key. Dedicate a short period each day to sketching, even if it’s just 15 minutes. Also, don’t stick to a single type of reference; draw from photos, life models, statues, and even memory to broaden your understanding and adaptability.
- Study Negative Space: Pay attention to the shapes created by the empty space around and between your figure and its limbs. Often, accurately drawing these negative spaces can help you correct proportional errors and improve the overall contour of your drawing.
Frequently Asked Questions
Frequently Asked Questions
Why is studying human anatomy so important for artists?
Studying human anatomy provides artists with a deep understanding of the body’s underlying structure, proportions, and how muscles and bones interact. This knowledge allows for the creation of more realistic, believable, and dynamic figures, enhancing accuracy and emotional expression in your artwork.
What are the most challenging body parts to draw, and how can I improve?
Hands, feet, and faces are often considered the most challenging due to their intricate bone structure, numerous small muscles, and expressive qualities. Improvement comes from dedicated practice using specific anatomical references, breaking down these parts into simpler shapes, and focusing on their function and movement from multiple angles.
How can I make my anatomy drawings look less stiff and more dynamic?
To achieve dynamic drawings, start with gesture sketches to capture the pose’s energy and flow before adding detail. Focus on the line of action, exaggerate curves slightly, and understand how the body’s weight shifts and balances. Drawing figures in motion and observing real-life movement are also crucial.
What are the best tools for starting out with anatomy drawing?
Begin with a good quality sketchbook, a range of graphite pencils (H, HB, 2B, 4B), a kneaded eraser, and a blending stump. These basic tools are versatile and allow you to focus on form, value, and line work without significant investment.
How long should I spend on each anatomy drawing study?
The duration can vary. For gesture drawings, spend 30 seconds to 5 minutes. For detailed studies of specific body parts or muscle groups, you might spend 30-60 minutes or even several hours. The key is consistent practice and varying your approach, rather than fixed time limits.
Ready to Sketch? Save to Pinterest for Future Inspiration!
We hope these 21 Human Anatomy Drawing Tutorials and References – How to Draw Feet and other body parts have ignited your passion for figure drawing! Mastering human anatomy is a journey, not a destination, filled with continuous learning and artistic growth. By diligently studying these references and applying the pro tips, you’re well on your way to creating more dynamic, realistic, and expressive figures. Don’t forget to save this comprehensive guide to your Pinterest boards so you can easily revisit these valuable insights and references whenever you need a boost of inspiration or a fresh perspective for your next drawing session. We’d love to hear about your progress and favorite anatomy drawing tips in the comments below!


