21 Human Anatomy Drawing Tutorials and References – Master How to Draw Feet & More
Embark on an artistic journey to master the complexities of the human form with these 21 human anatomy drawing tutorials and references, specially curated to elevate your skills. Whether you’re a budding artist or looking to refine your techniques, understanding anatomy is foundational to creating dynamic and believable figures. This comprehensive guide will not only help you grasp core anatomical concepts but also provide specific insights, such as dedicated tips on how to draw lips easily and, critically, how to draw feet with precision and nuance. Get ready to transform your sketchbook into a detailed study of the human body.
From foundational proportions to intricate muscle groups and expressive facial features, this collection of references and tutorials covers essential aspects of human anatomy. We’ll delve into the differences between male and female figures, explore bodies in motion, and break down challenging areas like hands and feet. Prepare your graphite pencils and sketchbooks, because with consistent practice and these detailed guides, you’ll see remarkable improvement in your figure drawing. Don’t forget to explore other subjects too, like learning how to draw beautiful flowers to diversify your artistic repertoire!
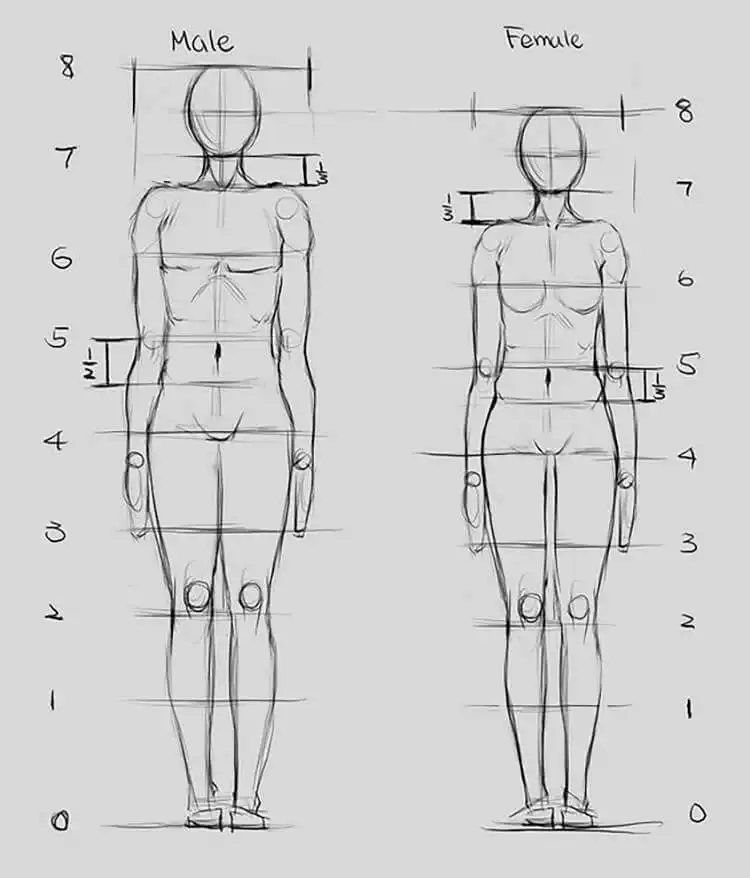
Male and Female Anatomy
Understanding the fundamental differences in male and female anatomy is crucial for accurate figure drawing. This reference highlights key proportional distinctions, such as shoulder-to-hip ratios, muscle mass distribution, and skeletal landmarks. When sketching, focus on the broader structural shapes before detailing. For instance, male figures often exhibit broader shoulders and a more angular torso, while female figures typically feature wider hips and softer, more curvilinear forms. Practice drawing simplified mannequins first, focusing on the core differences in the rib cage, pelvis, and overall silhouette. Pay attention to how these underlying bone structures influence the surface forms and muscle groups. Use light, gestural lines to capture the essence of these differences, gradually adding more definition as your understanding grows.
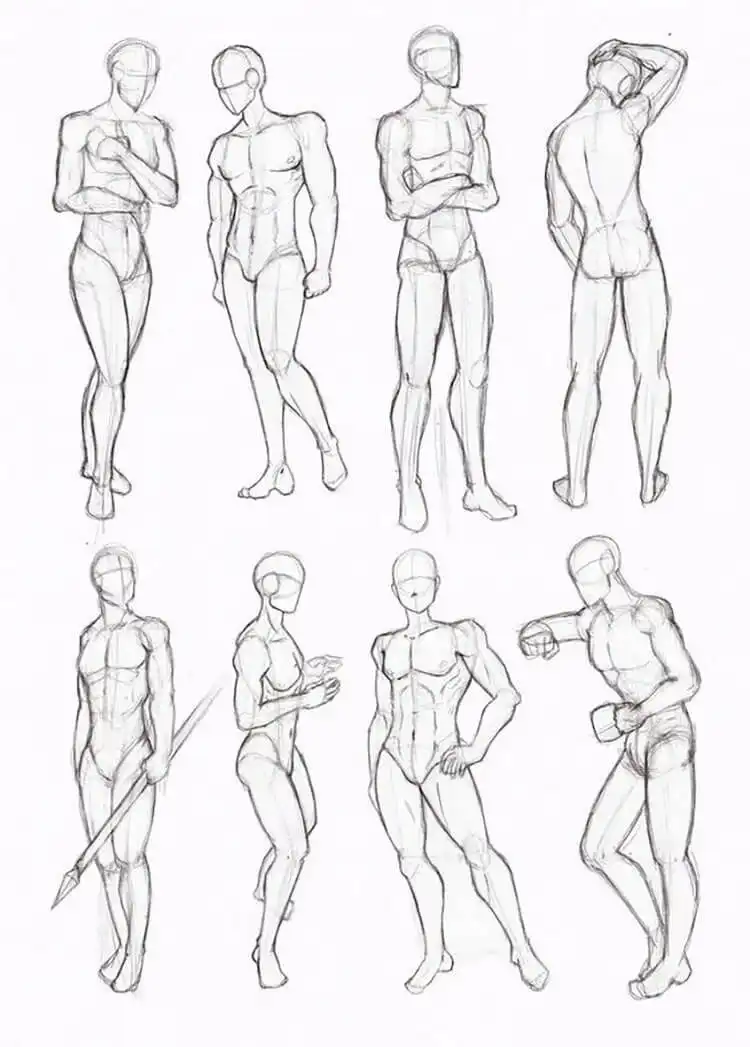
Muscular Male Anatomy
Delving into muscular male anatomy requires a keen eye for form and function. This section presents sketches that emphasize major muscle groups, their origins, insertions, and how they contribute to the overall physique. Notice how the deltoids, pectorals, biceps, and quadriceps define the shape of the male torso and limbs. When studying these references, try to identify the underlying bone structure – the clavicle, scapula, and rib cage – and how muscles drape over them. Experiment with shading techniques to give volume and depth to each muscle, indicating areas of tension and relaxation. Observing how muscles stretch and contract in dynamic poses, such as holding a coffee mug or a spear as depicted, provides invaluable insight into drawing realistic action figures. Use a varied pencil set (e.g., 2H for light construction lines, 2B-4B for shading) to achieve different tonal values and textures.
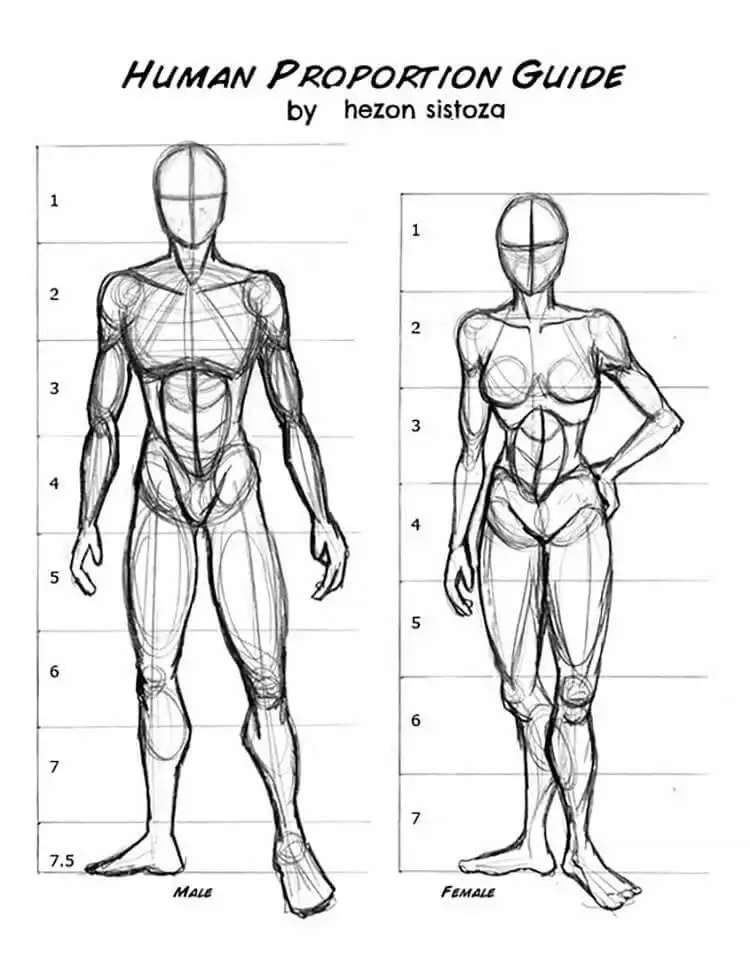
Human Proportion Guide
A solid grasp of human proportions is the cornerstone of realistic figure drawing. This guide illustrates standard proportional systems, often based on head-lengths, for both male and female figures. For example, the average adult human is typically 7.5 to 8 heads tall. Understanding where key anatomical landmarks (like the crotch, navel, and knees) fall in relation to these head units will help you construct well-balanced figures every time. Practice drawing the skeletal framework as a series of connected boxes or cylinders before adding muscles and skin. Compare the differences in limb length, torso height, and shoulder width between the male and female diagrams. Consistent application of these proportional guidelines will prevent common drawing errors, such as overly long limbs or disproportionately small heads, making your figures appear more natural and credible.
Muscular Anatomy
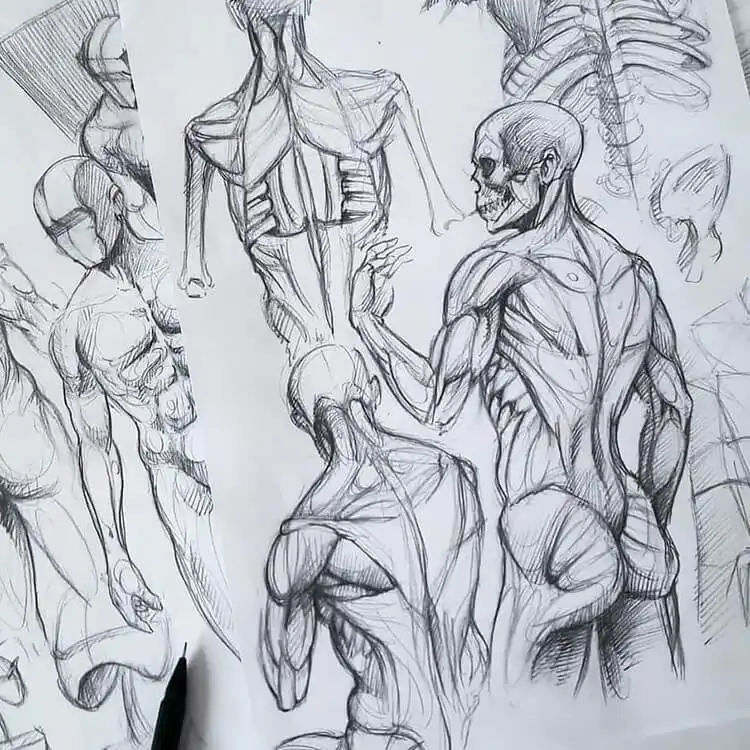
This imaginative muscular anatomy reference encourages artists to think beyond mere replication and understand the interplay of muscle groups. It’s not just about memorizing names; it’s about comprehending how muscles attach, overlap, and create the contours of the body. Focus on the flow and direction of muscle fibers, even when drawing fantastical interpretations. Consider how light falls upon these forms, creating highlights and shadows that define their three-dimensional nature. This type of reference is excellent for developing an intuitive sense of anatomy, allowing for stylized yet believable figures. Use cross-contour lines to map the curvature of the muscles, enhancing the sense of form and volume. Don’t be afraid to exaggerate certain muscle groups for dramatic effect, as long as the underlying anatomical logic is sound.
Different Parts of the Body
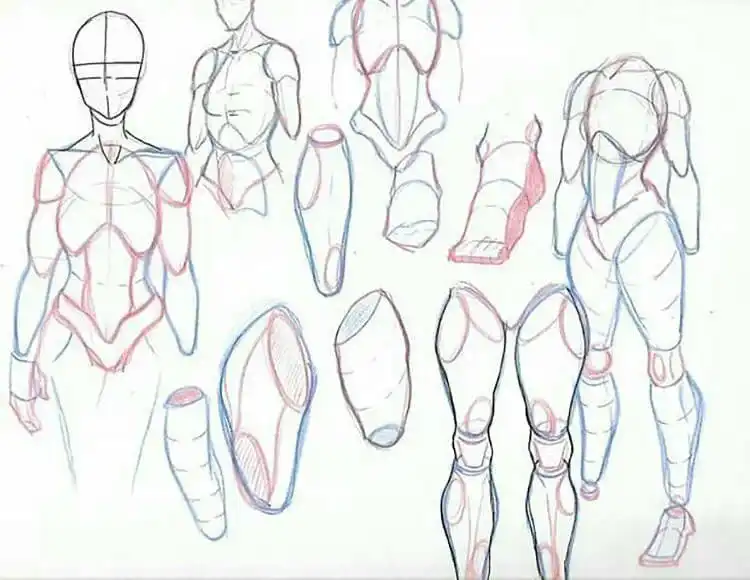
To truly improve your human drawing skills, dedicating time to individual body parts is paramount. This section underscores the importance of focused studies. Rather than always drawing the full figure, isolate hands, feet, torsos, or heads and devote entire sketching sessions to them. Each part presents unique challenges and anatomical complexities. For example, drawing hands involves intricate bone structures and tendons, while the torso requires understanding the rib cage, pelvis, and abdominal muscles. By breaking down the body into manageable segments, you can concentrate on mastering each component before reassembling them into a cohesive whole. Keep a dedicated sketchbook for these focused studies, practicing various angles, gestures, and lighting conditions. This targeted approach accelerates skill development and builds a robust visual library of anatomical forms.
Leg Anatomy
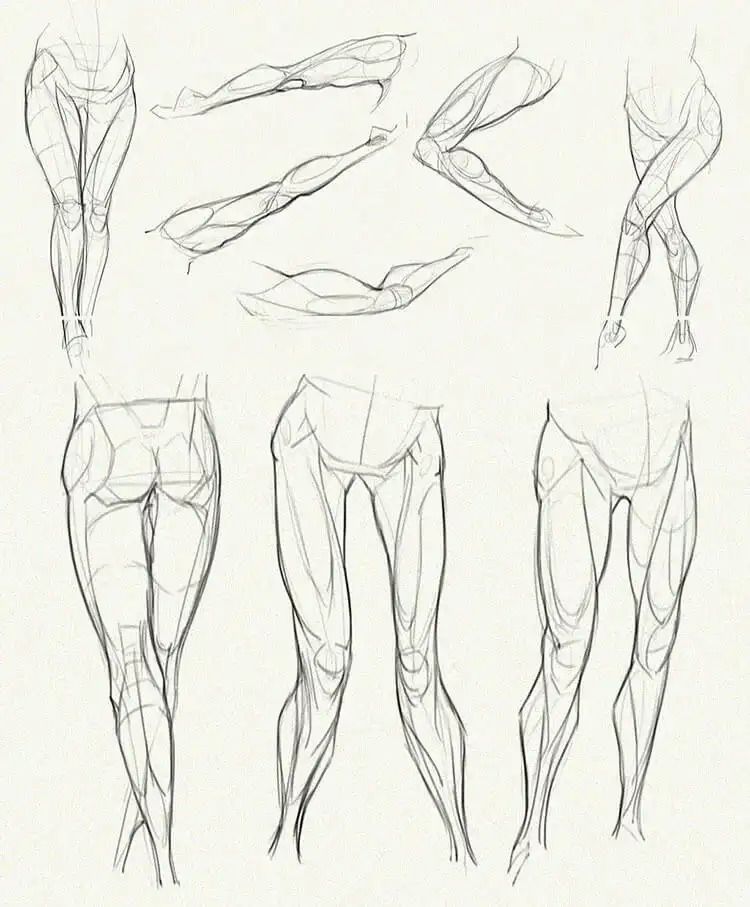
Leg anatomy is often overlooked but is crucial for creating figures that stand, walk, and run convincingly. These drawings offer various angles and pose references to help you practice drawing the lower half of the body. Pay close attention to the major muscle groups: the quadriceps on the front of the thigh, hamstrings on the back, and the gastrocnemius and soleus (calf muscles) on the lower leg. Understand how the femur, tibia, and fibula bones provide the structural foundation. Observe how these muscles interact during movement, creating dynamic tensions and compressions. Practice drawing legs in different actions – standing, walking, kneeling – and from multiple viewpoints (front, side, back, three-quarters). Shading plays a vital role in conveying the cylindrical nature of the thighs and calves, giving them a sense of weight and strength.
Woman’s Body in Motion
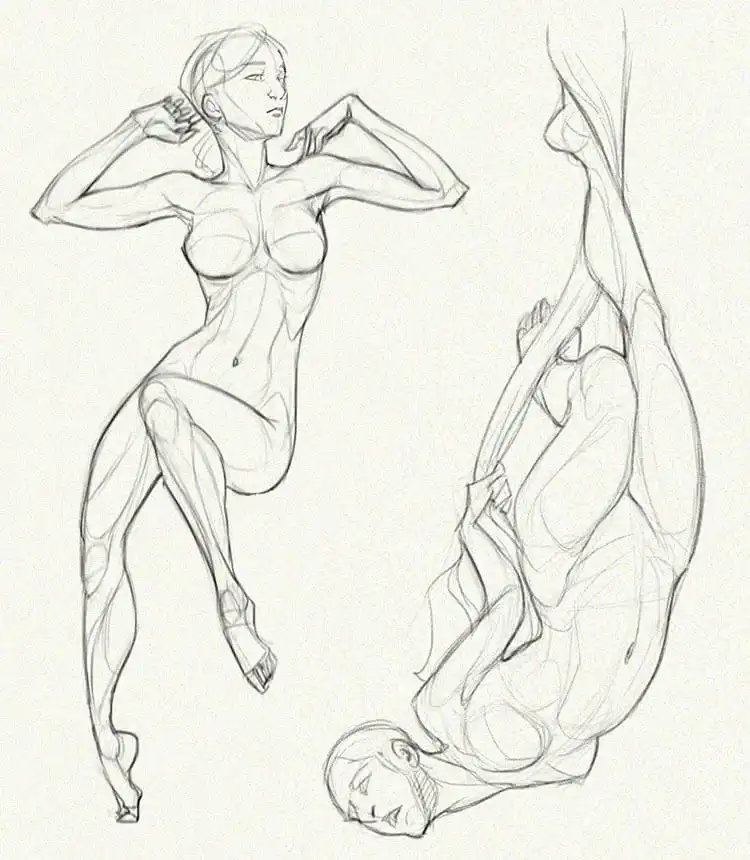
Capturing the female body in motion requires an understanding of gesture, balance, and fluidity. These sketches beautifully illustrate how the female form changes as it moves, emphasizing the line of action and the graceful curves created by shifting weight and muscle engagement. Focus on the overall flow of the pose rather than individual static parts. Use quick, expressive lines to capture the essence of movement before refining details. Observe how the spine curves, how the hips tilt, and how the limbs extend or contract. The interplay of drapery, if applicable, can also enhance the sense of movement. Practice drawing from life or video references to train your eye to see and translate dynamic poses onto paper. A good understanding of gesture drawing will make your figures feel alive and less stiff.
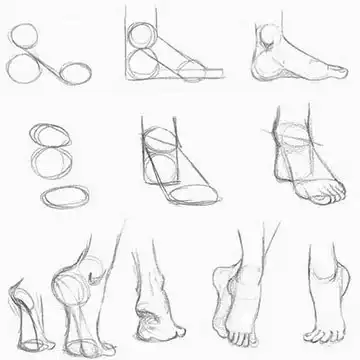
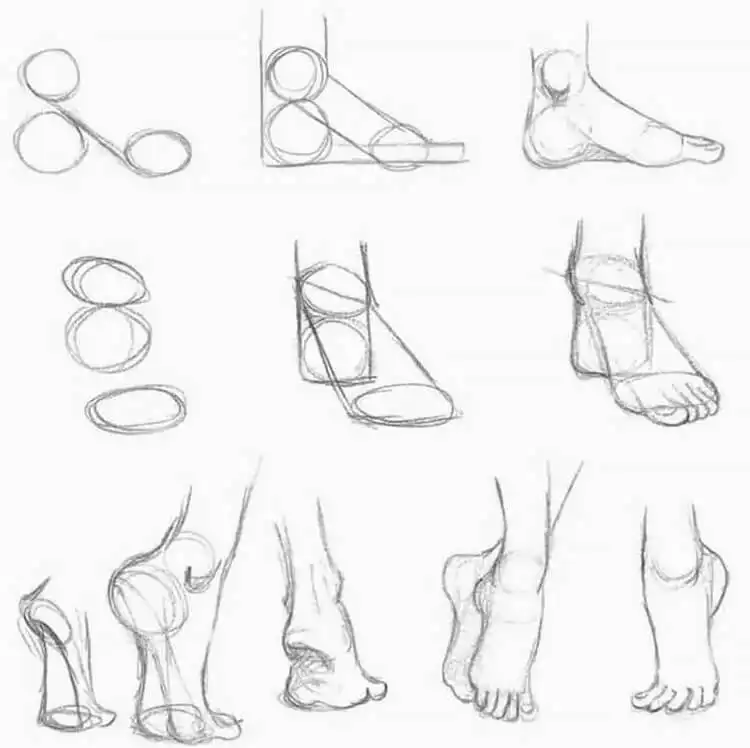
Foot Anatomy
Drawing feet can be one of the most challenging aspects of figure drawing, but this sketch offers an invaluable starting point. It presents the foot from multiple perspectives: front, side, and standing on the toes, providing a comprehensive view for practice. The foot is a complex structure composed of 26 bones (tarsals, metatarsals, phalanges), numerous ligaments, and muscles. When drawing, start by understanding the basic wedge shape of the foot and how it connects to the ankle. Observe the arch of the foot, crucial for weight distribution, and how it flattens or accentuates depending on pressure. Pay attention to the subtle bumps and contours created by the ankle bones (malleoli), the heel, and the toes. Practicing these different views will help you depict feet accurately, whether they are planted firmly, gracefully extended, or actively supporting body weight. Remember that feet are highly expressive and can convey a lot about a figure’s posture and mood.
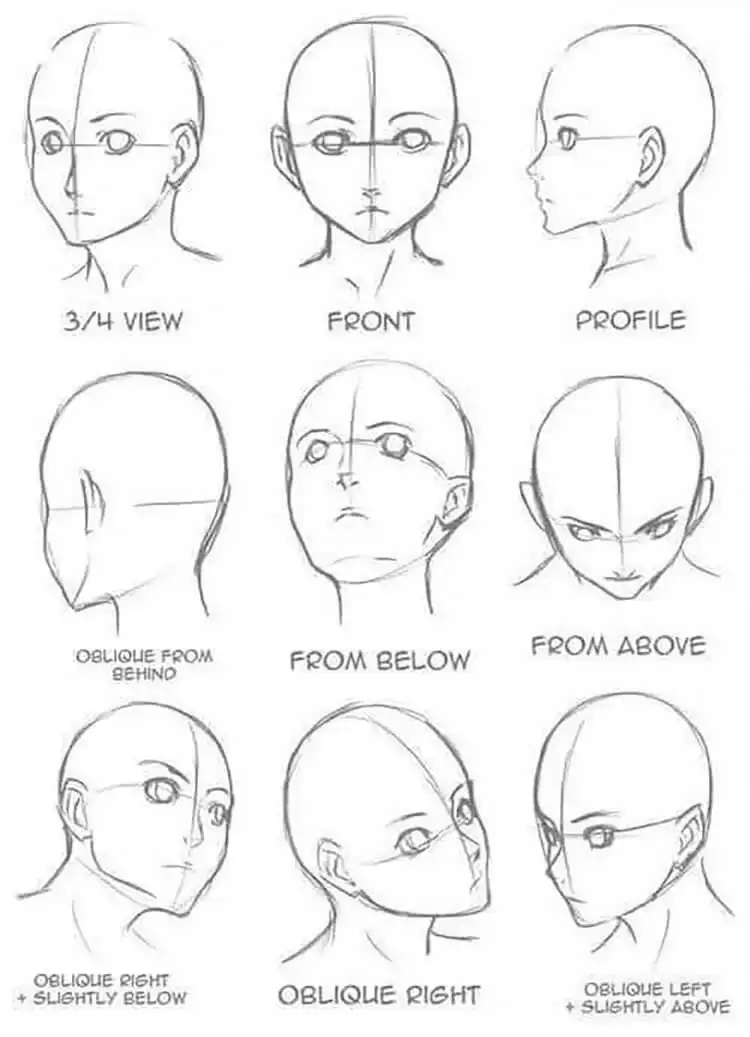
Facial Viewpoints
Mastering the human face from various angles is essential for creating compelling portraits and character designs. This drawing brilliantly demonstrates how to approach the face from a multitude of viewpoints: front, profile, three-quarters, and even from above or below. Each angle presents unique challenges in terms of perspective and foreshortening. When practicing, begin by establishing the basic skull structure and placing the central features (eyes, nose, mouth) in relation to the center line and eye line. Notice how the eye sockets, cheekbones, and jawline shift in appearance with each turn of the head. Understanding the underlying cranial structure is key to maintaining consistency across different views. Use construction lines to guide the placement of features and ensure proportional accuracy. Consistent practice with these facial viewpoints will build confidence in drawing expressive and anatomically correct faces.
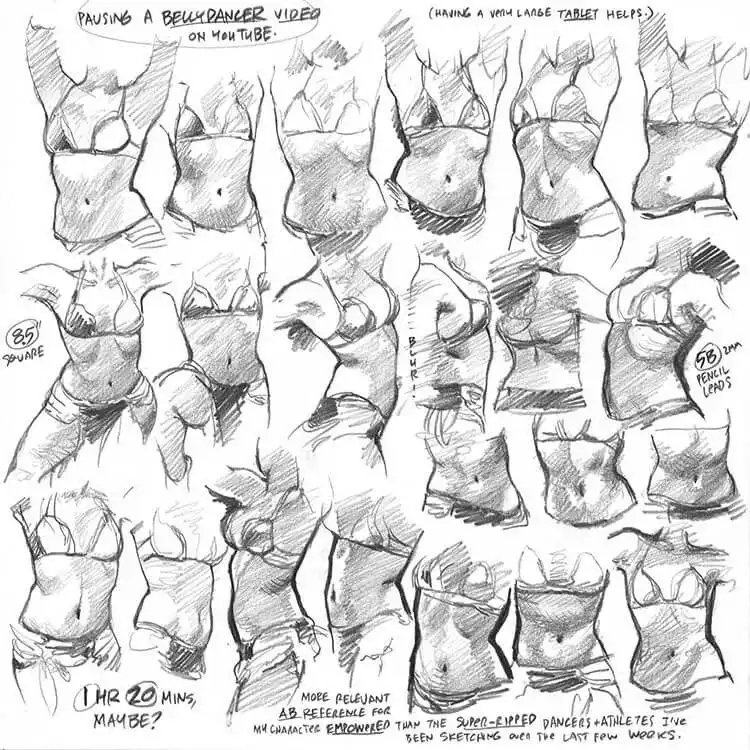
Belly Dancer Anatomy
This reference encourages a fun and expressive approach to sketching the female body, specifically focusing on the dynamic movements of belly dancing. This art form emphasizes fluid torso movements, hip isolations, and graceful arm gestures. When sketching, focus on capturing the serpentine curves of the spine and the rhythmic undulations of the abdomen and hips. Observe how the oblique muscles and core engage to create these movements. YouTube videos of belly dancers can be an excellent resource for studying live motion. Pay attention to the interplay of light and shadow on the flowing fabric and how it accentuates the body’s curves. This is an excellent exercise for developing a sense of rhythm and fluidity in your figure drawings, moving beyond static poses to truly capture life and energy.
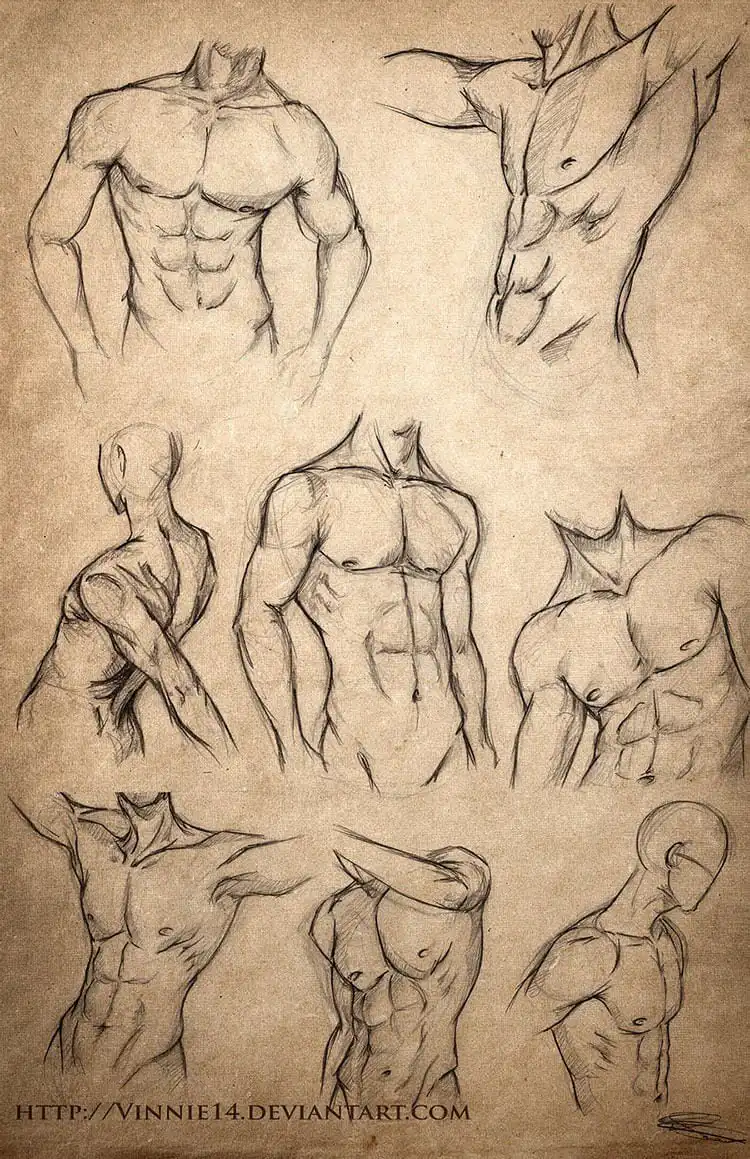
Male Physique
Further honing your skills in depicting the male form, this reference provides excellent material for practicing the male physique. Focus on the distinct muscular development and skeletal structure that characterizes male anatomy. Pay attention to the broader shoulders, narrower hips (compared to females), and the more pronounced muscle definition, particularly in the chest, back, and arms. When sketching, try to understand the volumes and planes of the body. Simplify complex muscle groups into basic geometric shapes (cylinders, boxes, spheres) before refining them. Experiment with different lighting scenarios to emphasize the contours and definition of the muscles. This practice is crucial for developing a strong understanding of how light interacts with the male form, helping you create figures with weight, depth, and anatomical accuracy.
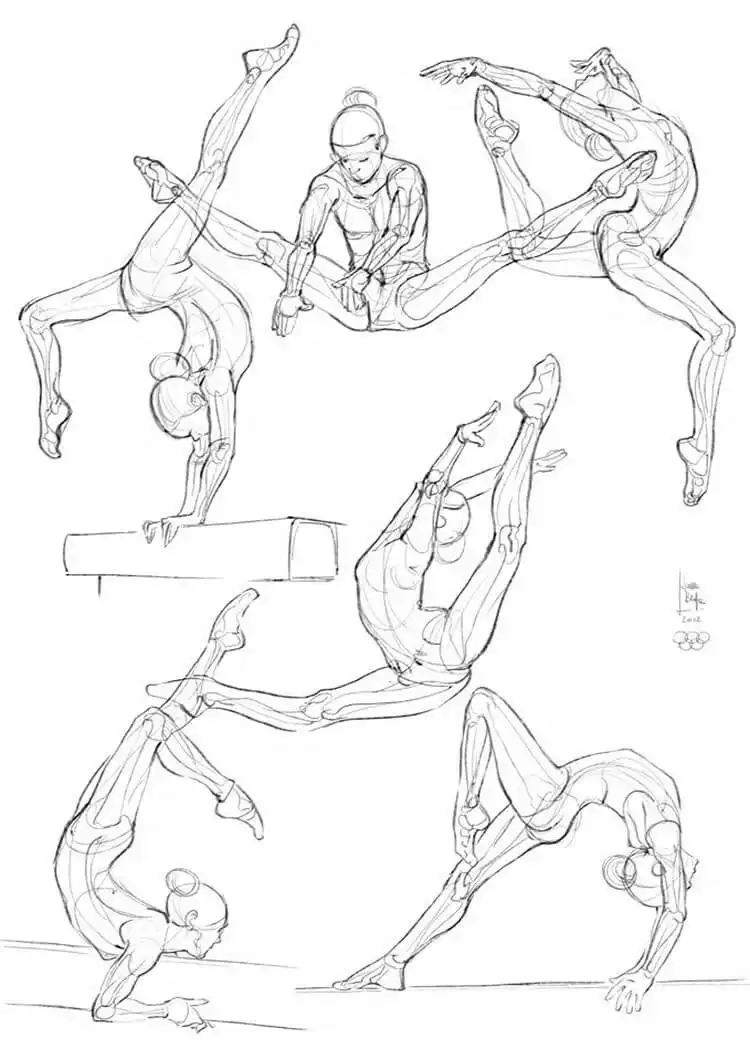
Gymnastics
This creative anatomy drawing showcases a woman performing gymnastics, offering an exceptional opportunity to study extreme poses, foreshortening, and muscle tension. Gymnastics involves incredible flexibility, strength, and balance, making it a rich subject for figure drawing. When sketching, pay close attention to the line of action, which often forms a dramatic curve through the body. Observe how muscles stretch and compress, and how joints articulate at their maximum range of motion. Foreshortening, where parts of the body appear shorter due to perspective, will be a significant challenge here. Practice simplifying the figure into basic forms to get the perspective right before detailing. This type of dynamic pose study significantly enhances your ability to draw figures in complex, active situations, instilling a sense of power and grace in your art.
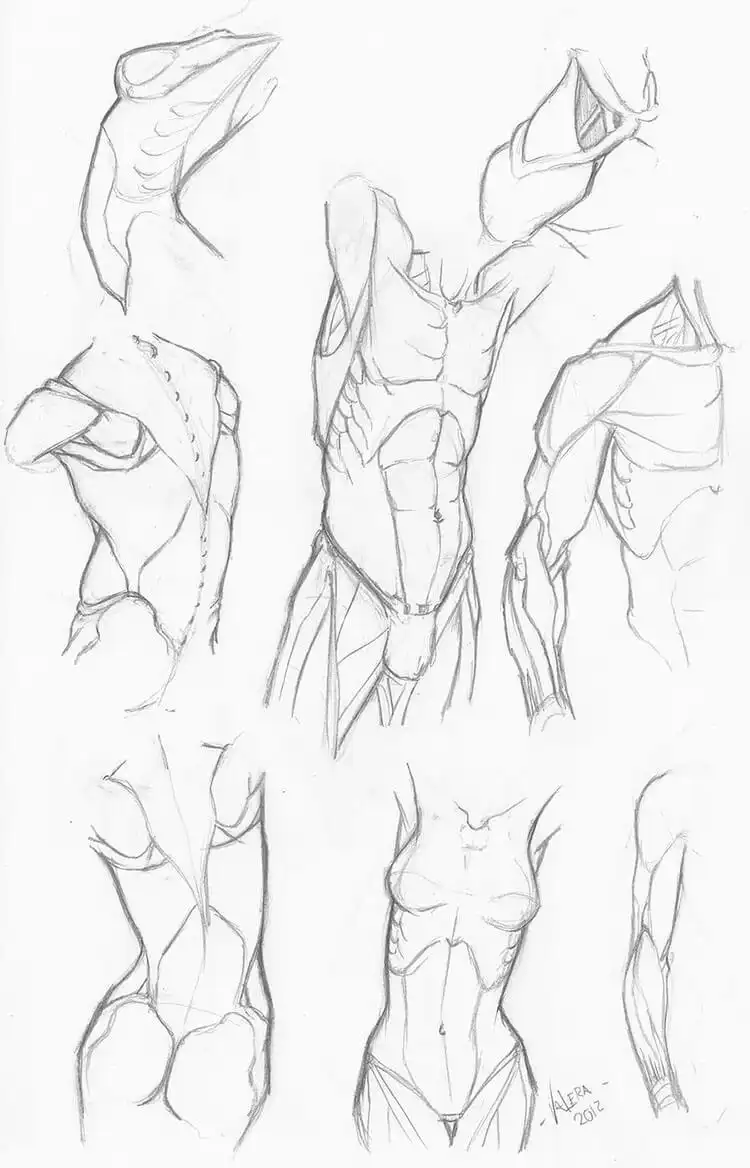
Muscle Drawing
For those new to drawing muscles on the human body, this is an excellent beginner’s reference. It simplifies the complex network of human musculature into more digestible forms, focusing on key superficial muscles. Start by understanding the major muscle groups – deltoids, pectorals, biceps, triceps, quadriceps, gastrocnemius – and how they define the overall shape of the limbs and torso. Don’t feel overwhelmed by trying to draw every single muscle fiber. Instead, focus on the larger masses and how they connect to bones and other muscles. Use basic shading techniques to give these muscle groups volume, indicating where light hits and where shadows fall. This foundational understanding will gradually build your confidence, allowing you to draw more detailed and anatomically accurate figures over time. Remember, consistency in practice is more important than immediate perfection.
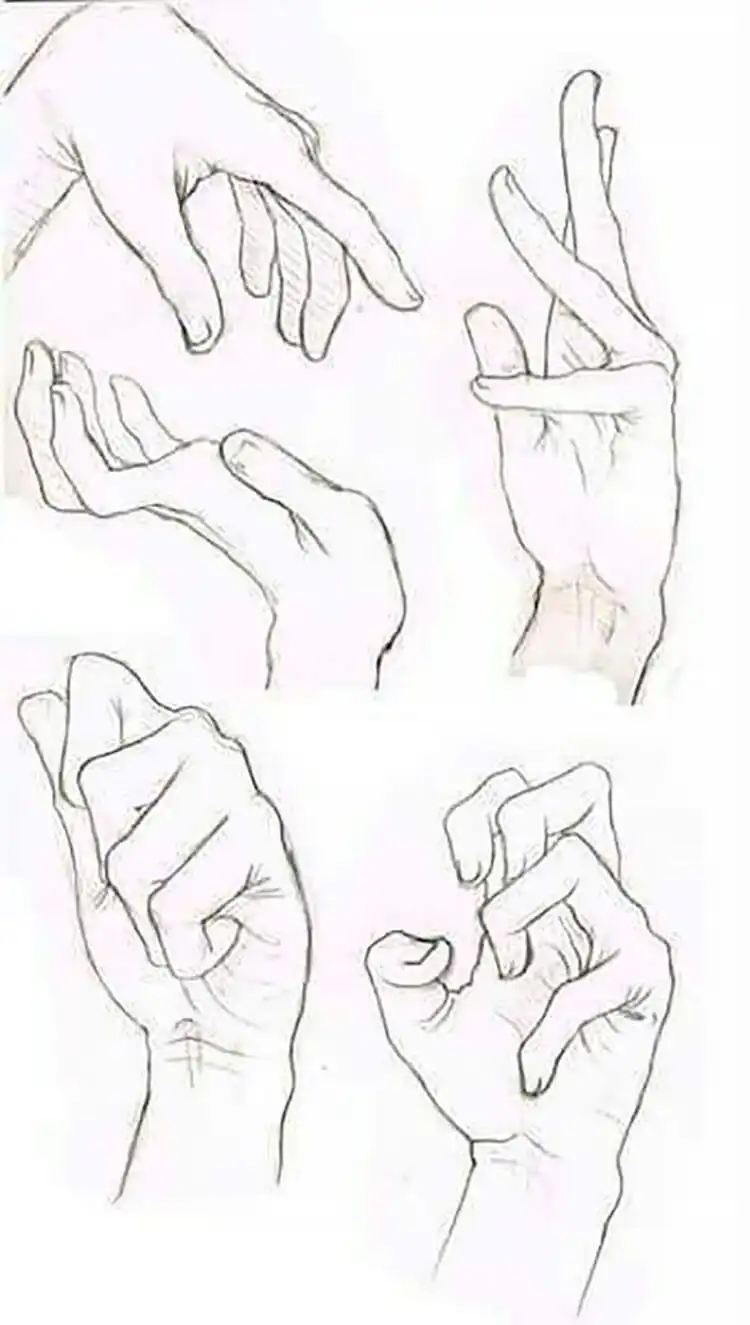
Hand Anatomy
Drawing hands is notoriously difficult due to their complex structure and expressive potential. This reference emphasizes the critical need for consistent practice to improve your techniques. The hand consists of 27 bones, intricate tendons, and small muscles, allowing for a vast range of gestures and actions. When drawing hands, begin by understanding the basic palm shape and the cylindrical forms of the fingers. Pay attention to the knuckles, the wrist bones, and how the thumb articulates differently from the other fingers. Practice drawing hands in various poses: gripping, pointing, relaxed, open, and closed. Foreshortening is a common challenge when drawing hands, so simplify the forms first. Observing your own hand in a mirror or using a reference photo will provide invaluable insights into its nuances. Regular hand studies will significantly enhance the believability and expressiveness of your figures.
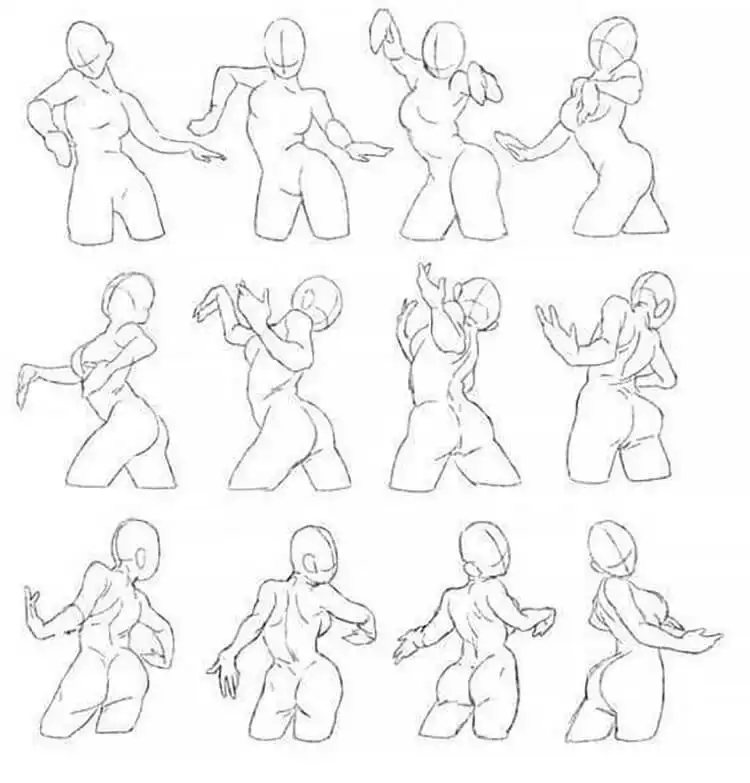
Female Body Form
These female body forms are presented as simple yet effective references, particularly excellent for beginners. They focus on capturing the essential silhouette and overall flow of the female figure, emphasizing its characteristic curves and proportions. When using these references, start with gestural lines to establish the overall movement and balance of the figure. Then, build upon this foundation with basic geometric shapes to define the torso, pelvis, and limbs. Pay attention to the S-curve often found in the female spine and the wider pelvic structure. These simplified forms allow you to concentrate on proportion and overall shape without getting bogged down in intricate muscle details. It’s an ideal way to build a solid foundation before moving on to more complex anatomical studies, helping you develop an intuitive feel for the female form.
Eyes, Nose, and Mouth
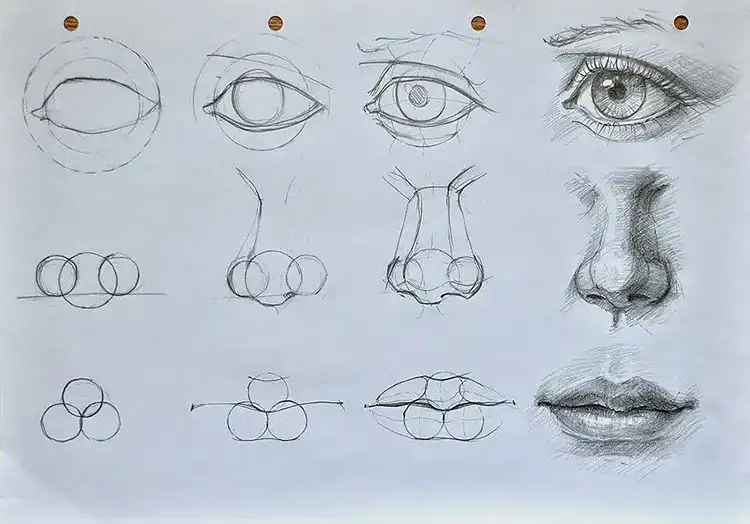
If you struggle with drawing the intricate features of the face, this step-by-step tutorial section is designed to assist you in mastering the eyes, nose, and mouth as an integrated unit. Instead of drawing them in isolation, understand how they relate to each other in terms of placement, proportion, and perspective. The distance between the eyes, the alignment of the nostrils with the inner corners of the eyes, and the relationship between the base of the nose and the mouth are all crucial. Practice drawing these features not just front-on, but also in three-quarter views and profiles, observing how their shapes change. This integrated approach, combined with diligent practice, will lead to significant improvements in the realism and harmony of your facial drawings. Remember to consider the planes of the face and how light interacts with each feature.
How to Draw Eyes
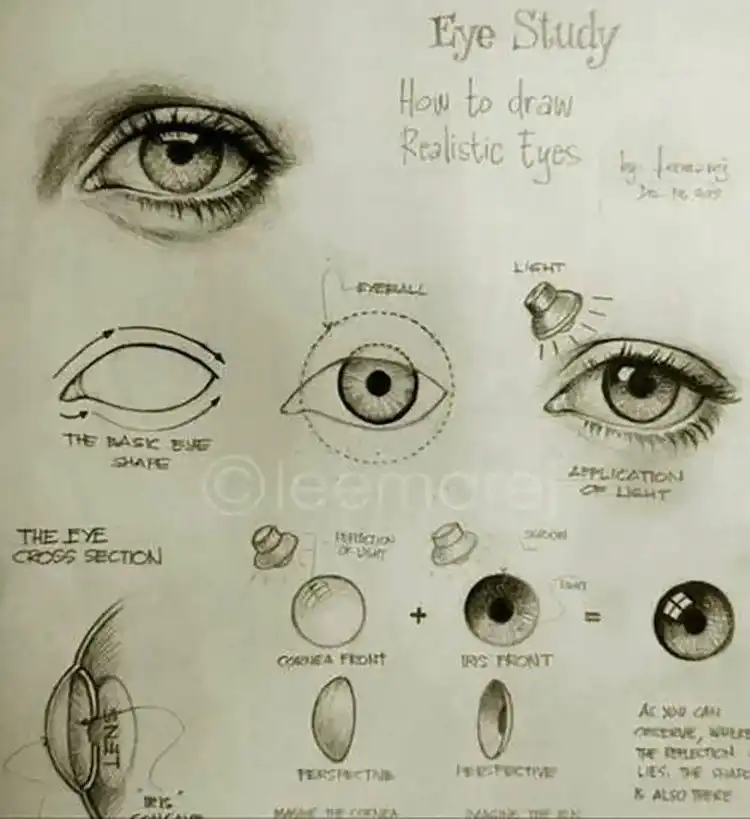
For those new to or struggling with drawing eyes, this eye study is incredibly helpful. It breaks down the complexities into manageable components, showing the basic spherical shape of the eyeball, the structure of the eyelids, the iris, and the pupil. Crucially, it demonstrates how light hits the eye, creating highlights that give it life and dimension. Start by sketching the sphere of the eyeball, then drape the eyelids over it, paying attention to their thickness and curvature. The iris should be drawn as a circle within the sphere, slightly covered by the upper lid, and the pupil as a dark center. Experiment with different eye shapes and expressions. Understanding how reflections work on the cornea is key to making eyes appear wet and alive. Practice shading the white of the eye (sclera) with subtle tones to give it roundness, avoiding pure white.
Nose Studies
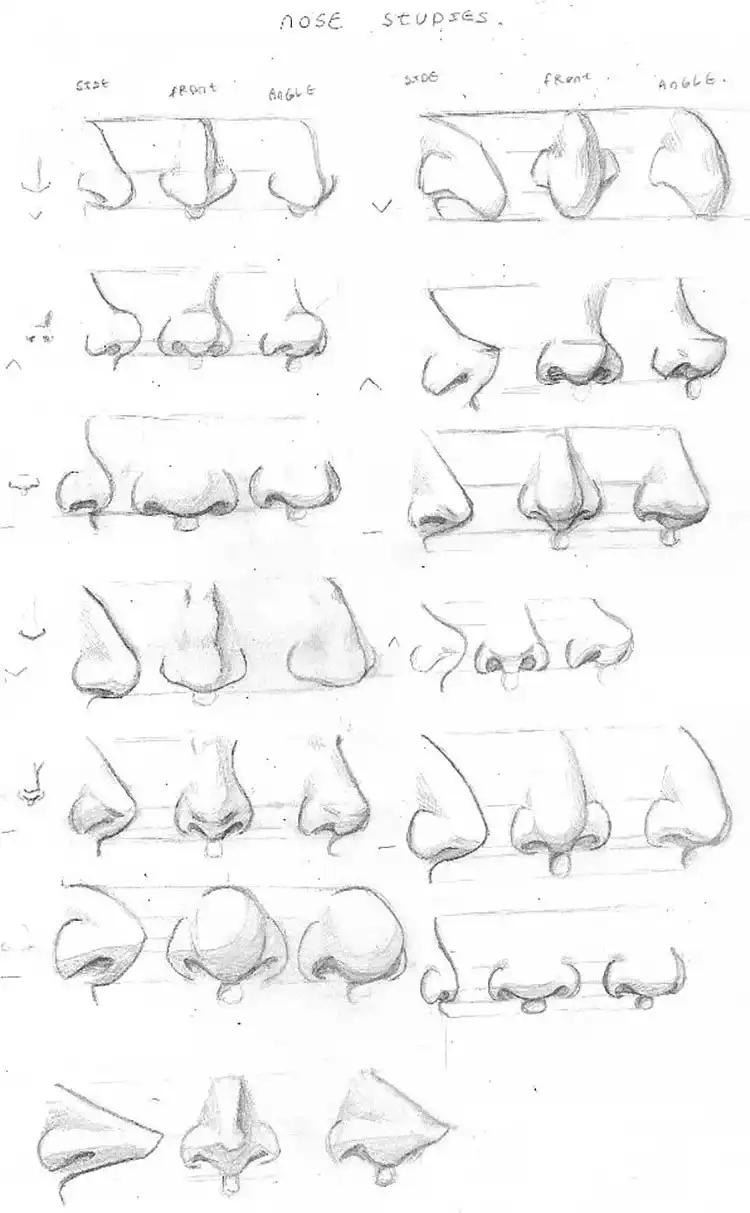
While not a step-by-step tutorial, this section offers invaluable nose studies, showcasing how differently shaped noses appear from the front, side, and angled views. The nose, though seemingly simple, is a complex interplay of cartilage and bone. Observe the various types of nasal bridges, tips, and nostril shapes presented. When drawing, start by blocking in the basic form as a wedge or prism before refining the contours. Pay attention to how light and shadow define the planes of the nose, particularly along the bridge and around the nostrils. Practice rendering different nose types – aquiline, snub, Greek, Roman – to expand your visual vocabulary. This detailed study, while just a starting point among the myriad of nose shapes, is fundamental for adding personality and realism to your portraits. Understanding its structure is key to avoiding a flat or generic rendition.
Eyes, Nose, Mouth, and Ears
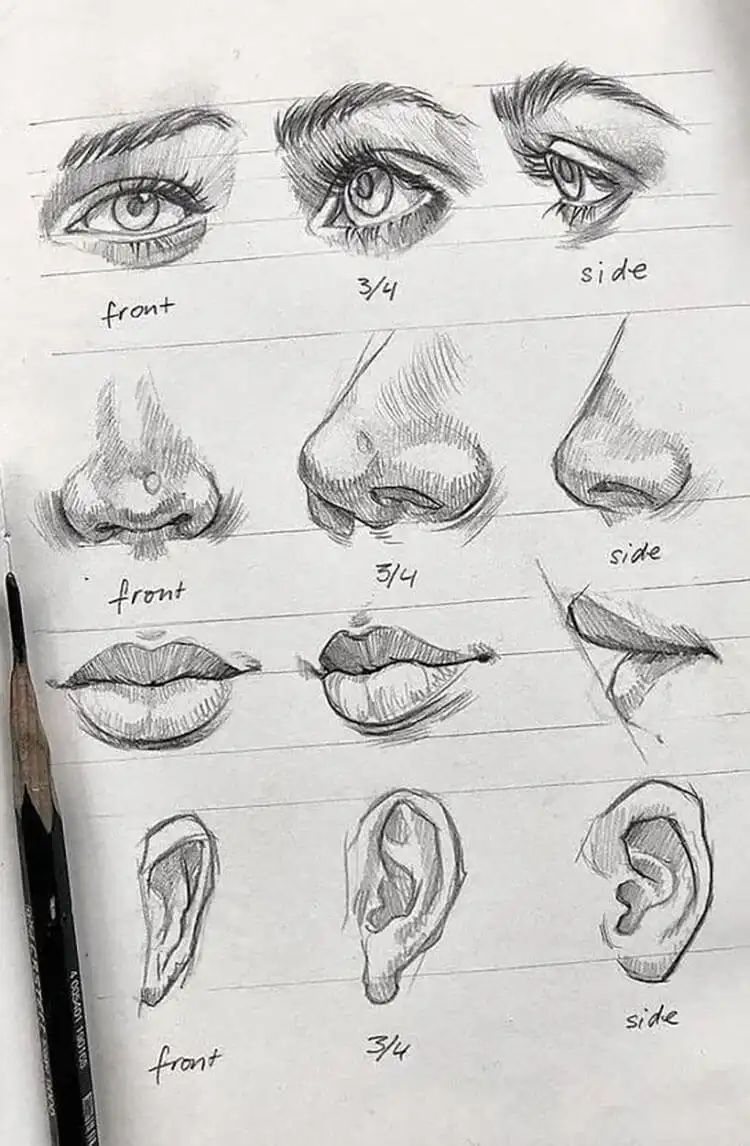
This comprehensive reference integrates the drawing of eyes, nose, mouth, and ears, demonstrating how to sketch them cohesively from different angles: front view, three-quarters view, and side view. This holistic approach is essential for achieving facial harmony and accurate proportions. When working on a full head, always establish the overall skull shape and guidelines for the eye line, nose line, and mouth line first. Then, place each feature in relation to these guides and to each other. Pay particular attention to the placement and angle of the ears, which often align with the brow and base of the nose. Understanding how these features interact and shift in perspective across different views is critical for believable portraiture. Consistent practice with this type of integrated study will dramatically improve your ability to construct well-proportioned and expressive faces.
Drawing accurate human anatomy can indeed be a challenge, but as you’ve seen, it’s an incredibly rewarding effort that profoundly elevates your artistic skills. With these detailed reference images and insightful tutorials, you now have a powerful toolkit to begin creating your own amazing anatomical drawings. Don’t forget to save this guide to your Pinterest board for future reference, share it with fellow artists who might benefit, and leave a comment below to let us know which tutorial helped you the most!


