This post contains affiliate links. As an Amazon Associate, we earn from qualifying purchases. Visit our Amazon Crocheting Storefront for more essentials!
How to Single Crochet: Your Ultimate Beginner’s Guide
The single crochet stitch is the cornerstone of countless beautiful projects, making it an essential skill for any aspiring crocheter. Learning how to single crochet opens up a world of creative possibilities, from sturdy wearables to intricate amigurumi. This comprehensive guide will walk you through every aspect of mastering this fundamental stitch, ensuring you build a strong foundation for your crochet journey. To kickstart your crafting, consider a complete crochet kit for beginners.
Join us as we demystify the single crochet (sc) and equip you with the knowledge and confidence to create your own stunning handmade pieces. We’ll cover everything from the basic loop to working rows and troubleshooting common issues, setting you up for success with future projects like how to crochet a granny square.
What is a Single Crochet Stitch?
The single crochet stitch, often abbreviated as “sc,” is one of the most fundamental and widely used stitches in the world of crochet. It’s typically represented by a “+” or “x” symbol in crochet patterns and diagrams, making it easily recognizable. This stitch creates a dense, firm fabric that is less stretchy than taller stitches like double crochet, making it incredibly versatile for a variety of projects. Understanding the single crochet is your first big step into the craft, forming the basis for many other crochet techniques and patterns you’ll encounter.
Benefits of Learning Single Crochet(sc)
Mastering the single crochet stitch is more than just learning a basic technique; it’s a foundational skill that unlocks a vast array of creative opportunities. Its unique characteristics make it indispensable for many projects, and understanding its advantages will help you choose the right stitch for your next creation.
- Density: Single crochet creates a wonderfully dense fabric with stitches that are tightly packed together. This characteristic makes it ideal for projects requiring durability and structure, such as robust crochet coasters, sturdy baskets, or detailed amigurumi projects where a firm, shape-holding fabric is crucial. When making amigurumi, you’ll also want some quality stuffing to give your creations shape.
- Easy and quick: For beginners, the single crochet is remarkably simple to learn. Its repetitive nature allows for quick progress once you get the hang of it, providing a satisfying sense of accomplishment. This ease of learning makes it perfect for building confidence in your early crocheting days.
- Versatility: The single crochet stitch is incredibly adaptable and can be used in an endless variety of projects. From the body of a warm blanket to intricate garment details or decorative home items, its understated texture serves as an excellent base or a beautiful stand-alone feature.
- Easy to count stitches: The distinct “V” shape formed by each single crochet stitch makes them very easy to identify and count. This clarity is a huge advantage, especially when you’re following patterns that require precise stitch counts or when you’re just starting and need to keep track of your progress row by row.
Why the Single Crochet Stitch is a Must-Know
The enduring popularity of the single crochet stitch stems from its unparalleled combination of versatility and simplicity. It truly is a fundamental technique that every crocheter should have in their repertoire. As mentioned, it produces a dense and sturdy fabric that excels at holding its shape, a quality highly valued in many applications. It’s particularly well-suited for amigurumi, the art of crocheting small stuffed toys, where a firm and compact structure is absolutely essential to achieve the desired form and durability. Furthermore, the single crochet stitch is incredibly adaptable to any type of worsted-weight yarn, from delicate lace weights to bulky roving, making it a fantastic and forgiving choice for beginners who are still experimenting with different materials.
Start with…
Before you dive into the single crochet stitch itself, there are two crucial preliminary steps that will set you up for success. Mastering these basic maneuvers ensures a smooth start to any crochet project.
- How to Make a Slip Knot: The slip knot is the very first loop you’ll create on your crochet hook. It’s adjustable, allowing you to tighten or loosen it as needed, and it forms the foundation from which your first chain stitch will emerge. A well-made slip knot is secure yet easy to undo if you need to restart.
- How to Make a Foundation Chain: After creating your slip knot, you’ll learn to make a series of chain stitches, which form the foundation row of most crochet projects. This chain provides the base into which you’ll work your first row of single crochets. A consistent foundation chain is key to a straight and even project. You’ll need some good quality cotton yarn for this.
How to Single Crochet Like a Pro: A Step-by-Step Guide for 2023
Ready to master this essential stitch? We’ve broken down the process into clear, actionable steps. Whether you prefer visual learning, detailed photo instructions, or written guidance, you’ll find everything you need here to learn how to single crochet with confidence.
Video
For visual learners, watching the stitch in action can be incredibly helpful. Many excellent video tutorials, like those by Crochetpedia, provide real-time demonstrations of each movement, making it easier to follow along and mimic the technique. Pause, rewind, and re-watch as many times as you need to grasp each step perfectly.
Step-By-Step
Follow these detailed written instructions to create your first single crochet stitch. Pay close attention to your hook and yarn movements for the best results.
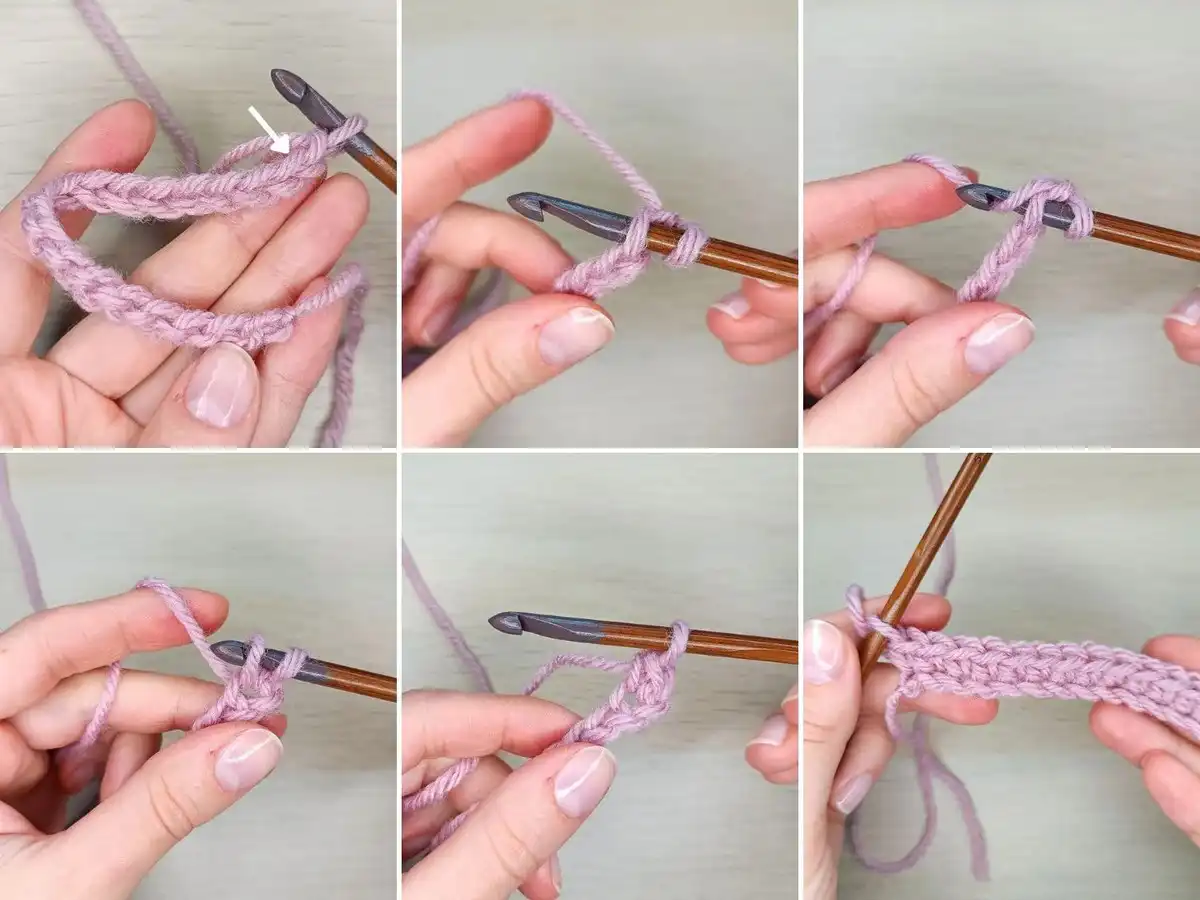
- Start with a foundation chain: Begin by creating a slip knot on your hook, then chain the desired number of stitches. For practice, a chain of 10-15 stitches is a good starting point. You can find a range of crochet hooks from 2.5mm to 14mm to get started.
- Insert your hook into the second chain from the hook: Locate the first loop on your hook, then count back one chain (the first chain) and then into the next chain (the second chain from the hook). Push your hook through the center of this chain stitch.
- Yarn over: Wrap the yarn coming from your skein over your hook from back to front. Ensure the yarn catches securely on the hook.
- Pull the yarn through the chain: Gently pull the yarn that’s on your hook through the chain stitch you inserted your hook into. You should now have two loops on your hook.
- Yarn over again: Wrap the yarn over your hook once more, from back to front.
- Pull the yarn through both loops on your hook: Carefully draw the yarn through both loops that are currently on your hook. You will be left with one loop on your hook, and you’ve successfully completed your first single crochet stitch!
Repeat these steps across the row, inserting your hook into the next chain stitch each time, to create a full row of single crochets and begin forming your crochet fabric. Maintain consistent tension for an even look.
How to Work Second Row
Once you’ve completed your first row of single crochets, you’ll need to know how to turn your work and start the next row. This involves a crucial step called the “turning chain.”
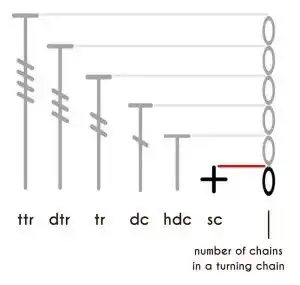
First of all, let’s see how many chains are in a turning chain for a single crochet. The turning chain for a single crochet is always one chain stitch. Critically, this single turning chain does not count as a stitch; it merely provides the necessary height to begin your next row evenly.
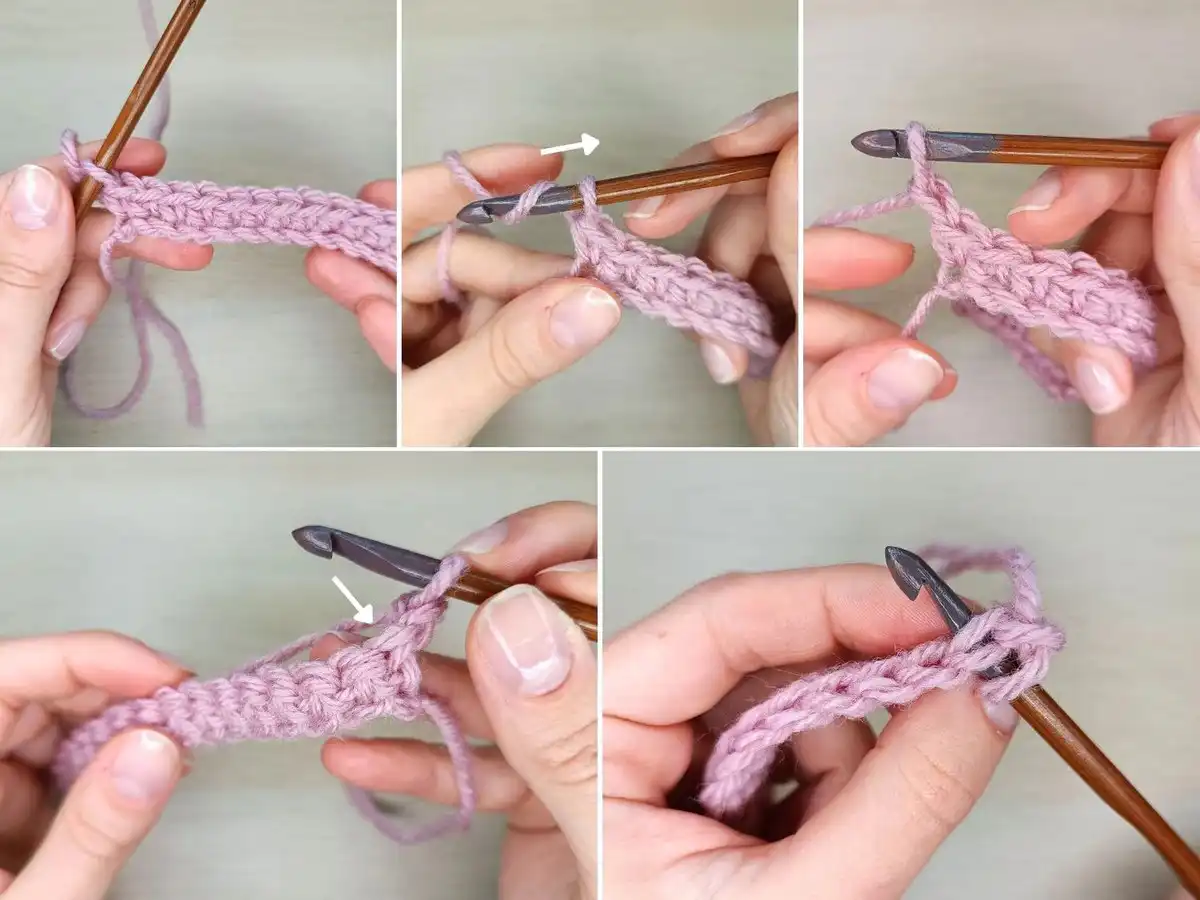
Let’s see the transition to another row:
- Make one chain stitch: After completing your last single crochet of the first row, yarn over and pull through the loop on your hook. This creates your turning chain.
- Turn the work over: Rotate your entire piece of crochet fabric so that the back of your first row is now facing you, and your hook is positioned to start working from right to left (if you are right-handed).
- Find the first stitch: Look for the distinct “V” shapes along the top edge of your previous row. The very first “V” after your turning chain is where you’ll insert your hook.
- Insert your hook under both arms of the V, yarn over, and pull up a loop: Slide your hook under both strands of the “V” of the first stitch. Yarn over, and draw the yarn through the stitch. You will now have two loops on your hook.
- Grab the yarn with your hook and pull it through both loops: Yarn over again, and pull this yarn through both loops on your hook. You’ve just completed the first single crochet of your second row!
- Repeat making one single crochet in each next stitch of the row: Continue working one single crochet into each subsequent stitch across the row, always ensuring you go under both loops of the “V” to maintain a neat edge.
Tips and Tricks
Even seasoned crocheters can benefit from a few tips and tricks to refine their technique. Here are some essential pieces of advice to help you master the single crochet and avoid common pitfalls. For more inspiration, a guide to crochet will be there to inspire you at every step.
How to Keep Your Stitches Consistent
Consistency is key to creating beautiful, professional-looking crochet projects. Here’s how to ensure your stitches are uniform and even:
- Control the Tension: Yarn tension is perhaps the most critical factor. Pay close attention to how you hold the yarn as it feeds through your fingers. Experiment with different grips until you find a comfortable method that allows the yarn to flow smoothly without being too loose (which creates gaps) or too tight (which makes stitching difficult). Consider trying Bonbons Yarn for a smooth experience.
- Use the Right Hook: Always ensure you have the correct size of crochet hook for your chosen yarn. Yarn labels typically recommend a hook size, but don’t hesitate to swatch and adjust. A hook that’s too large for the yarn will create a loose, open fabric, while one that’s too small will result in a stiff, dense piece. You can find ergonomic crochet hooks with different hook sizes to find your perfect fit.
- Count The Stitches: Make it a habit to count your stitches regularly, especially at the end of each row. This is vital whether you’re following a complex pattern or just practicing. For beginners, counting in every row prevents mistakes from accumulating and helps you maintain straight edges.
- Use Stitch Markers: These small, invaluable tools are perfect for marking the beginning of a round in circular projects, identifying specific stitches, or simply making stitch counting easier in longer rows. They prevent errors and save you from having to recount frequently. Pick up some colorful crochet stitch markers to make your work easier.
- Practice: As with any manual craft, repetition is the key to mastery. The more single crochet stitches you make, the more your hands will develop muscle memory. Over time, maintaining consistent tension, holding the yarn, and executing the stitch will become second nature. Don’t be afraid to unravel and try again; every stitch is a learning opportunity. A beginner-friendly crochet kit with various yarn colors and tools is perfect for extensive practice.
How to Count Stitches
Accurate stitch counting is fundamental to all crochet projects. While you can learn more detailed methods in dedicated articles, here’s how to count single crochet stitches effectively:
To count the stitches in the single crochet row, follow these instructions:
- Identify the V-Shapes: When you look at your single crochet fabric from above, each stitch clearly resembles a “V” shape at the top edge. Each complete “V” represents one stitch. Remember, the loop that is currently on your hook does not count as a stitch.
- Count from Right to Left: If you are right-handed and working in rows, you typically count your stitches from the right side of your work to the left side, starting from where your previous row began.
- Counting in the Round: If you are working in the round (e.g., for amigurumi projects), the basic principle is the same: you still look for the distinct “V” shapes and count them. However, it is absolutely essential to use a stitch marker to mark the very first stitch of each round. This way, when you reach the stitch marker, you know you have completed one full round and can easily keep track of your progress without losing count.
How to Increase and Decrease with Single Crochet
Once you’re comfortable with the basic single crochet, learning to increase and decrease will allow you to shape your crochet fabric, creating everything from curved edges to three-dimensional forms.
Increasing with Single Crochet (2 sc in one st)
Increasing stitches makes your fabric wider. The simplest method is to work two single crochet stitches into the same stitch from the previous row.
- Insert the hook in a stitch and work a single crochet there: Complete one standard single crochet stitch into your designated stitch.
- Again insert the hook in the same stitch and work another single crochet there: Without moving to the next stitch, insert your hook back into the very same stitch you just worked into, and complete another single crochet.
- You have increased with a single crochet: You’ve effectively added an extra stitch to your row, causing your fabric to expand at that point.
Decreasing with Single Crochet (sc2tog)
Decreasing stitches makes your fabric narrower. The “single crochet two together” (sc2tog) method combines two stitches into one, reducing your stitch count.
- Insert the hook in a stitch and pull up a loop: Work as if you’re starting a single crochet in the first designated stitch, but stop after pulling the yarn through. You will have two loops on your hook.
- Insert the hook in the next stitch and pull up another loop: Without finishing the first stitch, insert your hook into the next stitch, yarn over, and pull up another loop. You will now have three loops on your hook.
- Grab the yarn and pull through all three loops: Yarn over once more, and carefully pull this yarn through all three loops currently on your hook.
- You have decreased with a single crochet: You’ve successfully merged two stitches into one, reducing the width of your fabric. This technique is crucial for shaping intricate crochet patterns and garments.
How to Fix Mistakes
Don’t worry, everyone makes mistakes! Learning how to identify and fix them is a crucial part of becoming a confident crocheter.
- Identify the Mistake: Before you do anything, take a moment to understand what went wrong. Did you skip a stitch, accidentally add an extra one, or is your tension uneven in a particular spot? Knowing the nature of the error is the first step to correcting it efficiently.
- Use a Stitch Marker: If you’re working on a larger piece or have made a significant error, place a stitch marker at the exact point where the error occurred. This acts as a clear reference point, so you won’t unravel past it.
- Rip Back Stitches: Carefully unravel your work, stitch by stitch, until you reach the mistake. This is often referred to as “frogging.” As you unravel, pay attention to the loops. If needed, insert your hook back into the active loop as you reach it to prevent further unraveling and secure your work. Once you’re back to the correct stitch, you can simply resume crocheting from that point. Having a good bent tip yarn needle can also be helpful for weaving in ends and making small corrections.
You’ve now learned the fundamental skill of how to single crochet, opening up a world of creative crafting. We encourage you to practice these stitches, experiment with different multicolored yarns, and embark on your first exciting crochet projects. Don’t forget to save this guide to Pinterest for future reference, share it with a fellow crafter, and let us know about your progress in the comments below! Happy crocheting! For all your crocheting essentials, explore our curated selection.


