Mastering the Basics: How to Crochet a Circle Perfectly Every Time
Learning how to crochet a circle is an essential skill that unlocks a world of creative possibilities. From crafting stylish round bags and cozy blankets to adorable amigurumi toys and practical coasters, a flat, perfectly formed crochet circle is the foundation for countless projects. This comprehensive guide will walk you through the fundamental principles and practical steps to master this crucial technique, ensuring your circles are always flawless and frustration-free.
Whether you’re a beginner or looking to refine your technique, understanding the mechanics behind a flat circle is key. We’ll delve into the necessary increases, stitch variations, and provide clear, step-by-step instructions. Get ready to transform your yarn into beautiful circular creations with confidence and precision, expanding your crochet repertoire significantly.
PHOTOS by Agyness / yourcrochet.com
The Principle of Flatness for a Perfectly Round Circle
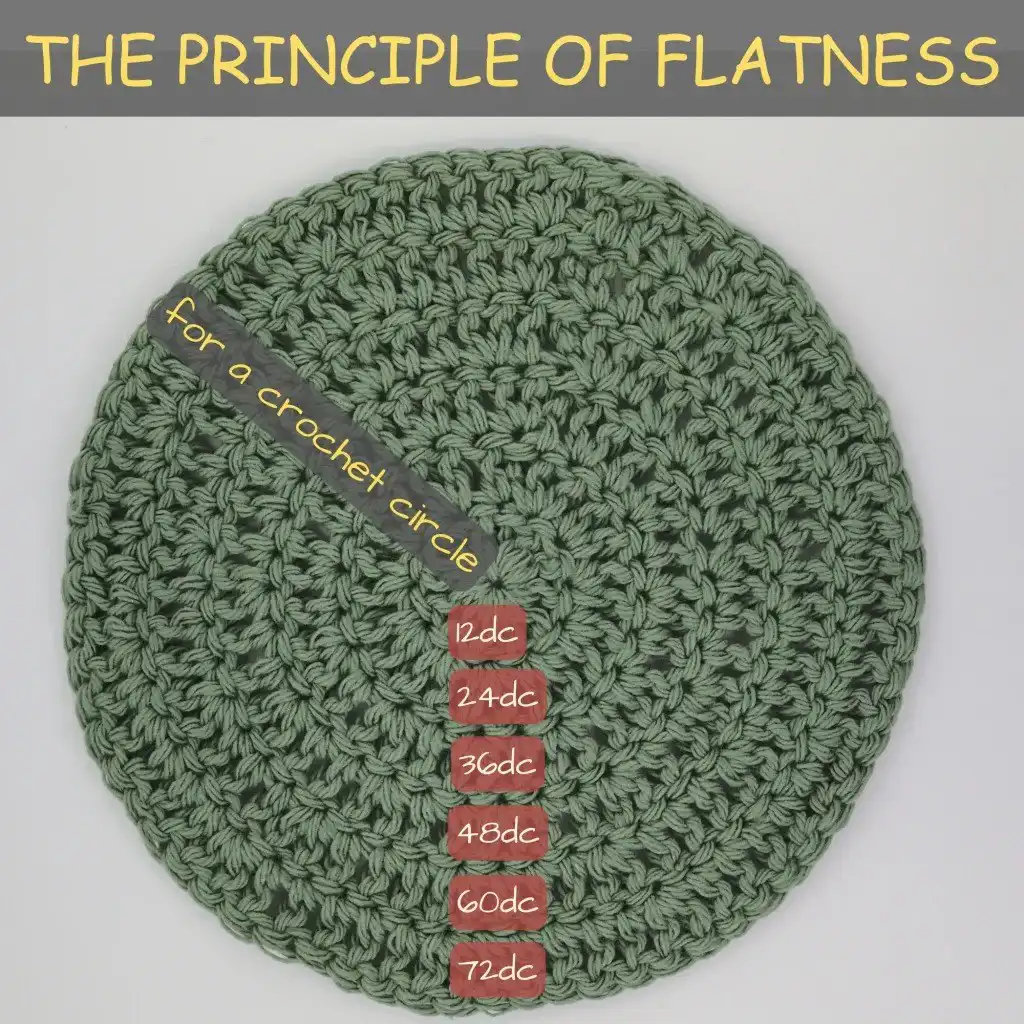
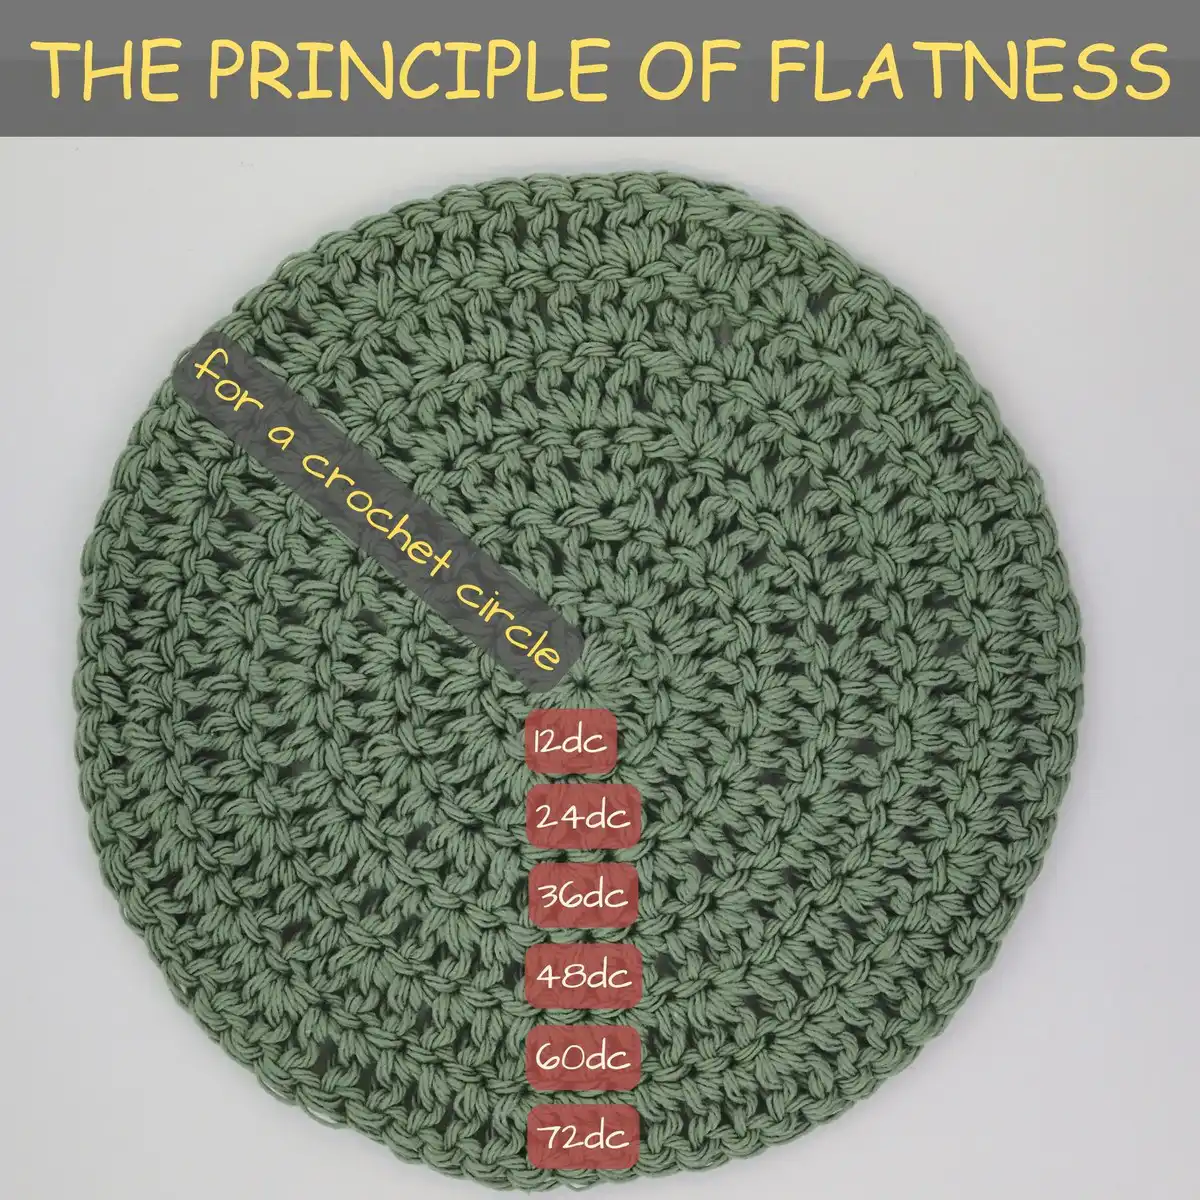
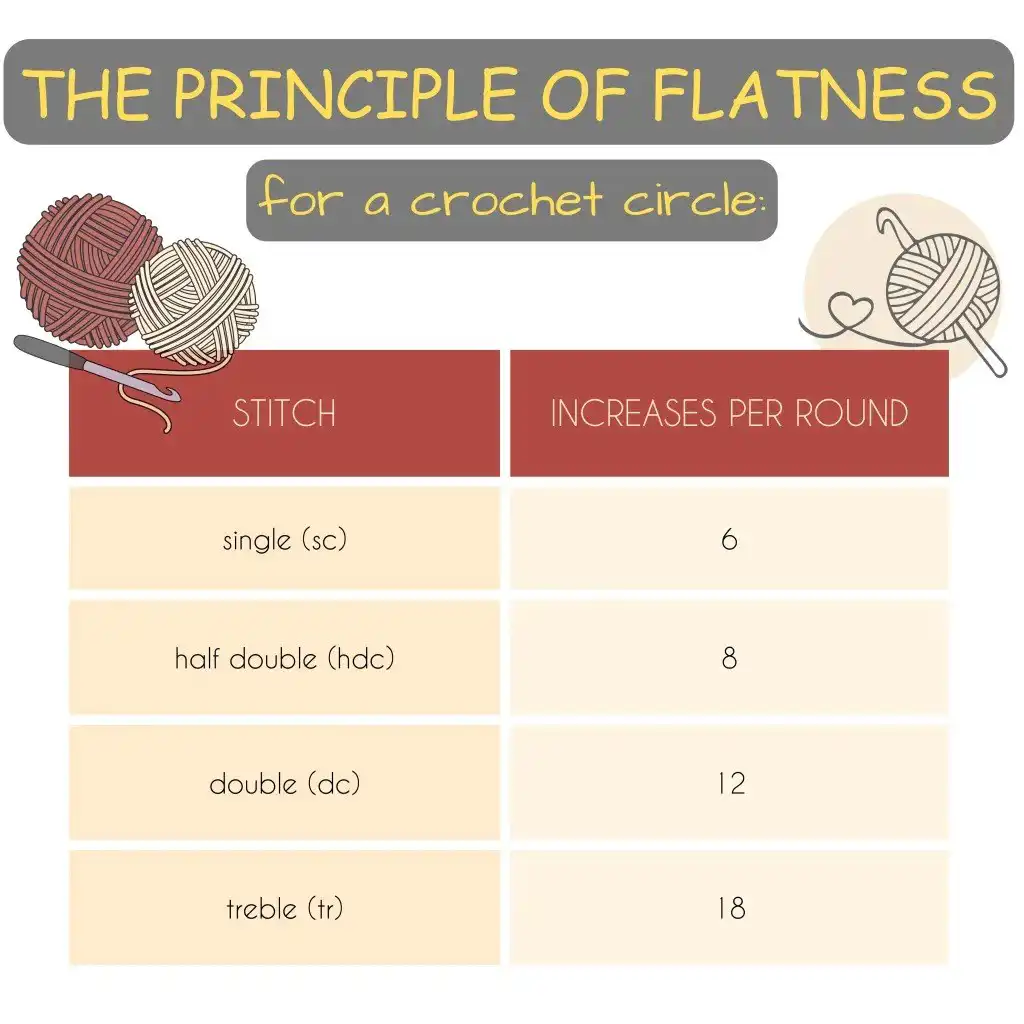
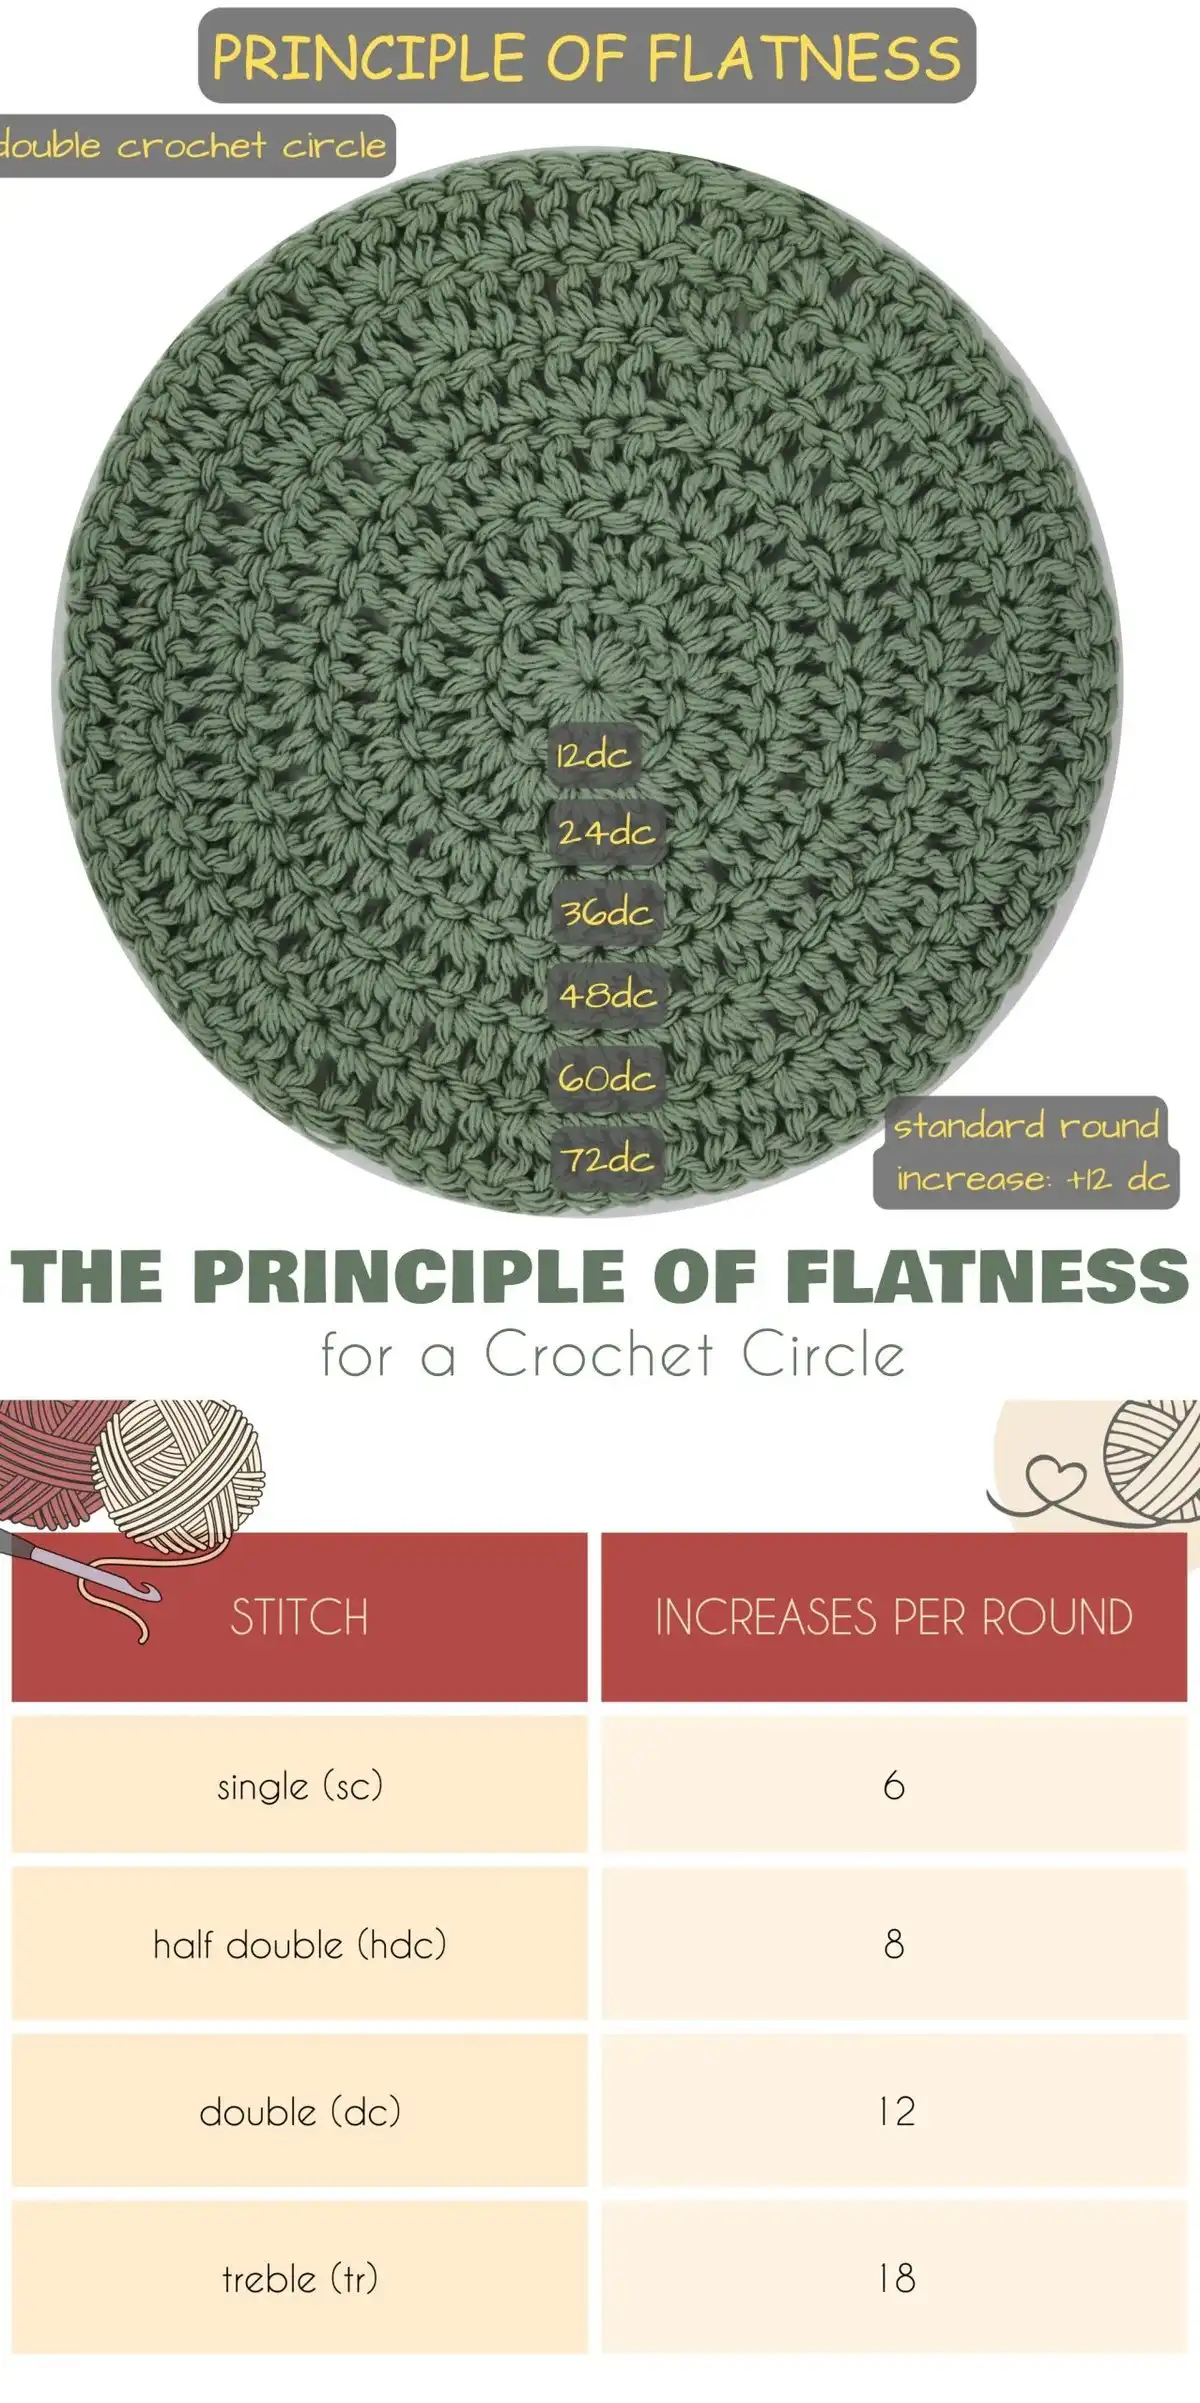
Achieving a perfectly flat crochet circle hinges on a simple mathematical principle: consistent increases in each round. As your circle’s diameter grows, its circumference expands, necessitating more stitches to prevent curling (too few stitches) or rippling (too many stitches). The beauty is that you don’t need complex calculations; there’s a reliable rule of thumb based on the height of your chosen stitch, which dictates the number of increases required per round.
For instance, single crochet (sc) stitches, being shorter, require 6 increases per round. Half double crochet (hdc) stitches, a bit taller, need 8 increases. Double crochet (dc) stitches, which are taller still, call for 12 increases per round, and treble crochet (tr) stitches, the tallest among these, demand 18 increases. Sticking to these guidelines ensures your work lays perfectly flat, forming a beautiful foundation for your projects, such as crochet coasters or mandalas.
PHOTOS by Agyness / yourcrochet.com
This systematic approach helps you avoid common pitfalls. If you increase too much, your circle will develop wavy, ruffled edges. Conversely, insufficient increases will cause your circle to cup and form a bowl shape, which is great if you want a basket, but not for a flat piece. The key is balance, and these stitch-specific increase rates provide that perfect equilibrium for a flat design.
PHOTOS by Agyness / yourcrochet.com
How To Crochet a Flat Circle in Double Crochet Stitch
The double crochet stitch is one of the most versatile and frequently used stitches for creating circular patterns, making it an excellent choice for mastering your first flat circle. Its height allows for quicker growth compared to single crochet, and the resulting fabric has a lovely drape. Learning to crochet a circle in double crochet will equip you with a fundamental technique applicable to many diverse projects, from large crochet blankets to decorative elements for garments.
Materials You’ll Need
Before you begin, gather your supplies to ensure a smooth crocheting experience. Having everything within reach will help you maintain your rhythm and focus on the pattern. Selecting the right yarn and hook combination is crucial for achieving the desired stitch definition and fabric texture.
- Yarn: While the color and fiber content are entirely your preference, a medium-weight (worsted weight yarn) is highly recommended for beginners. Its moderate thickness makes stitches easy to see and work with, allowing you to clearly observe your progress and identify any errors.
- Crochet Hook: Choose a hook size that complements your selected yarn. Yarn labels typically provide a recommended hook size range, which serves as an excellent starting point. You can experiment with slightly larger or smaller hooks to adjust tension and fabric density, but sticking to recommendations is usually best for consistent results. Consider an ergonomic crochet hook set for comfort.
- Scissors: A small pair of sharp scissors is essential for neatly cutting your yarn at the beginning, end, and whenever changing colors. A clean cut prevents fraying and keeps your work tidy.
- Tapestry Needle: Also known as a yarn needle, this blunt-tipped needle is invaluable for weaving in loose ends once your project is complete. Properly weaving in ends secures your stitches and gives your finished piece a professional, polished appearance.
Abbreviations
Understanding standard crochet abbreviations is like learning a secret language that unlocks countless patterns. Familiarizing yourself with these common terms will make reading and following any crochet pattern much easier, regardless of its complexity. A good Crochet Stitch Dictionary can be incredibly helpful.
- Ch = Chain stitches: The foundation of most crochet projects, created by looping yarn over the hook and pulling it through.
- Sl St = Slip Stitch: A very short stitch used to join rounds, move yarn across stitches without adding height, or finish off work.
- Dc = Double Crochet Stitch: A foundational stitch that creates a moderately tall fabric, formed by yarn over, inserting hook, yarn over, pull through, yarn over, pull through two loops, yarn over, pull through last two loops.
- Sc = Single Crochet Stitch: A compact stitch that creates a dense fabric, formed by inserting hook, yarn over, pull through, yarn over, pull through two loops.
- St(s) = Stitch(es): Refers to any completed stitch in your work.
- inc = increase: Working two or more stitches into the same stitch or space to add stitches and expand your fabric.
Pattern Notes
These notes provide critical guidance for the pattern’s execution, ensuring consistency and clarity. Always read through all pattern notes before you begin crocheting, as they often contain specific instructions that impact the overall outcome of your project.
The pattern is written in standard US crochet terms, which is important to note as UK terms differ for some stitches (e.g., US double crochet is equivalent to UK treble crochet). Additionally, each chain 3 (ch3) at the beginning of a round consistently counts as your first double crochet (dc) stitch. This establishes the height for the round and forms the initial stitch, so remember not to work into it when counting stitches in subsequent rounds unless explicitly instructed.
A Basic Double Crochet Circle – Tutorial for Beginners
This step-by-step tutorial will guide you through the creation of a simple, solid double crochet circle, perfect for Aeelike Complete Crochet Kit for Beginners. Pay close attention to your stitch count in each round, as maintaining the correct number of increases is vital for a flat result. Take your time with each step, and don’t hesitate to unravel and re-do if you find your circle isn’t lying flat. Having everything within reach will help you maintain your rhythm and focus on the pattern; consider having a crochet kit that has yarns, hooks, needles, and stitch markers ready.
PHOTOS by Agyness / yourcrochet.com
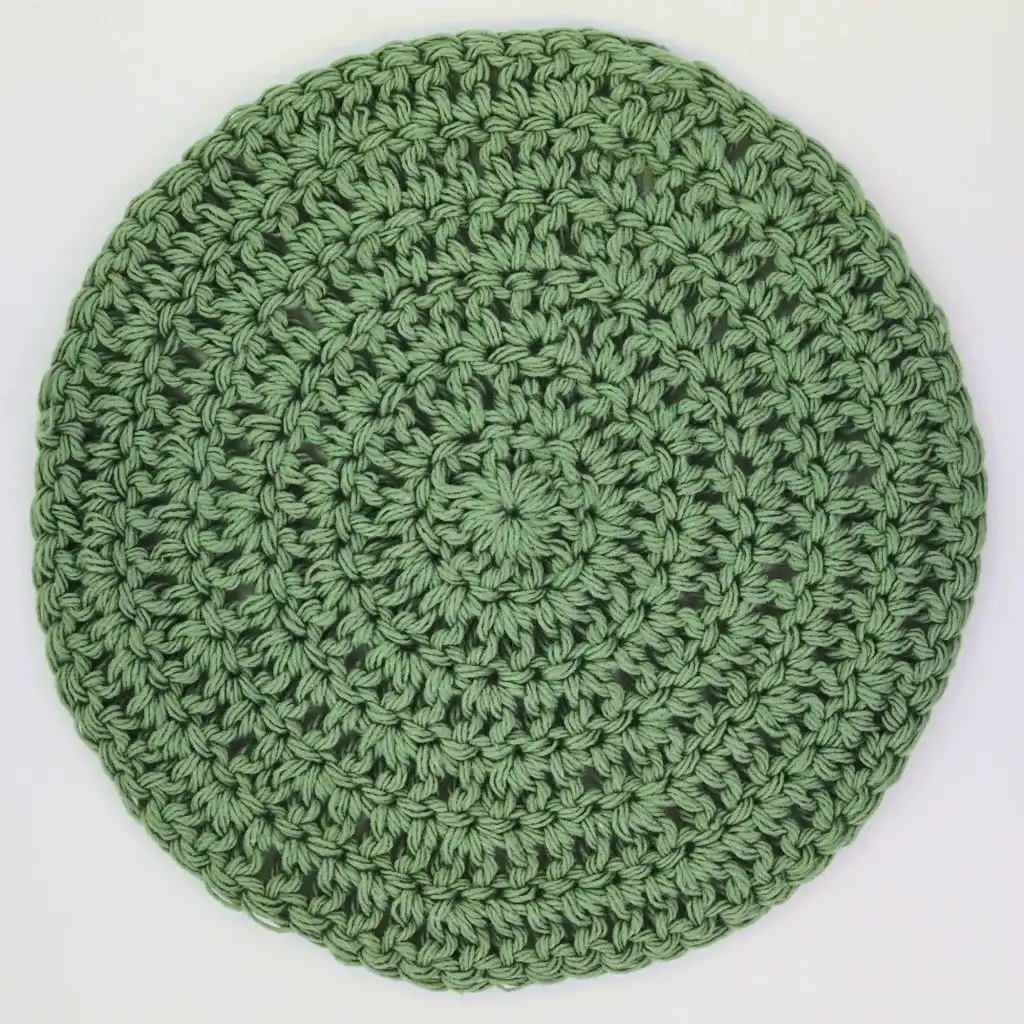
To make a simple solid circle from double crochet stitches, follow the crochet tutorial below:
- Foundation: Begin with a magic ring. This method creates a tightly closed center hole. Alternatively, you can chain 4 stitches and then slip stitch into the first chain to form a small ring.
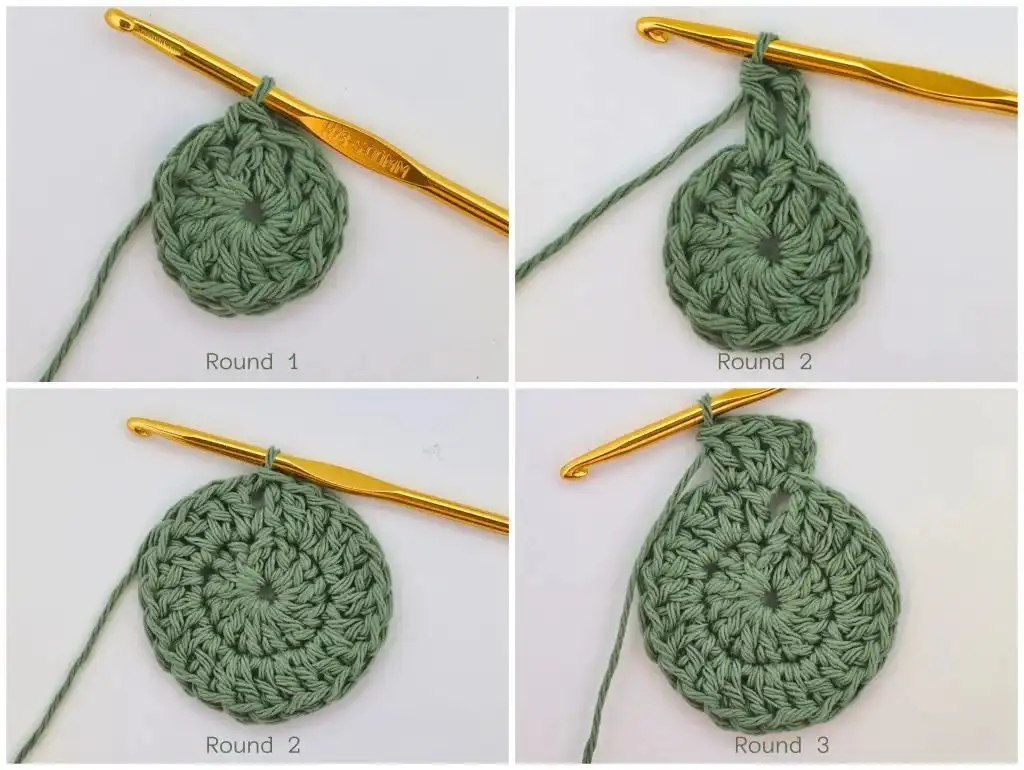
- Round 1: Chain 3 (counts as first dc). Work 11 double crochet stitches into the magic ring (or ch-4 ring). Join with a slip stitch into the top of the initial chain 3. You should have a total of 12 double crochet stitches at the end of this round.
- Round 2: Chain 3 (counts as first dc). Work 1 double crochet stitch into the same stitch at the base of your chain 3. Then, work 2 double crochet stitches into each subsequent stitch around the entire round. Join with a slip stitch into the top of the initial chain 3. You will now have 24 double crochet stitches.
- Round 3: Chain 3 (counts as first dc). In the first stitch (same as ch3), work 1 dc (this forms your first increase). Then, repeat the sequence (increase (2 dc into one stitch), 1 dc into the next stitch) around the entire round. Join with a slip stitch into the top of the initial chain 3. This round will yield 36 double crochet stitches.
- Round 4: Chain 3 (counts as first dc). Work 1 double crochet into the next stitch, then increase (2 dc into one stitch). Repeat the sequence (2 dc into next two stitches, increase) around. Join with a slip stitch into the top of the initial chain 3. You should have 48 double crochet stitches.
- Round 5: Chain 3 (counts as first dc). Work 2 double crochet stitches into the next two stitches, then increase (2 dc into one stitch). Repeat the sequence (3 dc into next three stitches, increase) around. Join with a slip stitch into the top of the initial chain 3. Your stitch count will be 60 double crochet stitches.
- Round 6: Chain 3 (counts as first dc). Work 3 double crochet stitches into the next three stitches, then increase (2 dc into one stitch). Repeat the sequence (4 dc into next four stitches, increase) around. Join with a slip stitch into the top of the initial chain 3. You will finish with 72 double crochet stitches.
Have you noticed the pattern emerging? Starting from Round 3, we delay our increase by one stitch in each subsequent round. In Round 3, you increased every second stitch; in Round 4, every third stitch; in Round 5, every fourth stitch, and so on. This consistent staggering of increases is the secret to maintaining a perfectly flat circle. The Waffle Pillow Free Crochet Pattern is a great example of a project that can incorporate circular elements.
PHOTOS by Agyness / yourcrochet.com
If you wish to make your double crochet circle even larger, perhaps for a rug or a continuous blanket piece, simply continue this established pattern. For each subsequent round, you will add one more double crochet stitch before your increase. So, Round 7 would be (5 dc, inc) around, Round 8 would be (6 dc, inc) around, and so forth. This scalable method ensures you can create circles of any desired diameter while maintaining their flatness. Having a variety of crochet hooks from 2.5mm to 14mm will be beneficial.
Final Remarks
Consistently remembering that the initial chain 3 at the beginning of each round counts as your first double crochet stitch is paramount. This convention ensures your stitch counts remain accurate and the join at the end of each round is seamless. Neglecting this detail can lead to uneven edges and an incorrect stitch count, altering the overall shape and flatness of your circle. Utilizing colorful crochet stitch markers can greatly help in keeping track.
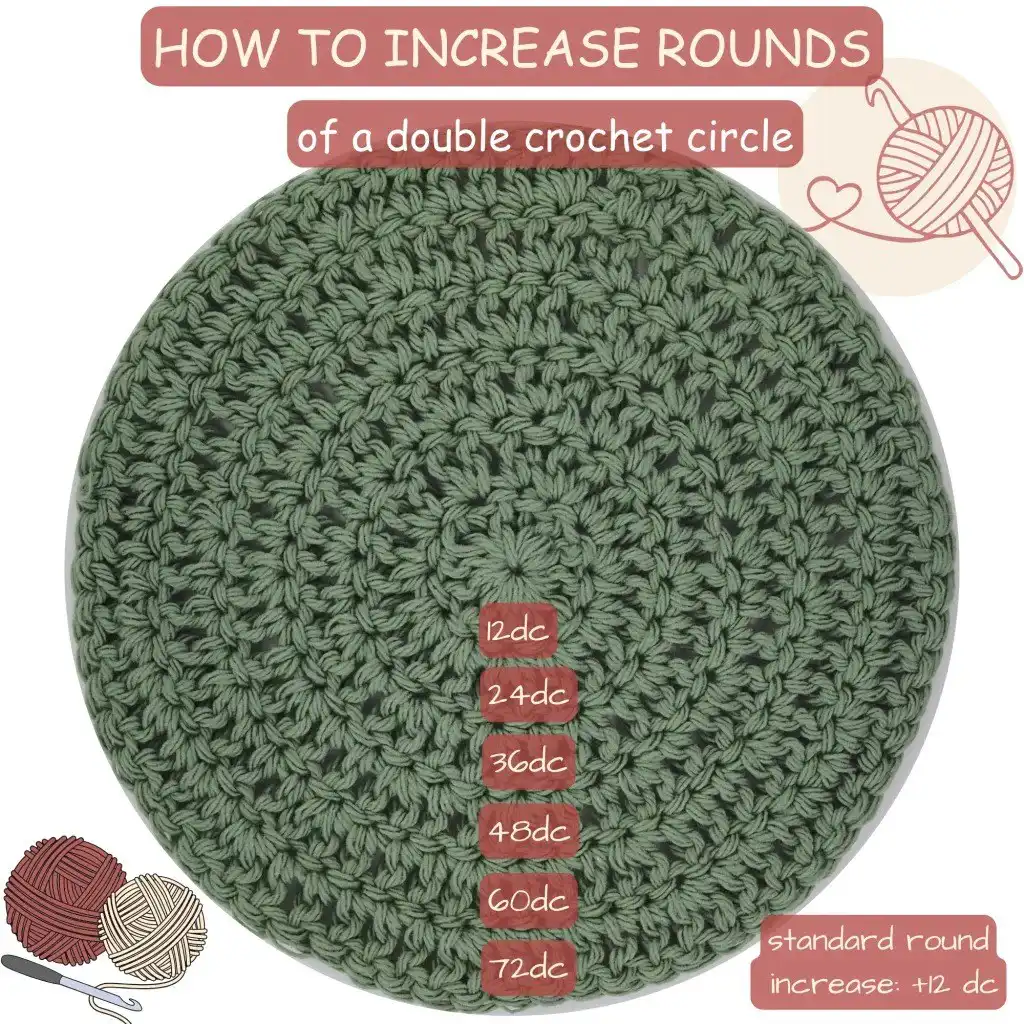
As you progress through the rounds, you’ll observe a predictable increase in the total number of stitches. For a double crochet circle, each round should add exactly 12 stitches. Round 1 has 12 dc, Round 2 increases to 24 dc, Round 3 to 36 dc, Round 4 to 48 dc, and so on. This steady increment of 12 stitches per round is the hallmark of a perfectly flat double crochet circle, providing a visual and tactile check of your progress and accuracy. For further guidance, consider a guide on crochet tips and tricks.
PHOTOS by Agyness / yourcrochet.com
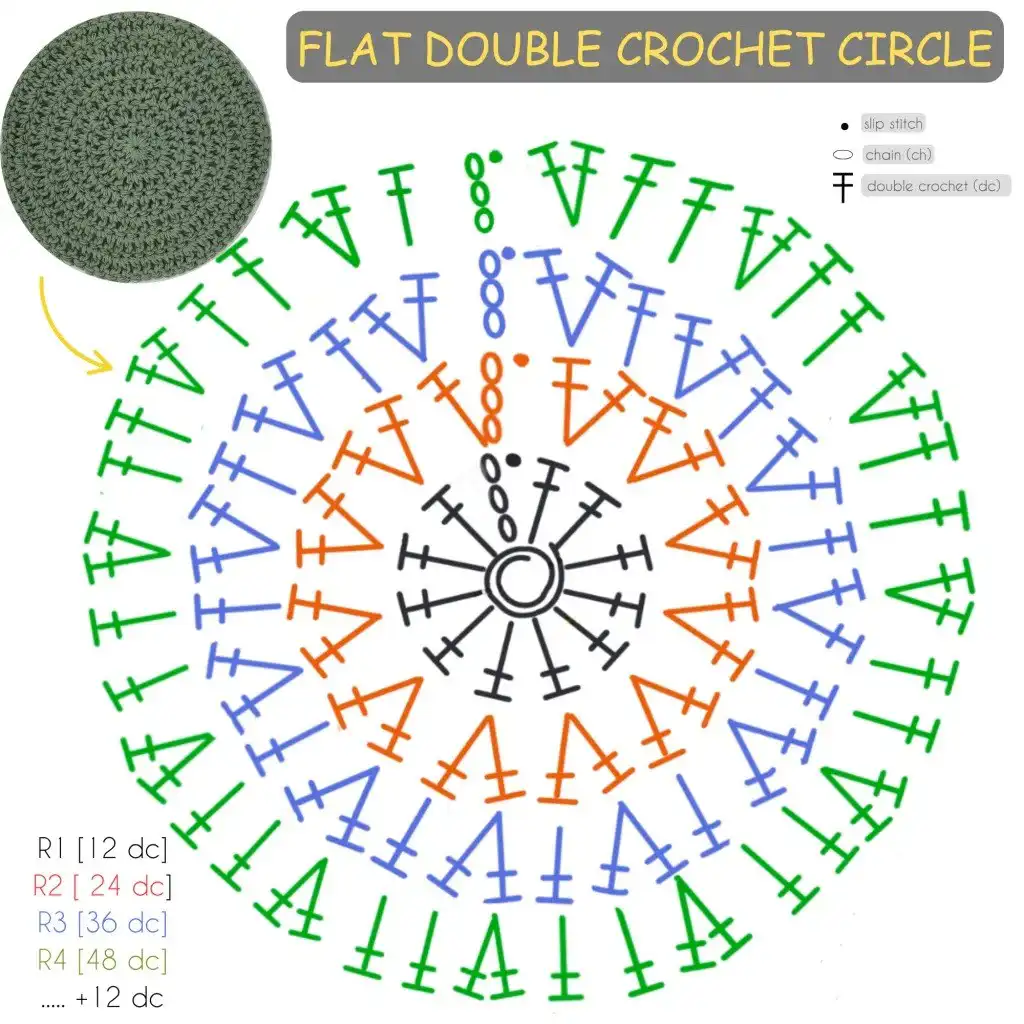
Flat Double Crochet Circle Diagram
For those who prefer a visual representation or find it easier to follow patterns through charts, a diagram can be incredibly helpful. This schematic offers an alternative perspective to the written instructions, showcasing the stitch placement and increase points for each round in a clear, concise format. Diagrams are particularly useful for quickly grasping the overall structure of a pattern and for experienced crocheters who can “read” stitches without relying solely on text. Consider investing in The Crochet Stitch Bible for comprehensive diagrams and patterns.
PHOTOS by Agyness / yourcrochet.com
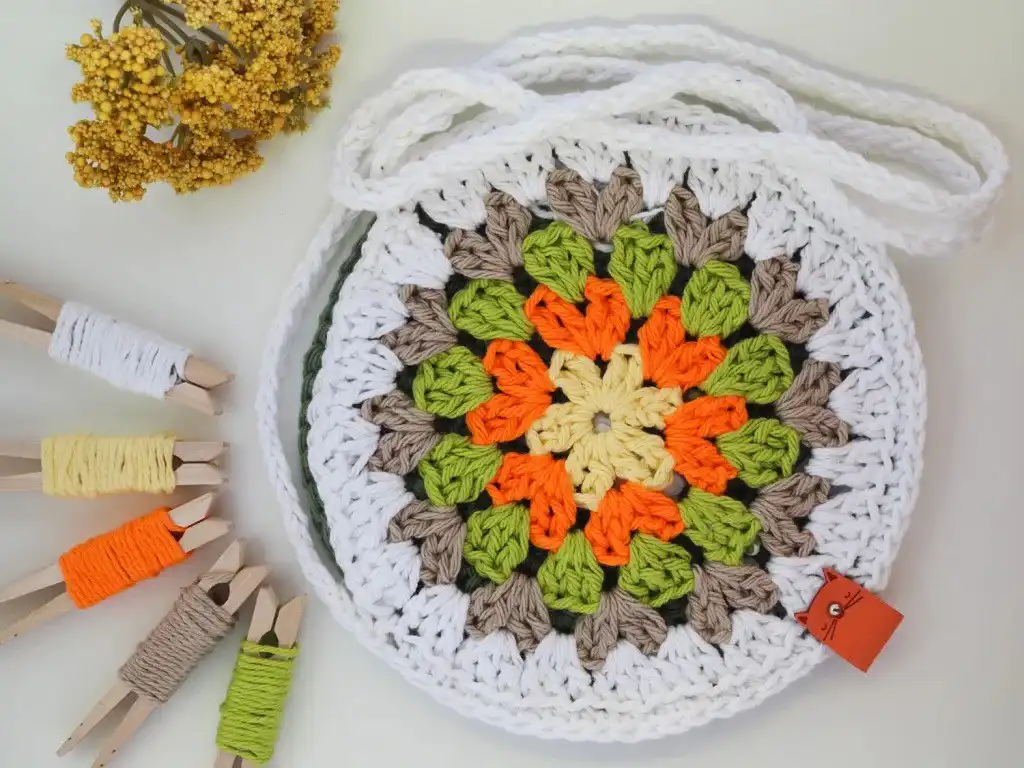
Once you’ve mastered the art of creating a flat double crochet circle, the possibilities are endless. Don’t let your newly crocheted circle go to waste! It makes a fantastic base for various projects. For example, you could transform it into the back side of a charming Granny Circle Bag, adding both structure and style. Utilizing your practice pieces in functional ways is a great way to reinforce your skills and minimize waste.
PHOTOS by Agyness / yourcrochet.com
How To Crochet a Flat Circle in Single Crochet Stitch or Half Double Crochet Stitch
The core principle of creating a flat circle remains consistent across different stitch types; only the specific number of increases per round changes to accommodate the stitch height. For a single crochet (sc) circle, you would apply the same construction method as the double crochet circle but adjust your initial stitches and subsequent increases. Start with 6 single crochet stitches in your magic ring for Round 1, and then increase by 6 single crochet stitches in each subsequent round (e.g., Round 2: 2 sc in each st (12 sc total); Round 3: 1 sc, inc around (18 sc total), and so on).
Similarly, for a half double crochet (hdc) circle, you’d begin with 8 half double crochet stitches in your magic ring for Round 1. Then, you’d consistently increase by 8 half double crochet stitches in every following round (e.g., Round 2: 2 hdc in each st (16 hdc total); Round 3: 1 hdc, inc around (24 hdc total), and so on). Referring back to “The Principle of Flatness” table will provide a quick reminder of these specific increase numbers for each stitch, allowing you to adapt any pattern to your preferred stitch with confidence.
How To Crochet a Granny Circle
While the techniques for single, half double, and double crochet circles focus on individual stitches, creating a granny circle introduces a different approach rooted in the distinctive “granny stitch” cluster. This stitch, typically composed of three double crochet stitches worked into the same space, results in a textured, open fabric unlike a solid circle. A flat granny circle, often used for blankets or decorative motifs, requires careful placement of these clusters and chain spaces to maintain its circular shape and prevent curling or rippling.
To successfully create a granny circle, you’ll need to adapt your increase strategy to accommodate the clusters, often incorporating chain spaces between them and increasing the number of clusters per round. This involves understanding how to work into the spaces between clusters from previous rounds rather than directly into individual stitches. For a dedicated guide and patterns on forming beautiful granny circles or even an entire Round Blanket with Free Crochet Patterns, it’s best to consult specialized resources that detail this unique technique.
PHOTOS by Agyness / yourcrochet.com
We hope this guide has empowered you to confidently crochet perfectly flat circles. Save this post to your Pinterest board for future reference, share it with a fellow crafter, and let us know about your circular crochet projects in the comments below! Don’t forget to stock up on all your crocheting essentials!


