The Master Crochet Magic Ring in 5 Minutes [Video for Beginners] is an indispensable technique for any crocheter looking to create seamless, tight centers in their projects. This comprehensive guide will walk you through everything you need to know about the magic ring, also known as a magic loop or adjustable ring, ensuring your creations have a professional finish from the very first stitch.
You may have heard the term “magic ring” before, also referred to as a magic loop, a magic circle, or an adjustable ring. A magic ring method is to start crocheting in the round. You will be amazed at both how easy and how useful it is. Learn how to crochet it with this comprehensive guide.
Mastering this fundamental technique is key to unlocking a world of patterns, from adorable amigurumi creations to intricately designed hats and blankets. Get ready to transform your crochet projects with perfectly closed centers, making your work look polished and professional.
PHOTOS by yourcrochet.com
You may have heard the term “magic ring” before, also referred to as a magic loop, a magic circle, or an adjustable ring. A magic ring method is to start crocheting in the round. You will be amazed at both how easy and how useful it is. Learn how to crochet it with this comprehensive guide.
PHOTOS by yourcrochet.com
What is a magic ring in crochet?
A magic ring, also called a magic loop or magic circle, is a foundational technique used in crocheting projects worked in the round. Its ingenious construction allows you to create an initial loop that can be cinched completely closed, eliminating the unsightly hole often found in the center of traditional circular crochet. This method ensures that the stitches of your first round are snugly packed together, providing a neat and professional start.
The ability to tighten the center means your projects will have a flawless finish. This is especially crucial for items where a tight center is paramount, such as amigurumi or intricate doilies, offering both aesthetic appeal and structural integrity.
Why is a magic ring important in crochet projects?
In short, the magic ring is arguably the best method for initiating rounded, tubular, or circular crochet items. It is frequently employed in popular projects like amigurumi, hats, doilies, and granny squares where a perfectly closed center is desired. While alternative starting methods, such as the chain method, exist, they often result in a noticeable central gap and can be more challenging to execute for a polished look.
The magic ring offers superior control over the starting point, making it a go-to technique for experienced crocheters. It provides a clean base that enhances the overall appearance and quality of your finished pieces, distinguishing your work with a touch of professional finesse.
What are the benefits of using a magic ring?
Only the crochet magic loop consistently creates an ideal circle with a virtually invisible center hole. The tight, adjustable core of the magic ring makes it exceptionally popular for amigurumi, as it effectively hides the starting point and prevents stuffing from escaping. This technique provides a seamless foundation for all your in-the-round projects, enhancing their aesthetic and structural quality.
Furthermore, the magic ring grants you greater control over the tension and final appearance of your center hole. You can manually adjust the center size by simply pulling the tail end, ensuring your project begins exactly as intended. This adaptability is a significant advantage, allowing for precision in your craft.
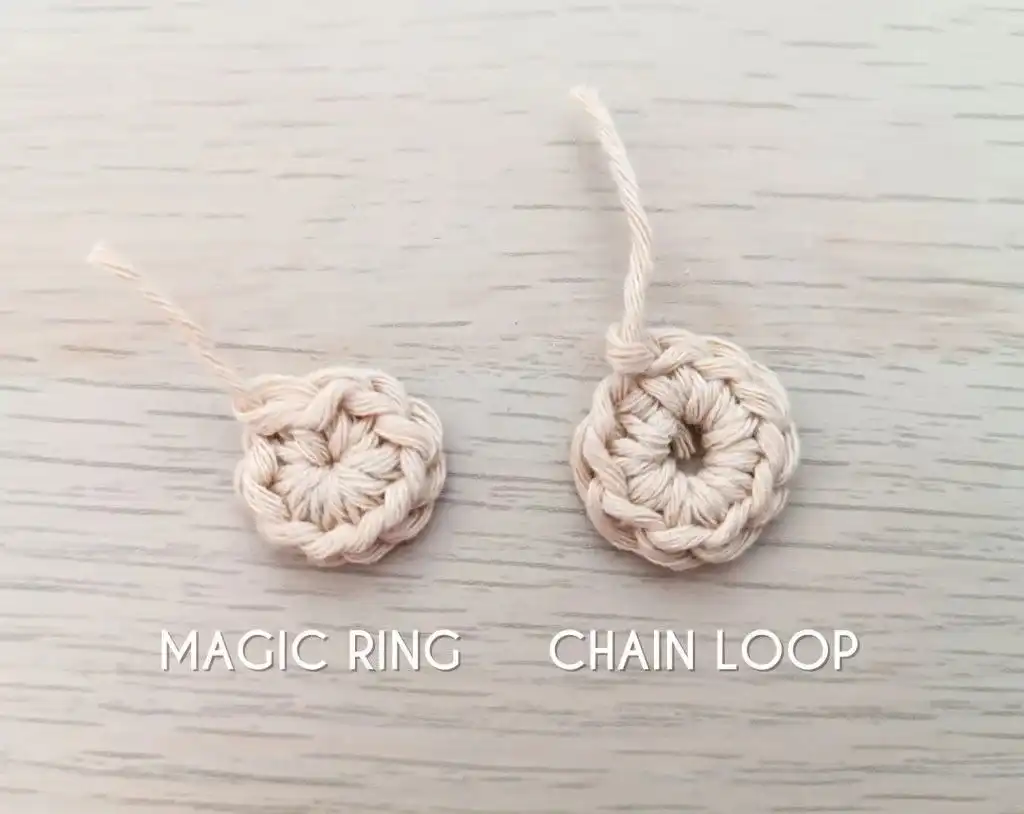
Magic Ring vs. Chain Loop
Crocheting in the round unlocks a vast array of creative possibilities for crafting seamless and beautifully symmetrical projects, including crochet hats, amigurumi, and diverse circular motifs. Understanding the different starting methods is crucial for choosing the right approach for your specific design vision.
PHOTOS by yourcrochet.com
In this chapter, we will delve into two primary methods for starting your rounds: the Magic Ring (also known as the Magic Circle) and the Chain Loop. Each technique presents its own set of advantages, and we’ll explore how to effectively utilize them to achieve optimal results in your crochet endeavors.
How do you create a magic ring?
In this section, you will learn about two prominent methods for creating a magic ring, giving you versatile options to start your circular crochet projects with a perfectly closed center. These techniques cater to different learning styles and preferences, ensuring you find the one that best suits you.
Video Tutorial
Learn the “Double Knot” method alongside the video with Kate from Crochetpedia. Visual learners will find this tutorial incredibly helpful, as it provides a clear, step-by-step demonstration of forming the magic ring using a technique that ensures a secure and tight start to your projects. Follow along to master this quick and efficient approach.
Make a Magic Ring Step-by-Step
Learn how to crochet a magic ring with the “Wrapping” method, a highly popular and effective technique that allows for a perfectly adjustable and seamlessly closed center. This detailed photo tutorial breaks down each stage, making it easy for beginners to follow along and achieve flawless results every time.
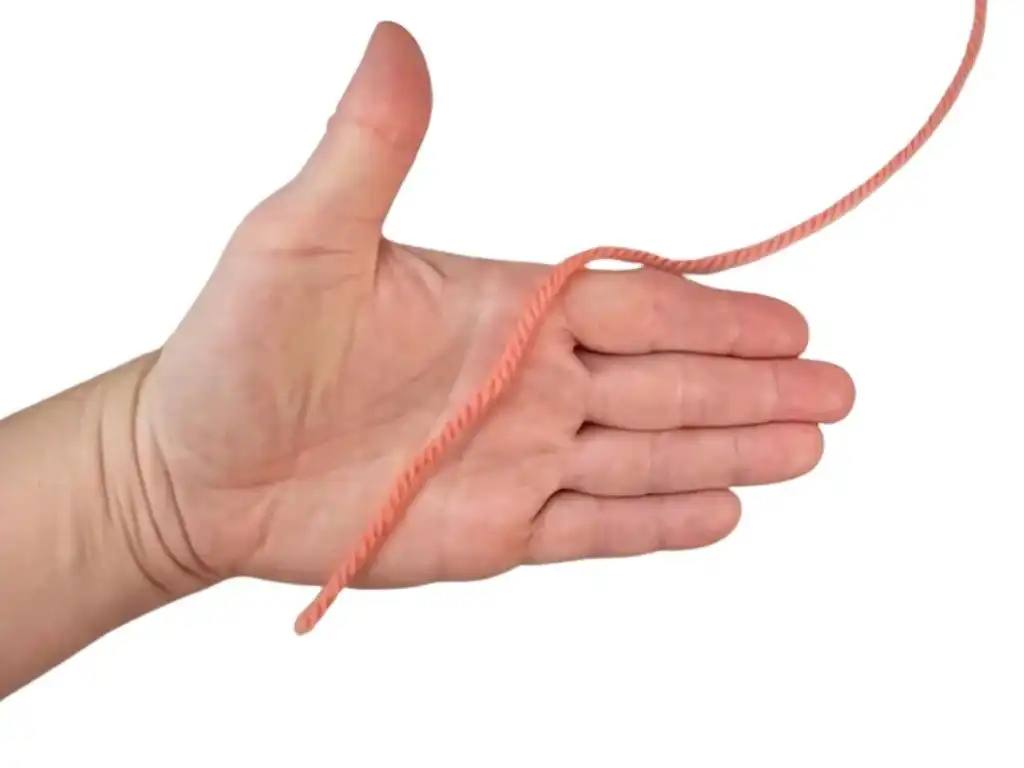
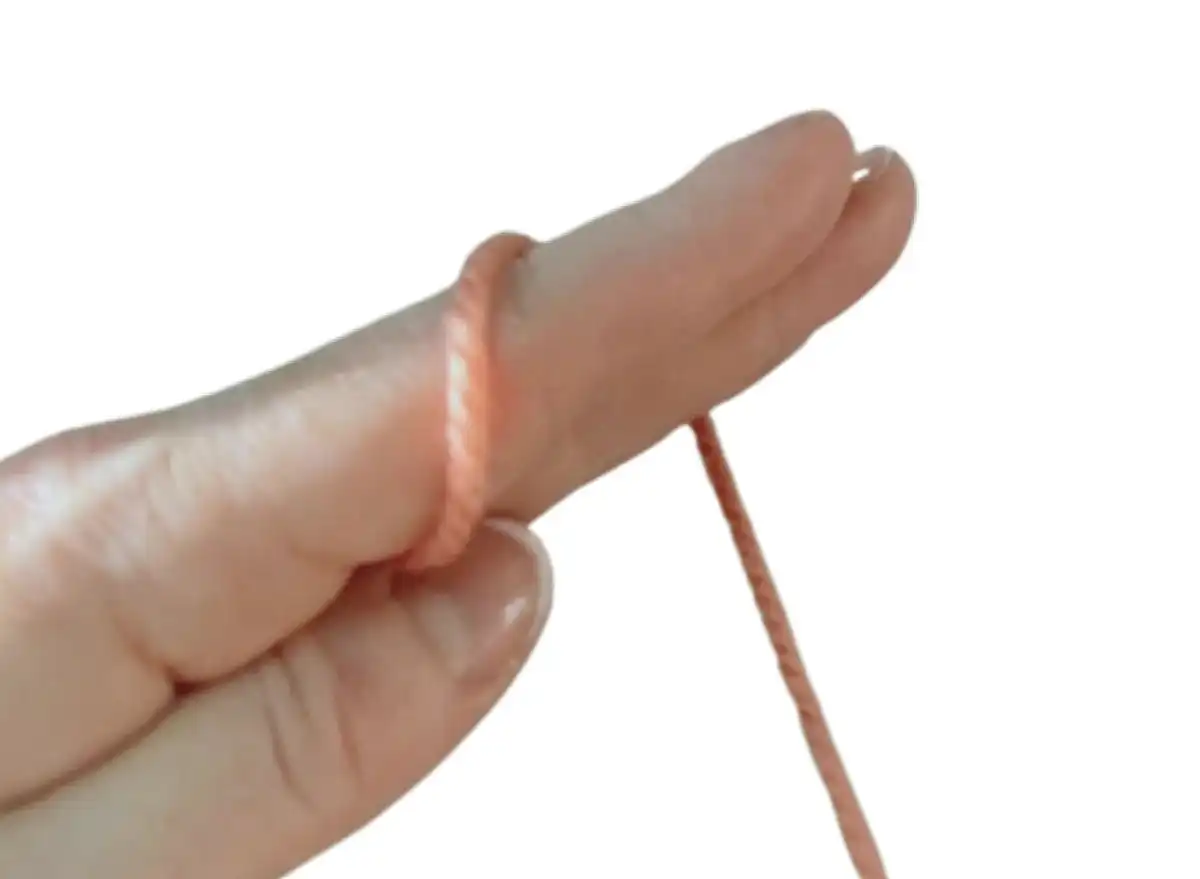
1. Place the yarn end across the inside of your palm, with the working yarn leading away. This initial placement is crucial for establishing the foundation of your magic ring, ensuring the yarn is positioned correctly for subsequent steps and proper tension control.
PHOTOS by yourcrochet.com
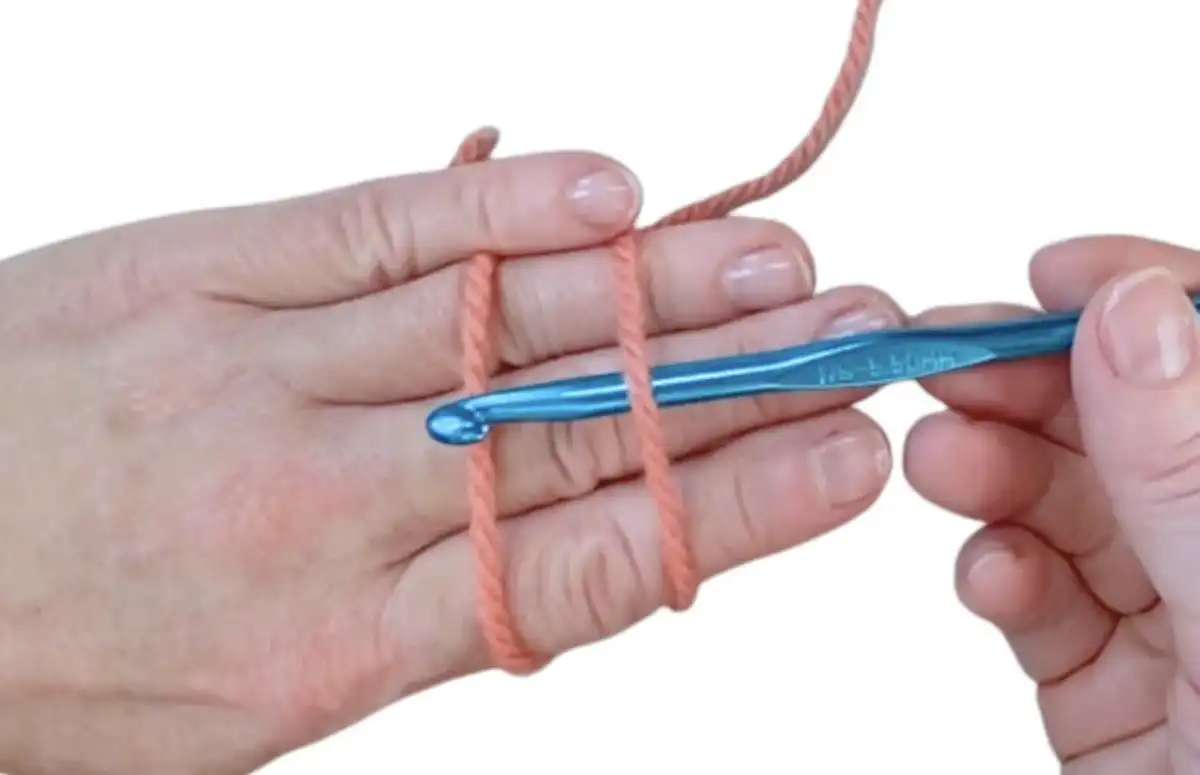
2. Keep the yarn tail with your thumb and the rest of the yarn wrapped around the top of your fingers. The working end should be immobile to maintain tension. This secures the initial loop and sets up the correct tension for consistent stitch formation, which is vital for a neat magic ring.
PHOTOS by yourcrochet.com
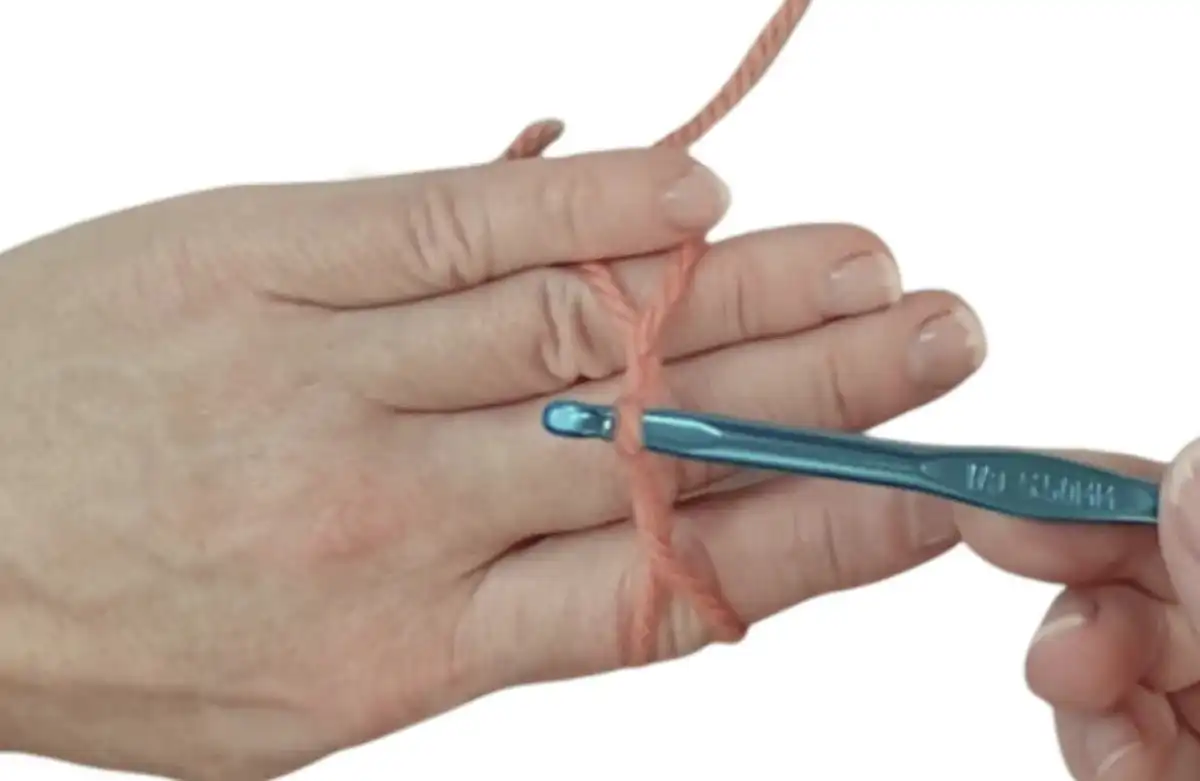
3. Wrap the yarn around your fingers again, so that you have two parallel strands on the top of your palm. Insert the crochet hook under the first strand of yarn towards your hand, then go over the second strand and hook it. Make sure to keep the rest of the yarn from moving. This creates the primary loop for your stitches, ensuring stability as you begin to work.
PHOTOS by yourcrochet.com
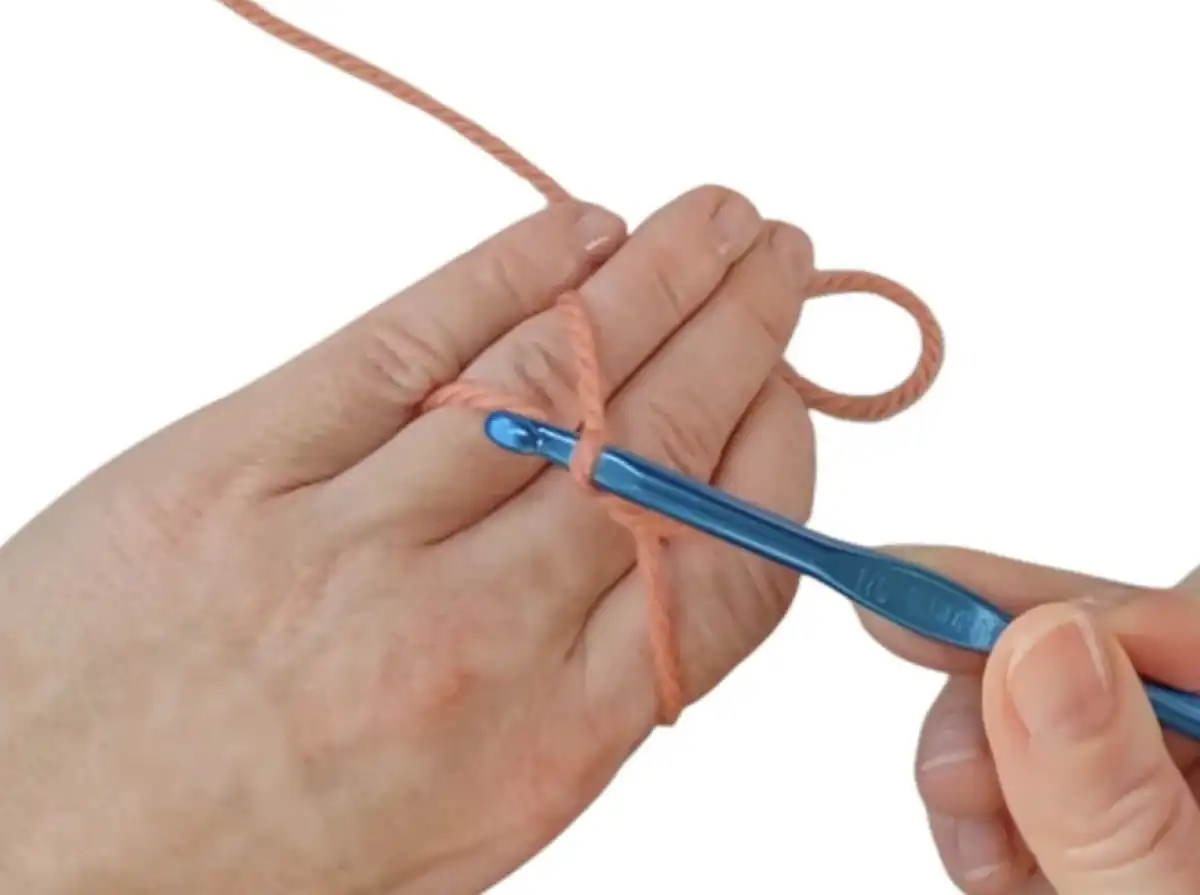
4. Pull the yarn underneath the first strand, while turning the hook 180 degrees. This action skillfully brings a loop of yarn through your initial wrap, forming the first part of your magic ring. The rotation of the hook is key to smoothly creating the foundational loop that will hold your first round of stitches.
PHOTOS by yourcrochet.com
5. Insert the hook under the leftmost, upper string (it will be the working end of the yarn, which means the yarn leading to the rest of the ball). Pull the yarn over to make a chain. This step completes the initial chain that secures your magic ring, providing a stable foundation from which to begin your first round of crochet stitches.
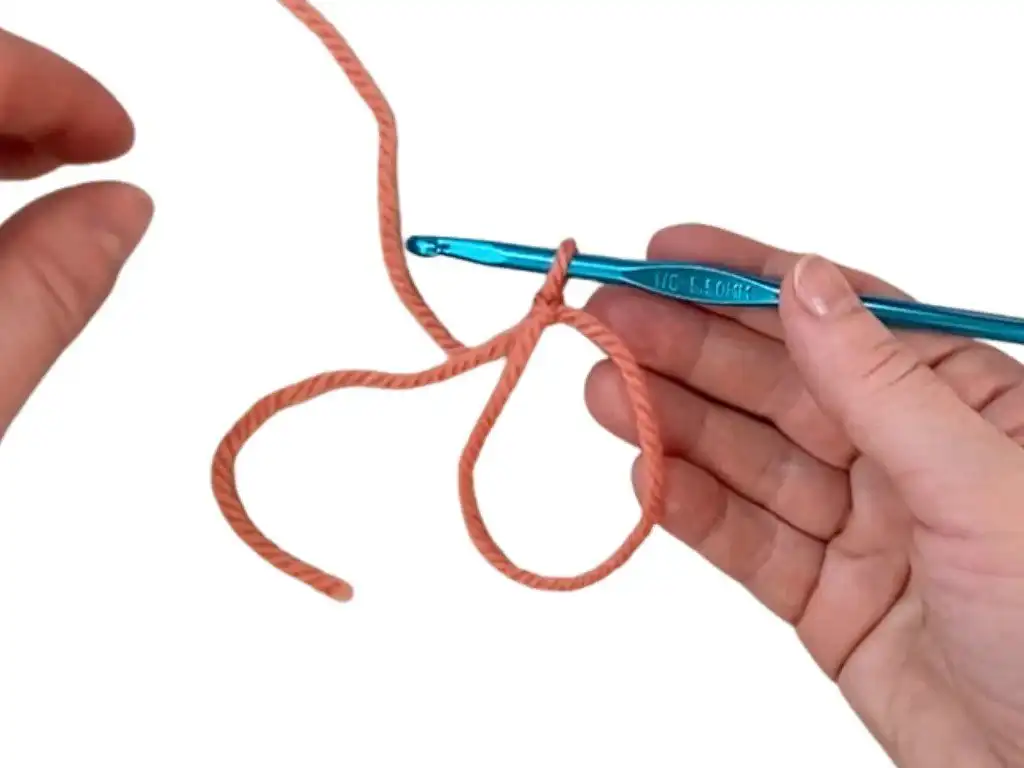
PHOTOS by yourcrochet.com
6. Slip the yarn off your fingers and take the loose end of the yarn off from the loop. Carefully removing the yarn from your fingers without disturbing the newly formed loop is essential. This allows the magic ring to take its free-standing shape, ready for the next phase of stitching.
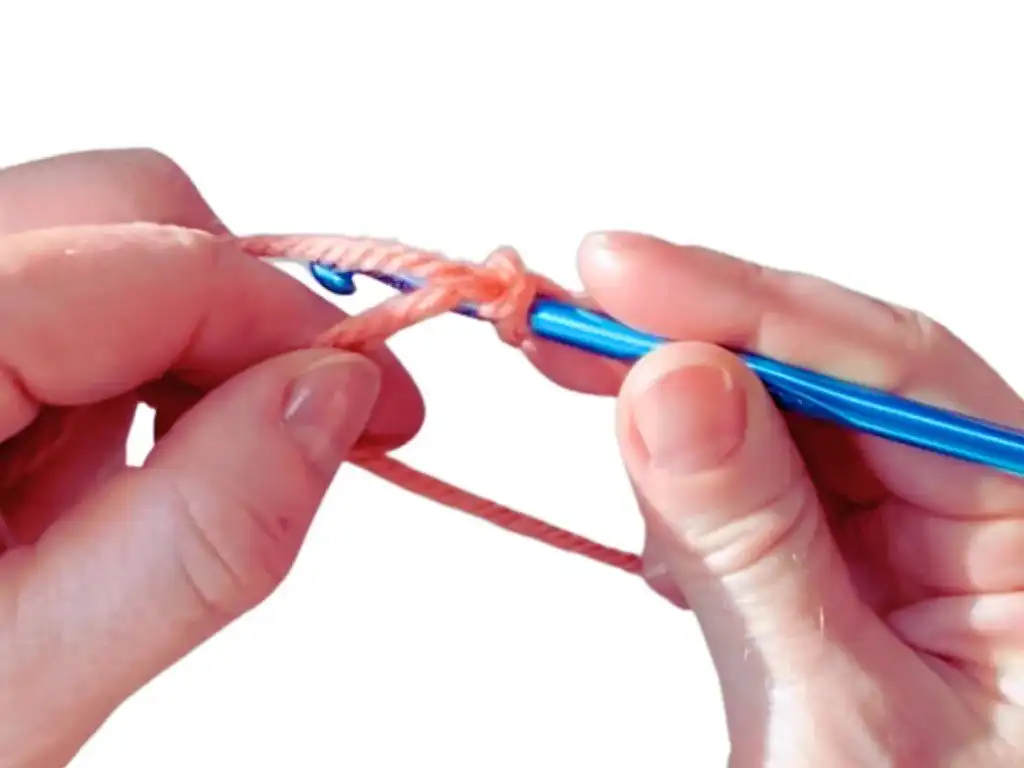
PHOTOS by yourcrochet.com
7. Wrap the working yarn around your left hand, ensuring that the loop is sufficiently large to make a first round of stitches. If it’s not, you can easily adjust it by pulling on the working end of the yarn. Now you can start making the first round of stitches into it.
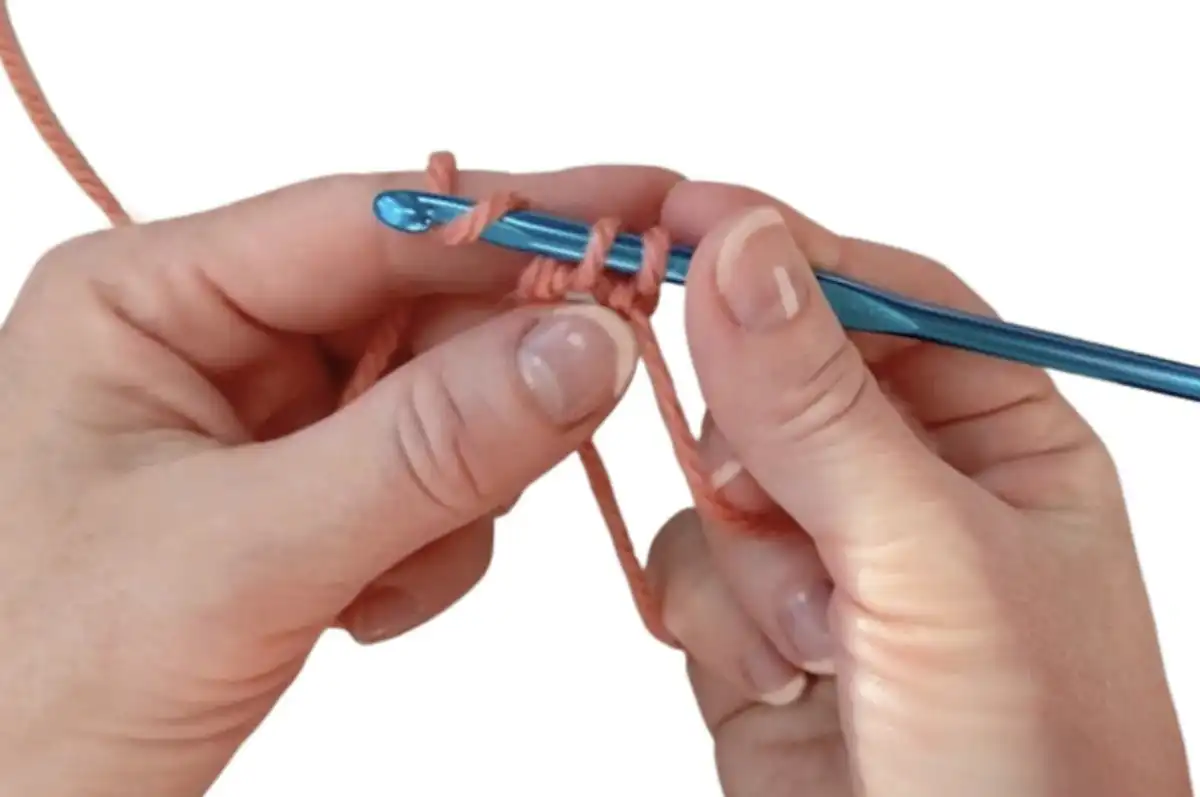
PHOTOS by yourcrochet.com
The next step is pattern-dependent. However, in all cases, we make all stitches in the first round through the magic loop. The chain we already made in step 5 counts as the first chain. We continue with single crochet stitches.
8. Insert the hook into the loop, hook the yarn over, and pull through. Grab the yarn over again and pull through 2 loops. This is the first single crochet stitch. This foundational stitch begins to fill your magic ring, setting the stage for the rest of your circular project with a neat and consistent start.
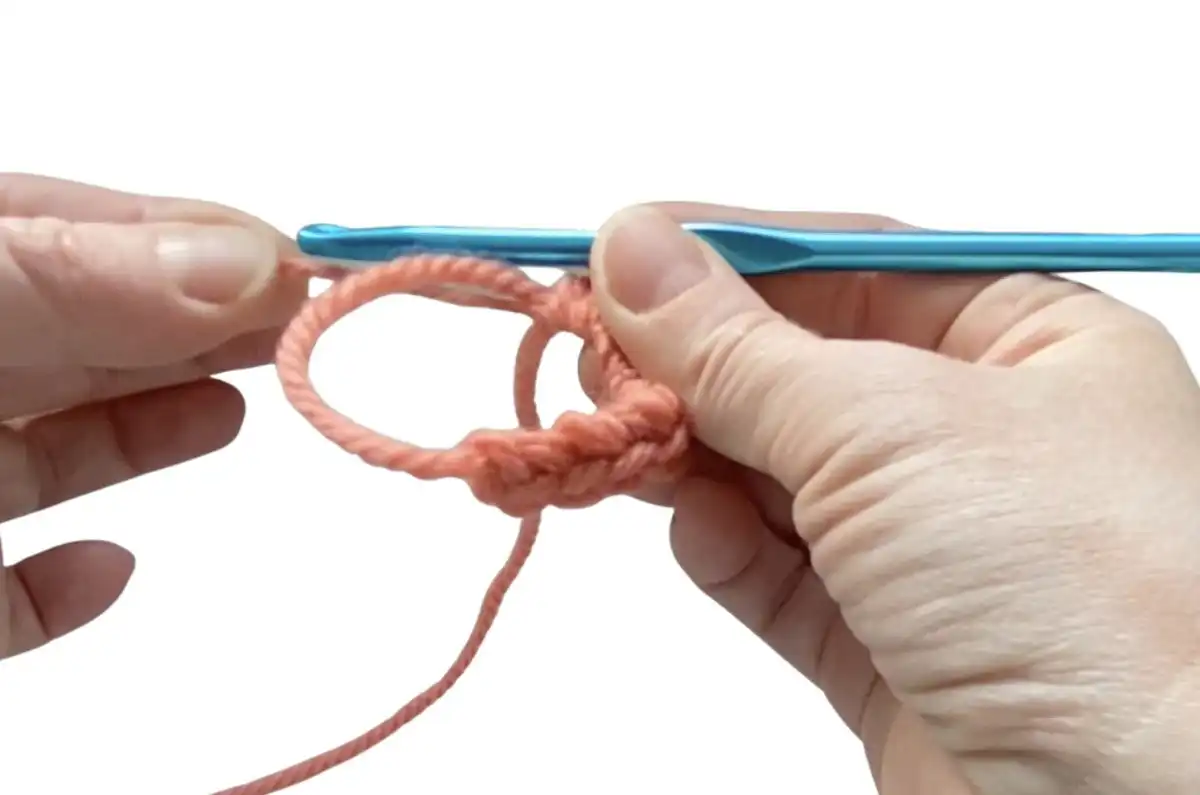
PHOTOS by yourcrochet.com
9. Continue working more stitches into the magic loop in accordance with your pattern. I made 8 single crochets, inserting the hook into the crochet magic loop each time. Now, you can close the circle by taking the tail end in your left hand and pulling it tight, while maintaining a hold on the rest of the loop in your right one. This action cinches the ring, eliminating the central hole for a clean finish.
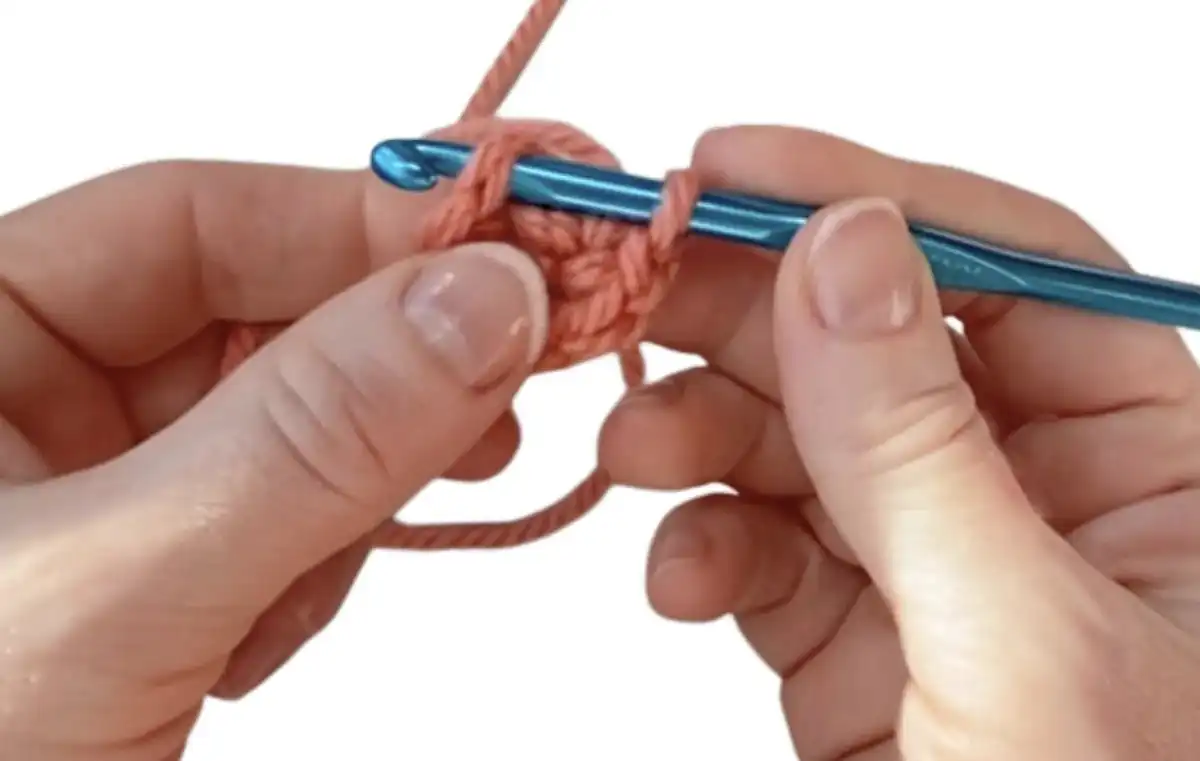
PHOTOS by yourcrochet.com
10. Use a slip stitch to finish the magic circle. To do this, insert the hook under the top two loops of the first stitch of this round, yarn over and pull through. This step securely joins the last stitch to the first, formally closing the round and creating a stable base for subsequent rows. PRO TIP: If you’re following a pattern for an amigurumi, you can skip this slip stitch. Make the next single crochet stitch to start the second round instead.
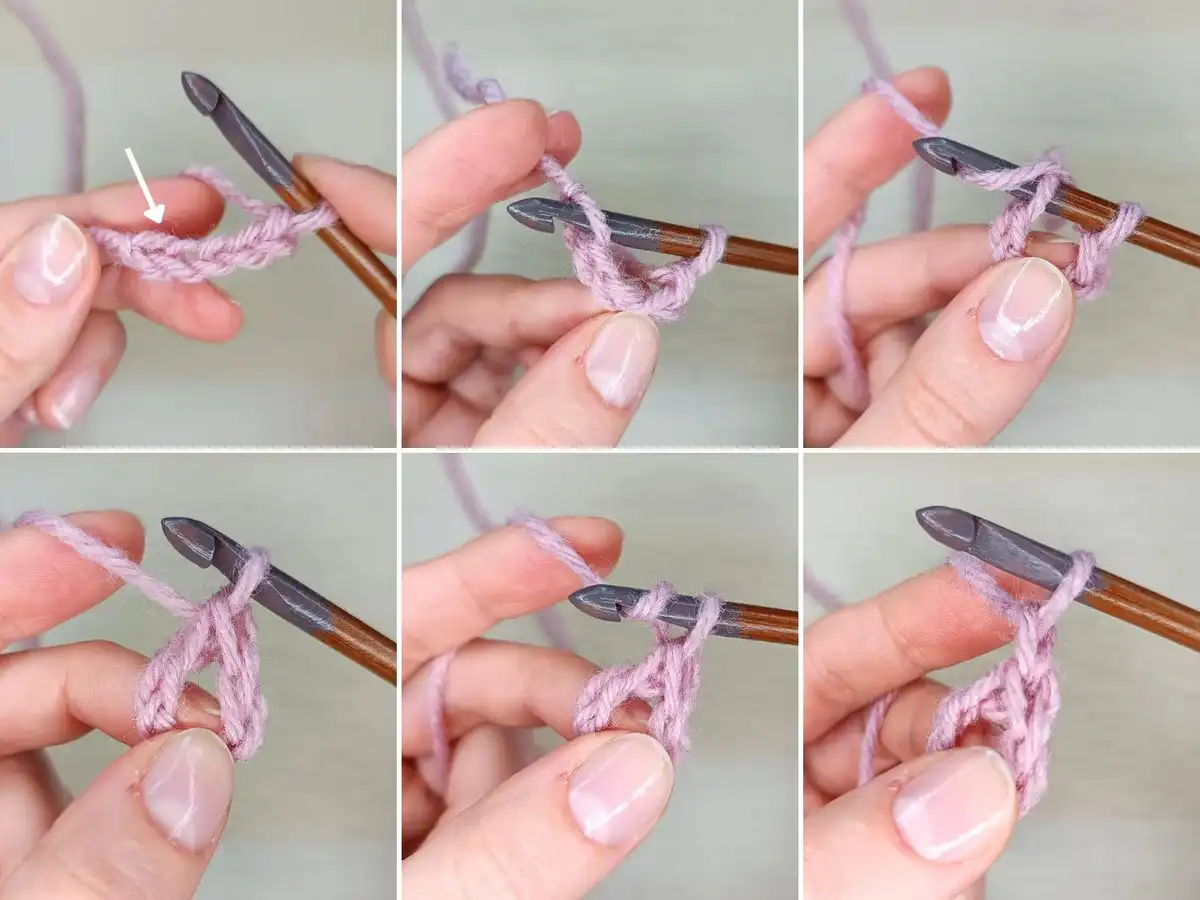
PHOTOS by yourcrochet.com
11. Finally, secure the tail end of the yarn to stop it from unraveling. Take a tapestry needle and work it through the workpiece. Pull the end again. As an added benefit, this will help tighten the ring and make the hole in the center invisible. Weaving in the tail properly ensures the durability and neatness of your finished project, preventing any loose ends from compromising the integrity of your work.
Tips and Tricks
These expert tips will significantly enhance your practice of magic rings, helping you to achieve more efficient and flawless results in all your circular crochet projects. Mastering these techniques will build confidence and improve the overall quality of your craftsmanship, making the process more enjoyable and rewarding.
Troubleshooting common mistakes
Making mistakes while learning is a natural and expected part of the process, and you shouldn’t be discouraged. Here are some common problems crocheters encounter with magic rings and how to effectively troubleshoot them to ensure your projects start off perfectly every time.
- Forgetting to Secure the Ring: Always secure the magic ring before starting your stitches, otherwise it may come undone. A quick securing stitch or careful handling will prevent this common issue, saving you time and frustration.
- The Ring Comes Undone: The ring may unravel if your yarn tail is too short to begin with. It may also happen if you don’t hold it properly while working the first set of stitches into the loop. Ensure a sufficient tail length and maintain a firm, yet gentle, grip on the working yarn.
- Difficulty Pulling Tail: If tightening of the magic ring is difficult, check if your stitches aren’t twisted. To make things easier, lay them on the table and arrange manually along the flat surface, then try pulling again. Untwisting stitches allows for smooth and complete closure of the ring.
- Loosening Ring: If your ring doesn’t want to close completely, you may have too many stitches in the starting round. In this case, the sheer amount of stitches may make it impossible to close up. Reduce the number of stitches in your initial round to ensure the ring can fully cinch.
Using a stitch marker
A stitch marker is an incredibly useful tool when working in the round, especially with techniques like the magic ring where rounds blend seamlessly. It helps you accurately track the beginning or end of your rounds, which is particularly beneficial for projects with numerous stitches or complex patterns, preventing errors and ensuring correct shaping.
- Mark the first stitch: Mark the first stitch you make into the loop of your magic ring. This is the beginning of the round, so when you reach the end, you will know where to make a slip stitch to join or simply continue if working in a spiral.
- Move the stitch markers: Move the stitch markers up with each round as you continue working your stitches – it will mark the new beginning point. Consistently repositioning your marker keeps you oriented throughout your project, preventing lost counts.
- Remove the marker: Remove the marker as you reach the end of your work. This final step is crucial to avoid having the marker permanently embedded in your finished piece, ensuring a clean and polished result.
How do you adjust the size of a magic ring?
The true beauty and primary advantage of the magic ring lie in its unparalleled ease of adjustment. You can precisely control its size with a simple, single movement of your hand. After you’ve worked the first set of stitches inside the loop, just pull the yarn tail to tighten or loosen it as needed.
Remember that you can always adjust the tightness of the magic ring, as long as you have access to the yarn tail. Keep the stitches and the rest of the loop in check to prevent it from twisting, ensuring an even and clean closure. This flexibility allows for perfect customization to match your project’s requirements.
Adding more rounds to the magic ring
After you’ve successfully completed the first round of stitches within your magic ring, you can effortlessly add more rounds to build upon your circular project. Typically, you should refer to the instructions provided in your specific crochet pattern, as it will precisely dictate the subsequent steps and stitch counts required.
Moving to the next row is straightforward, though the approach differs based on whether you are crocheting in rows or spirals. For crocheting in rows, finish with a slip stitch, make a turning chain, and begin a new row, remembering to add increases where necessary. For crocheting spirally, simply begin the new round directly into the first stitch of the previous round, using a stitch marker to keep track. Proper increase placement is key to maintaining the desired shape.
The Chain Loop Method
The Chain Loop method is another popular technique for starting circular crochet projects, involving the creation of a chain that is then joined to form a loop. Your stitches are subsequently worked into this foundational loop. This versatile method is commonly utilized for a wide variety of circular projects, such as crochet coasters, hats, and intricate doilies, offering a reliable alternative to the magic ring.
How to Create a Chain Loop
- Make a chain of the desired length, as specified in your pattern. This initial chain forms the circumference of your starting loop.
- Insert your crochet hook into the first chain made and slip stitch to create a loop. This joins the chain ends, forming a closed circle ready for your first round of stitches.
- Chain one to create a turning chain (counts as the first stitch or not, depending on your pattern). The turning chain helps to bring your yarn to the correct height for the next round of stitches.
- Crochet the required stitches into the loop, following your pattern instructions. Work your stitches directly into the center of the chain loop, encircling the initial chain to form your first round.
Advantages of the Chain Loop
- Easy to learn: The Chain Loop method is remarkably beginner-friendly and straightforward to master, making it an excellent starting point for new crocheters. Its simplicity allows for quick understanding and execution.
- Versatile: It can be adapted for various projects and stitch patterns, proving its utility across a broad spectrum of circular designs. This adaptability makes it a valuable technique in any crocheter’s repertoire.
- No need to adjust: Unlike the Magic Ring, there’s no need to adjust the tightness of the center hole since you control the size with your initial chain. Once your chain is made, the center size is fixed, offering predictability.
Choosing the Right Method
Both the Magic Ring and the Chain Loop are excellent, reliable methods for beginning your crochet projects in the round. Your ultimate choice between these two techniques will largely depend on the specific requirements of your project and your personal preferences as a crocheter.
Here’s a quick guide to help you decide:
- Use the Magic Ring when: You want a secure, adjustable center with no visible hole, perfect for amigurumi and projects requiring a tight, gap-free start. Its ability to fully close is unmatched.
- Use the Chain Loop when: You prefer a simpler, versatile method, or your project doesn’t require an extremely tight center and a small hole is acceptable. It’s ideal for projects where ease of execution is a priority.
Experiment with both techniques to discover which one works best for your projects and comfort level. Soon, you’ll be crocheting in the round with confidence and ease, creating beautiful, circular pieces with whichever method you prefer.
Advanced Techniques
Once you’ve mastered the fundamental techniques of the magic ring, you can explore advanced applications that will elevate your crochet skills and expand your creative possibilities. These techniques allow for greater versatility and precision in your circular projects, opening doors to more complex and intricate designs.
Using the magic ring for different crochet stitches
The most remarkable quality of the magic ring is its inherent versatility, allowing you to use it with virtually any stitch pattern worked in the round. While the precise number of stitches in your initial round might vary according to your pattern, the clean, tight closure provided by the adjustable loop remains a consistent advantage.
Once you have the magic loop securely set with its first round of stitches, you are perfectly poised to proceed with a wide array of crochet stitches. Whether your design calls for the classic texture of the granny stitch, delicate lacy techniques, or any other intricate stitch pattern, the magic ring provides a solid, adaptable foundation for your success.
Incorporating the magic ring into patterns
When you embark on a new crochet pattern that is designed to be worked in the round, always take a moment to check the type of beginning the designer specifies. Even if a pattern initially calls for a chain loop, you have the flexibility and advantage of substituting it with an adjustable ring instead.
Consider using the magic ring method whenever your project would benefit from a tightly closed loop. This strategic substitution is particularly effective in designs where a seamless, hole-free center is paramount for both aesthetics and structural integrity, allowing you to customize patterns for a superior finish.
We hope this guide to mastering the Master Crochet Magic Ring in 5 Minutes [Video for Beginners] has been incredibly helpful for your crochet journey! Don’t forget to save this pin to your Pinterest board for future reference, share it with fellow crochet enthusiasts, and leave a comment below with your favorite magic ring tips or projects.


