Brush Up: Watercolor Food Painting Tutorial – Fried Egg & Tasty Treats
Step into the delightful world of watercolor food painting, where everyday culinary delights transform into captivating art. This comprehensive guide, featuring a detailed Watercolor Cupcake Tutorial, will inspire you to bring your favorite dishes to life on paper. Discover techniques to master textures, colors, and the unique translucency watercolor offers, starting with the iconic fried egg.
Whether you’re a beginner or looking to refine your skills, these tutorials offer a fantastic opportunity to explore vibrant palettes and expressive brushstrokes. From juicy fruits to comforting baked goods, you’ll learn how to infuse each painting with delicious realism and charm. Embrace your artistic appetite and create mouth-watering masterpieces, just like exploring other forms of art such as Cool Watercolor Plant Painting.
How to Paint Fried Chicken
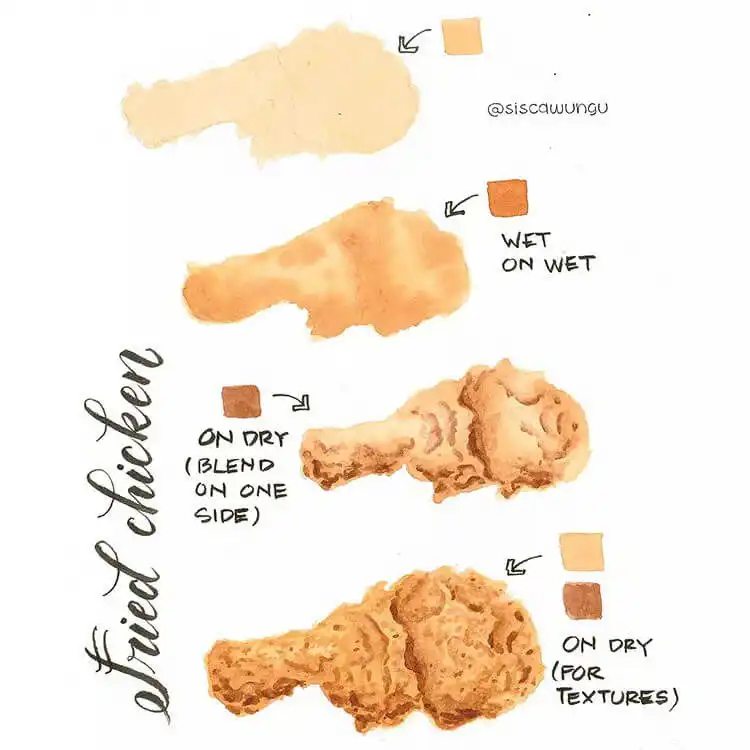
Capture the irresistible golden-brown hues and crispy textures of fried chicken with watercolor. Focus on layering warm yellows, oranges, and browns to build depth in the breading. Experiment with dry brush techniques to achieve that perfect crunch, making the skin truly glisten on paper.
Highlighting the light bouncing off the textured surface is key to realism. Pay attention to subtle shadows under the crispy edges to give your fried chicken a three-dimensional appearance, making it look as appetizing as the real thing.
How to Paint a Slice of Watermelon
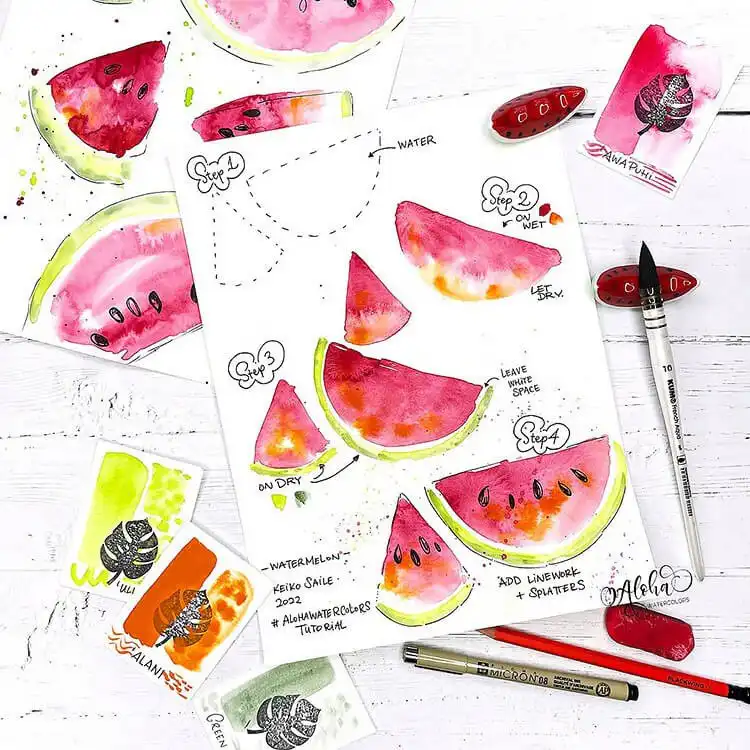
Watercolor is uniquely suited to depict the juicy, refreshing quality of a watermelon. Begin with a pale green wash for the rind, gradually building up darker greens for depth. The vibrant pink or red flesh can be achieved with bold, wet-on-wet techniques, allowing colors to bleed naturally.
Don’t forget to add subtle white highlights for dimension, mimicking the watery sheen of a freshly cut slice. Tiny, dark seeds placed strategically will complete your mouth-watering watermelon art, making it appear incredibly fresh and cool.
How to Paint Bubble Tea
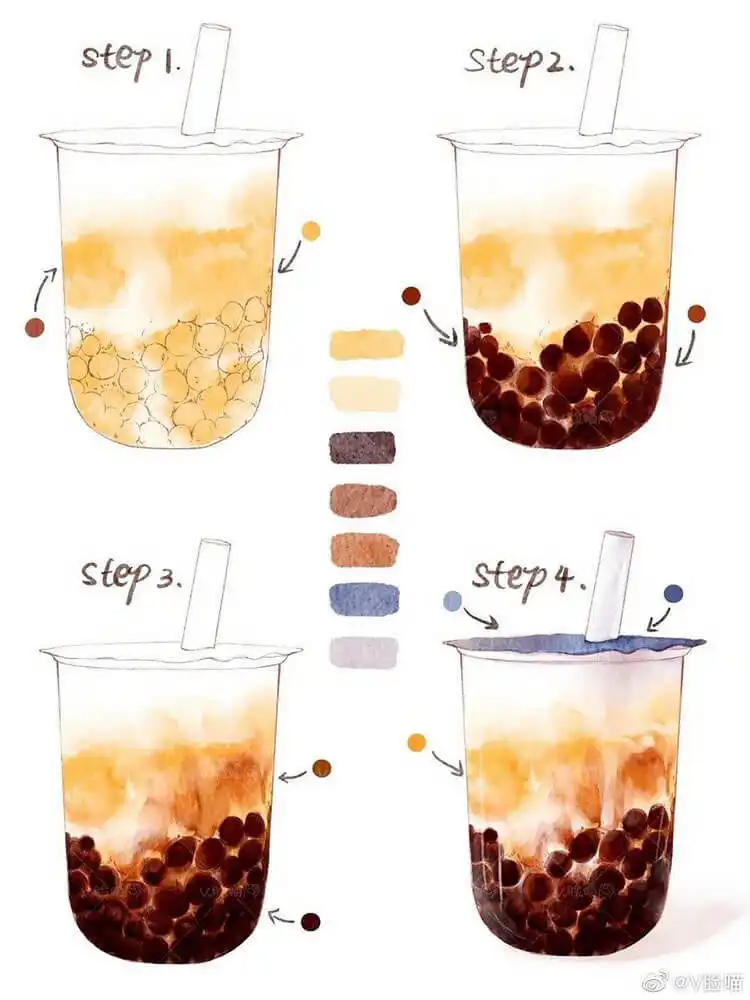
This bubble tea tutorial is an excellent exercise in playing with muted colors and mastering transparency. Use soft washes for the tea base, letting the paper show through to create that see-through effect. The boba pearls offer a fun challenge in layering dark, glossy circles.
To add texture and realism, vary the size of your bubbly circles and ensure there’s a slight space or highlight between them. This technique helps convey the distinct, chewy texture of the tapioca pearls within the translucent drink, giving it a playful depth.
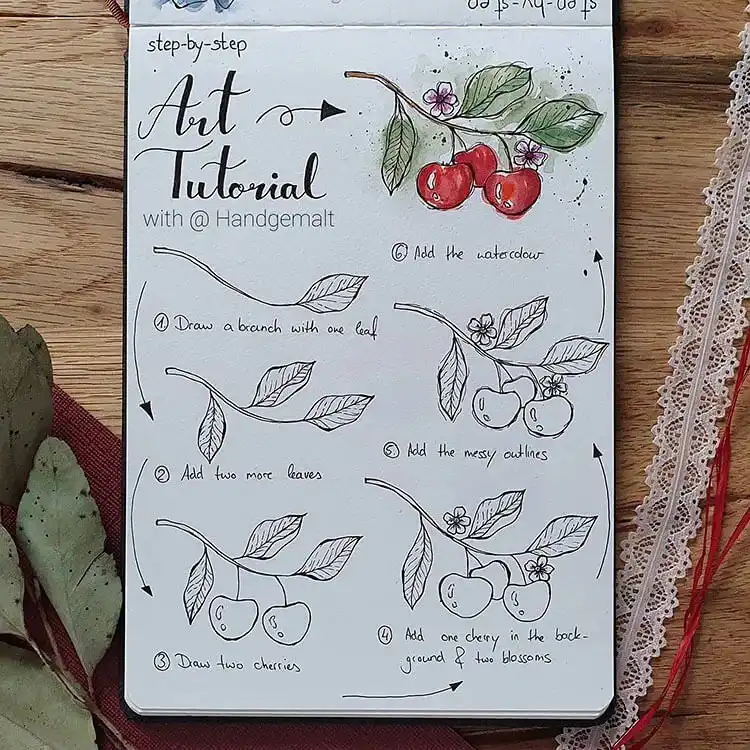
How to Paint Cherries
Cherries are a beautiful subject for watercolor, combining rich light reds and deep dark reds. Build up the spherical shape with layers, starting with lighter tones and gradually adding darker glazes to create shadows and highlights. The natural sheen of the skin is perfect for subtle white reflections.
The stems provide a striking contrast with their rich brown and green tones against the vibrant fruit. Experiment with dynamic brushstrokes for the stems to guide the viewer’s eye, enhancing the composition and making your cherries appear ripe and ready to pick.
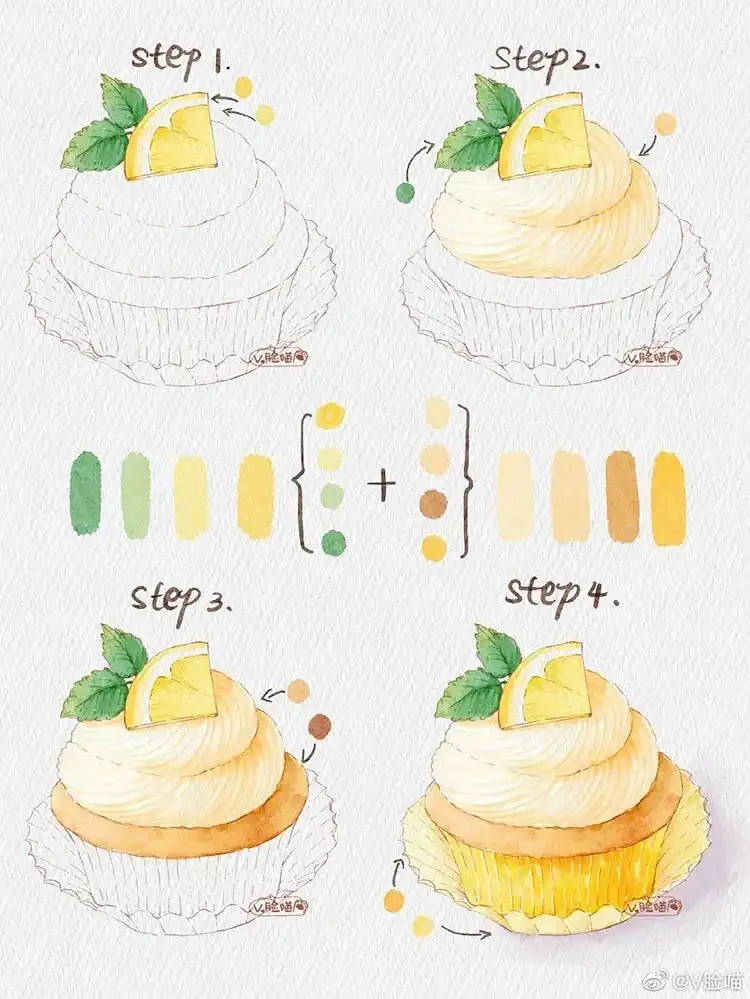
How to Paint a Lemon Cupcake
This lemon cupcake tutorial invites you to dive into bright yellows and refreshing light greens, evoking a summery, citrusy feel. Focus on creating fluffy cake texture with gentle, layered washes for the cupcake base and creamy swirls for the frosting. Use delicate strokes to suggest its airy consistency.
To truly make your cupcake pop, add a thin, translucent lemon slice or zest on top, capturing its juicy transparency. This small detail amplifies the lemon theme, making your watercolor treat look utterly delicious and inviting.
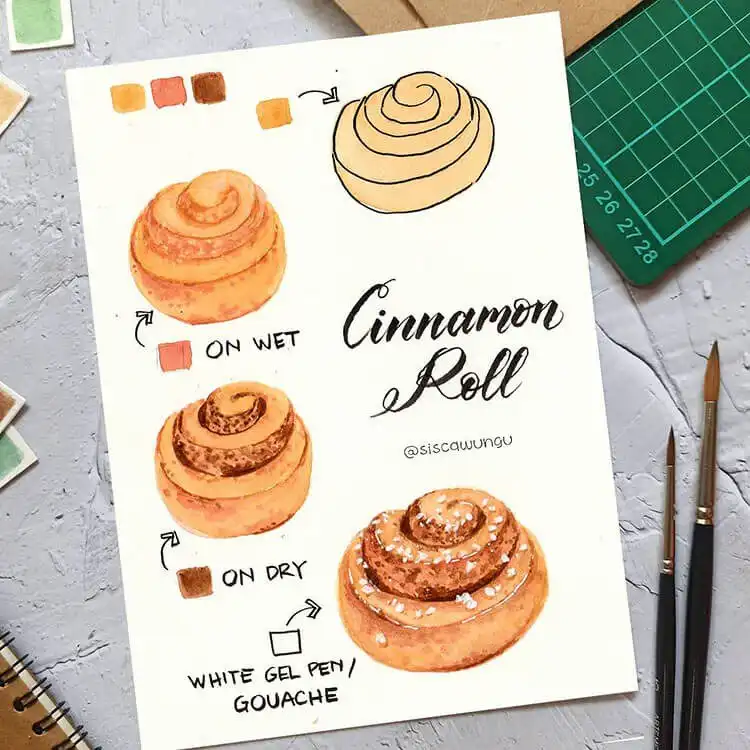
How to Paint a Cinnamon Roll
The intricate spiral of a cinnamon roll is a dream subject for watercolors, allowing for beautiful transitions of warm, baked tones. Use layers and shades of warm browns, ochres, and hints of burnt sienna to depict the dough and the rich cinnamon filling.
Capturing the warmth of a fresh-baked pastry requires careful attention to subtle gradients. These layers evoke not just the visual appeal but also the imagined aroma and taste of this comforting dessert, making viewers almost smell the sweetness.
How to Paint a Carrot
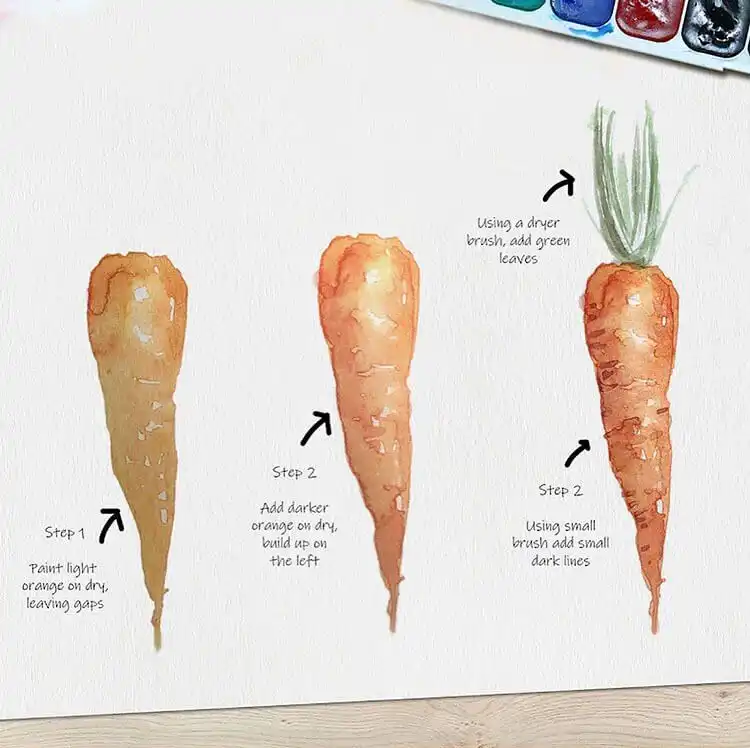
Learn to capture the vibrant orange hue and crisp texture of this root vegetable in watercolor. Start with a light orange wash and gradually build up deeper tones, especially towards the tip and where shadows fall. Use slight variations in color to mimic its natural imperfections.
Simple, deliberate strokes can create the distinct tapered shape and slight ridges of a carrot. Adding subtle greens for the leafy top provides a wonderful contrast, resulting in a watercolor carrot that looks fresh from the garden and good enough to eat.
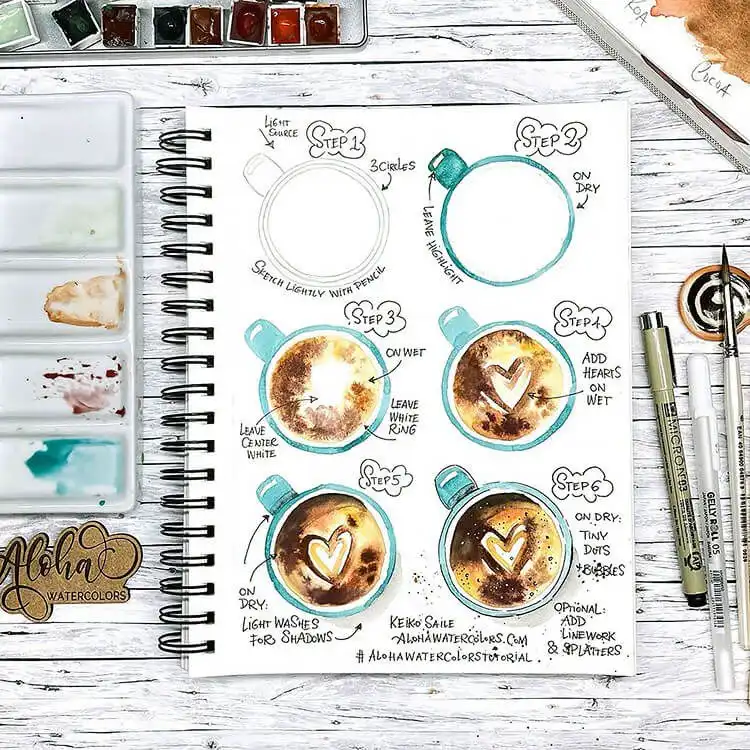
How to Paint a Coffee Mug
One of the joys of painting food and drink with watercolor is rendering warm, comforting tones. A mug of hot coffee or a latte is an ideal subject for this, allowing you to play with rich browns, creamy whites, and steam effects. Focus on the reflections on the mug’s surface.
Don’t forget to add your favorite foam design on top, using lighter tones and gentle blending to create a soft, frothy appearance. The steam rising from the mug, subtly painted, adds to the cozy atmosphere, inviting the viewer to take a sip.
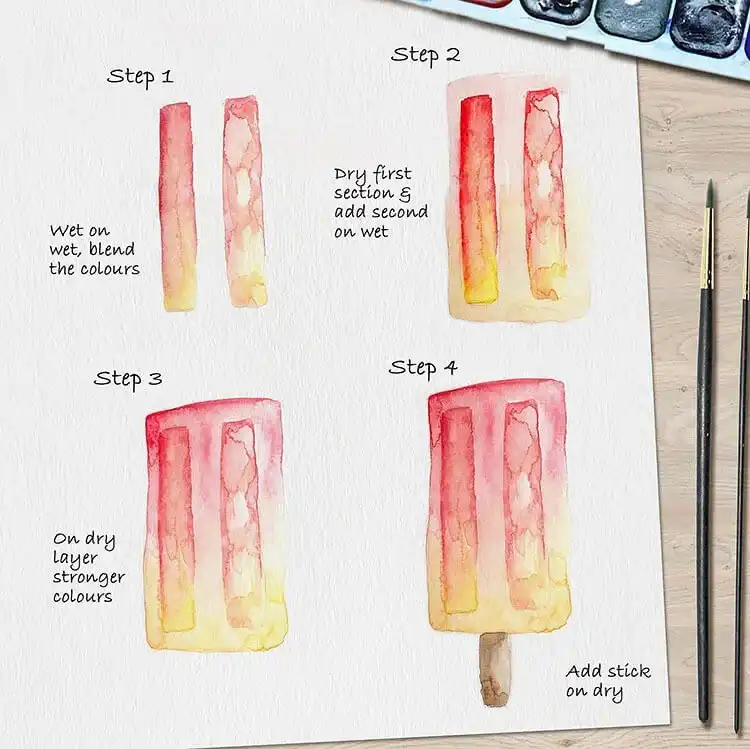
How to Paint an Ice Pop
The summer season is perfectly encapsulated by a refreshing ice pop, making it a fun watercolor subject. Utilize bright, translucent colors to represent the frozen treat, allowing the light to shine through as if it were melting slightly. Experiment with vibrant gradients for a multi-flavored look.
Capture the nostalgia and flavor of these frozen treats by focusing on their glossy, slightly translucent texture. Adding subtle drips or reflections can enhance the illusion of a cold, sweet delight on a warm day, bringing summer vibes to your canvas.
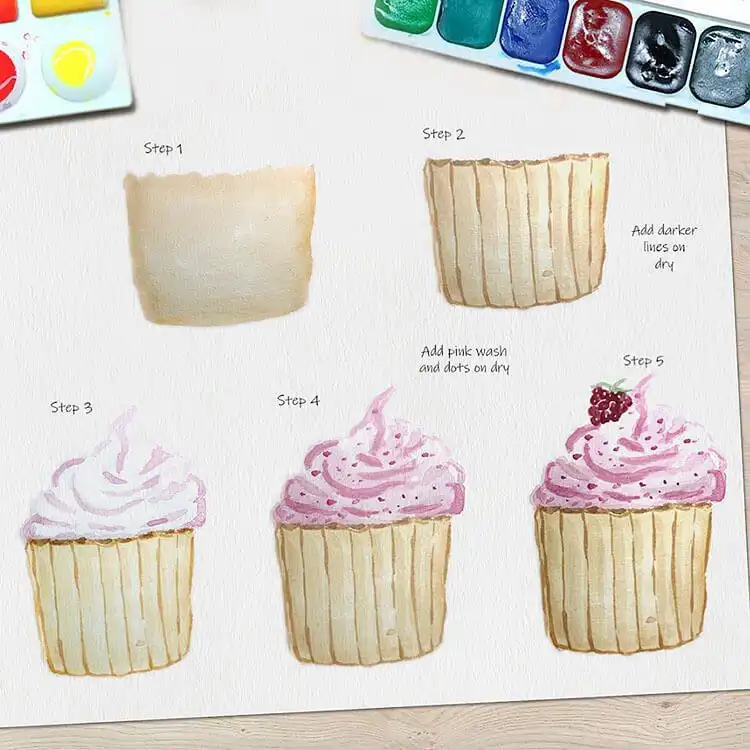
How to Paint a Cupcake with a Raspberry
Cupcakes are not just for birthdays; they are fantastic subjects for watercolor art. This tutorial guides you through painting a cupcake adorned with a luscious raspberry, capturing its delicious layers and textures. Focus on the soft crumb and the creamy frosting.
The raspberry on top offers a delightful textural contrast with its delicate, bumpy surface and rich red hue. By blending colors for the cupcake base and adding careful details to the berry, you can capture all the deliciousness in one charming watercolor painting.
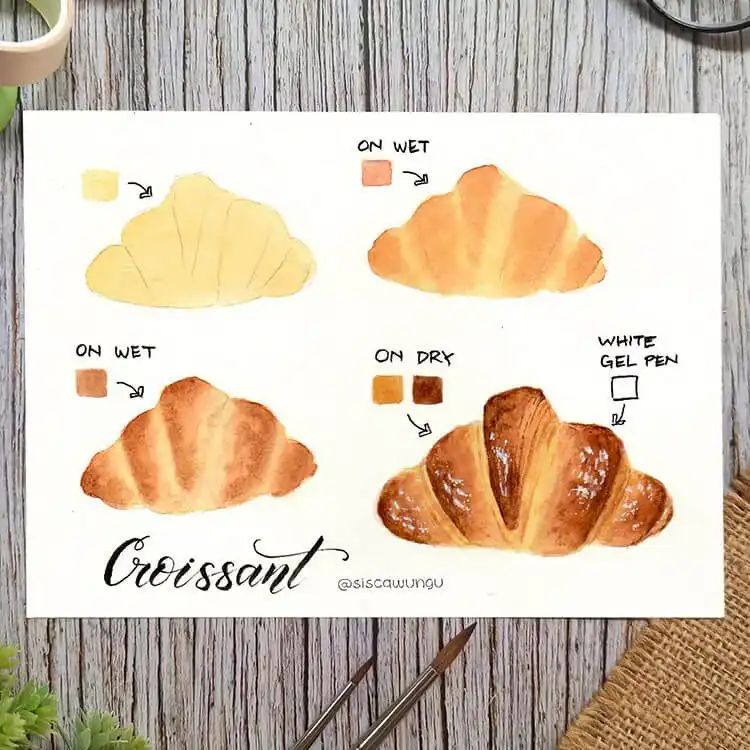
How to Paint a Croissant
This flaky French pastry is all about capturing subtle color changes and delicate layers for its toasty outer surface. Use warm, golden browns with hints of yellow and ochre to convey the baked shine and crispy exterior. The interplay of light and shadow on its folds is crucial.
Emphasize the texture by using slightly broken brushstrokes or dry brushing to suggest flakiness. The goal is to make it look light and airy, as if just pulled from the oven, inviting viewers to imagine its buttery aroma and delicate crunch. For more ideas on developing your art skills, consider how to learn how to draw eyes with detail.
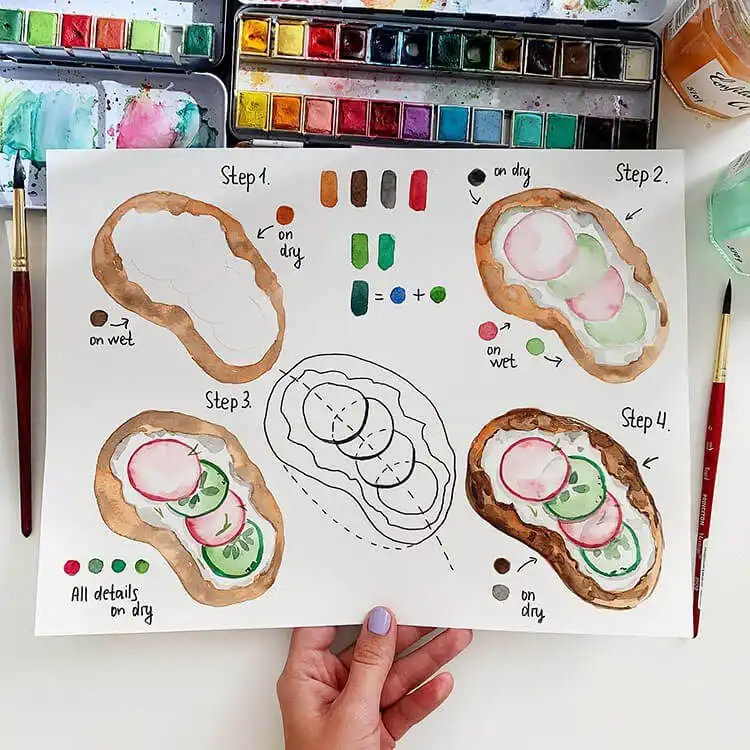
How to Paint Toast with Cucumber and Radish
A veggie and toast combo presents a wonderful challenge in capturing varied textures. Focus on the crispy, slightly browned surface of the toast using warm, muted yellows and browns. The distinct grains and char marks add character.
Then, transition to the juicy, cool green of the cucumber slices and the vibrant, peppery red of the radish. Each ingredient offers a unique texture and color opportunity, allowing you to showcase contrast and fresh detail in a simple, elegant composition.
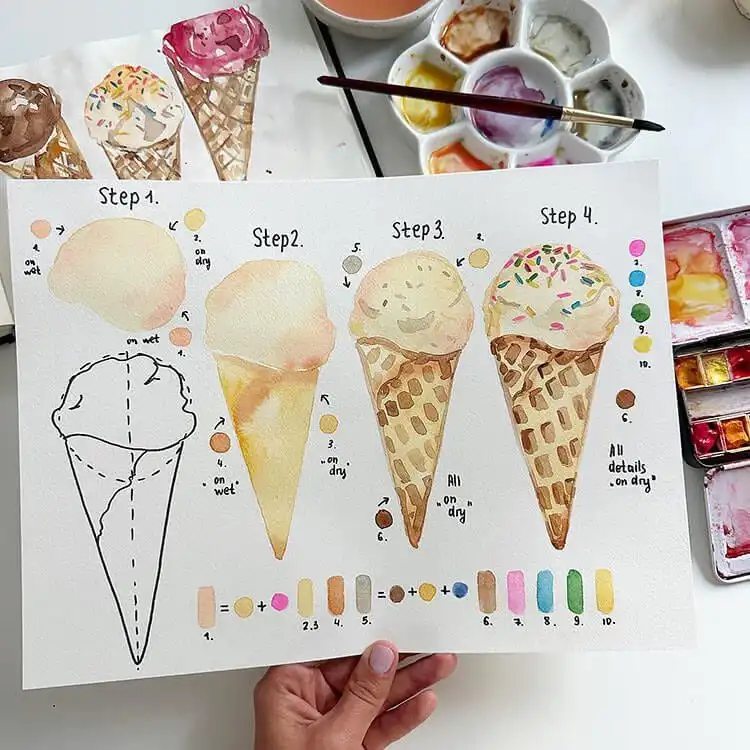
How to Paint an Ice Cream Cone with Sprinkles
This tutorial is all about fun and vibrant colors. Choose an inviting color for the ice cream, allowing for soft, melting edges where it meets the cone. The cone itself can have a warm, waffle-like texture created with cross-hatching or dry brush techniques.
Add sprinkles that contrast well with the ice cream color, using tiny, distinct dots or dashes. This detail brings your painting to life, creating a playful and tempting treat that captures the joy of a perfect scoop on a sunny day.
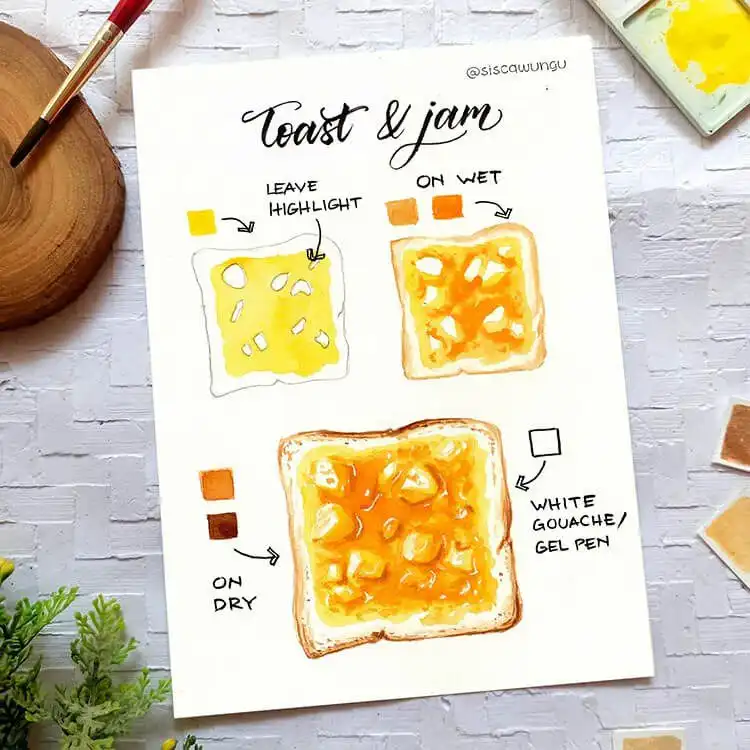
How to Paint Toast and Jam
In this tutorial, you will learn to create a beautiful watercolor painting of a rustic slice of toast with a dollop of juicy jam. Begin with soft browns and yellows for the toast, focusing on the texture and subtle browning around the edges.
The jam provides a vibrant focal point, with its translucent, rich color peeking through. Use wet-on-wet techniques for the jam to achieve a juicy, slightly translucent look, making it appear sweet and spreadable, creating a truly comforting breakfast scene.
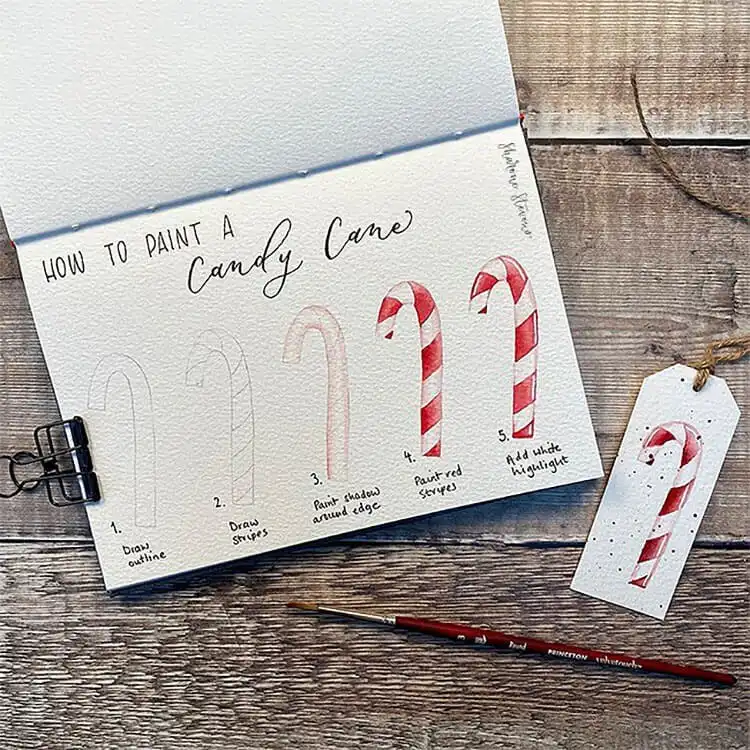
How to Paint a Candy Cane
Practice your brush control to create the clean, crisp stripes of a classic candy cane. Use vibrant reds and whites, ensuring the lines are sharp and well-defined. The curving shape offers an opportunity to demonstrate form through subtle shading.
Employ white paint or masking fluid to add realistic highlights and a glossy shine to the candy cane, making it appear smooth and inviting. These details elevate the simple treat into a visually appealing watercolor piece, perfect for holiday themes.
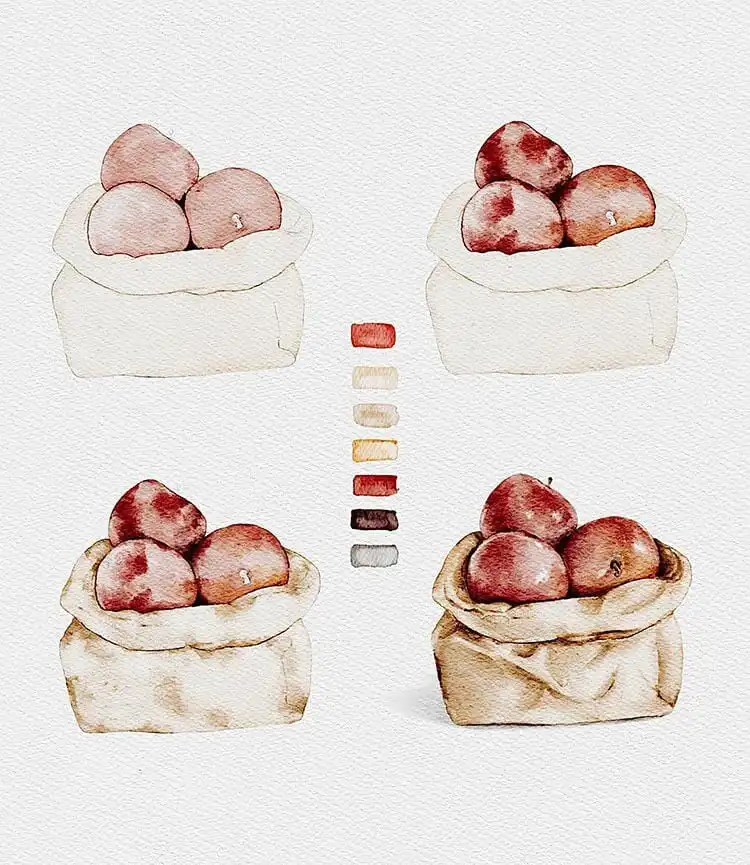
How to Paint a Bag of Apples
This painting of a bag of apples is an excellent lesson in creating repeating shapes while maintaining individuality. Focus on the varied reds, greens, and yellows of the apples, ensuring each one has its unique coloration and subtle imperfections. The challenge is in achieving depth.
Properly mixing your paint is crucial to avoid a flat look; use glazes and layering to build up color and form. The bag itself can be rendered with muted tones and soft folds, creating a supportive backdrop for the vibrant fruit, suggesting abundance and freshness.
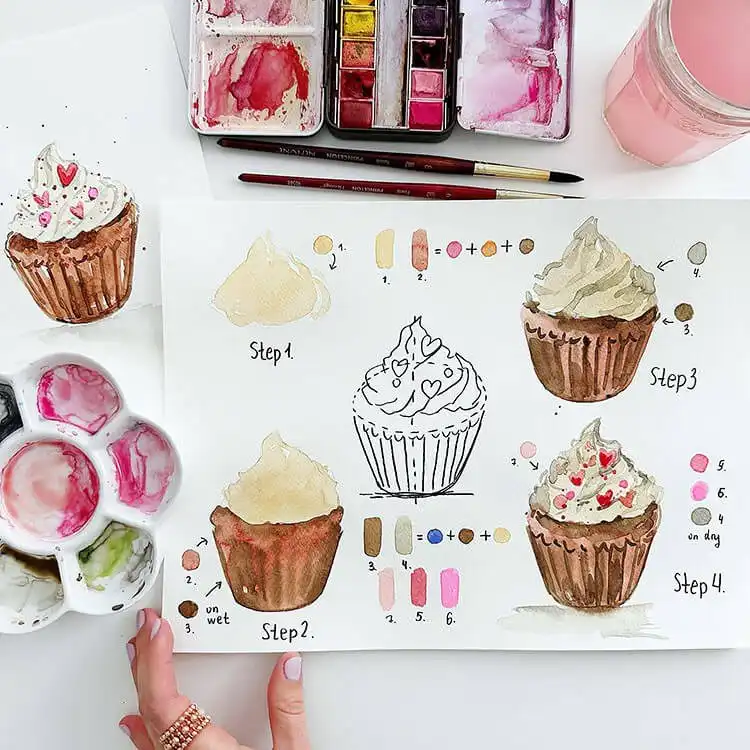
How to Paint a Love-Themed Cupcake
A cupcake tutorial with a love theme provides a delightful opportunity to experiment with colors to create a romantic feel. Think soft pinks, gentle reds, and perhaps a touch of gold for frosting or decorations. Focus on a fluffy, inviting texture.
You can enhance the love vibe by adding delicate heart-shaped sprinkles or a small, hand-painted heart motif on the frosting. This personal touch transforms a simple cupcake into a heartfelt artistic expression, perfect for a special occasion. For broader art inspiration, explore Beautiful Aesthetic Drawing Ideas.
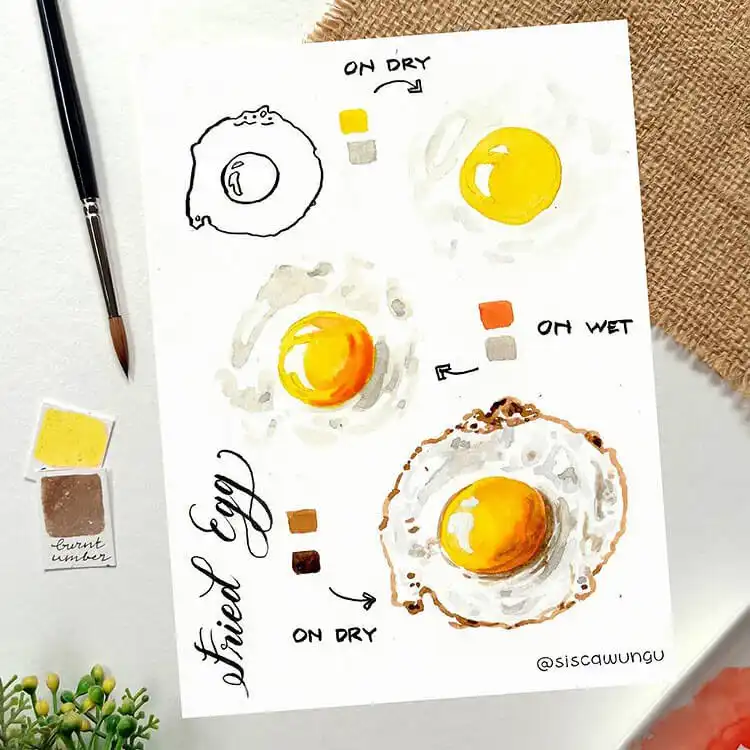
How to Paint a Fried Egg
Art truly has the ability to elevate even the simplest breakfast foods. Follow this tutorial to learn how to capture the luminous radiance of a fried egg yolk against the contrasting hues of its white. The key is in creating translucency and soft transitions.
Use bright yellows and oranges for the yolk, allowing colors to blend softly. For the whites, employ delicate washes with hints of pale yellow or grey to suggest its delicate texture. This piece celebrates the everyday, turning a simple meal into a work of art.
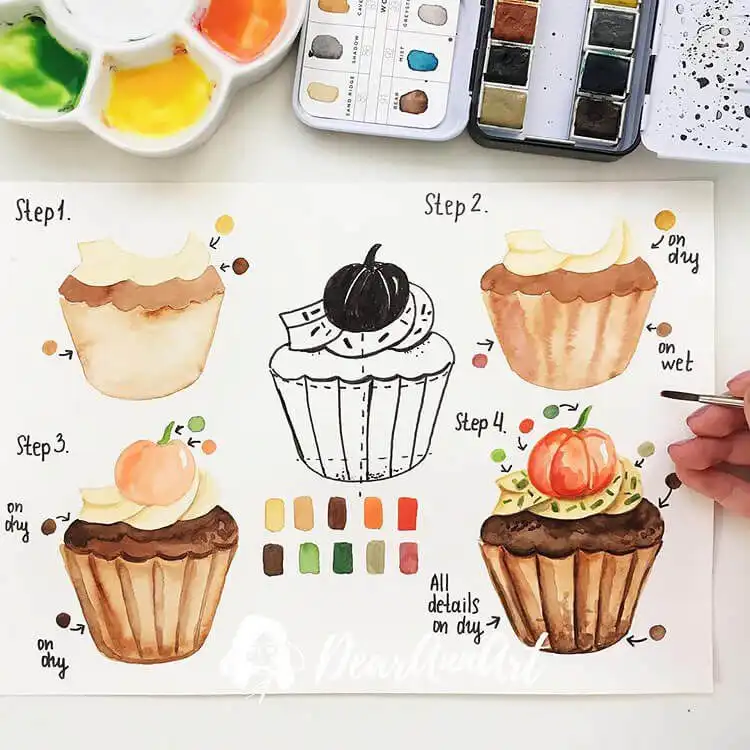
Pumpkin Cupcake
These fall-themed pumpkin cupcakes are undeniably cute and a joy to paint. Embrace the warm, earthy tones of autumn with rich oranges, browns, and subtle spices reflected in your palette. Focus on creating a soft, inviting texture for the cake base.
The frosting can be a creamy off-white or a light caramel, topped with tiny, delicate details like a swirl of cinnamon or a miniature pumpkin accent. These elements combine to create a cozy, delicious watercolor representation of a beloved fall treat.
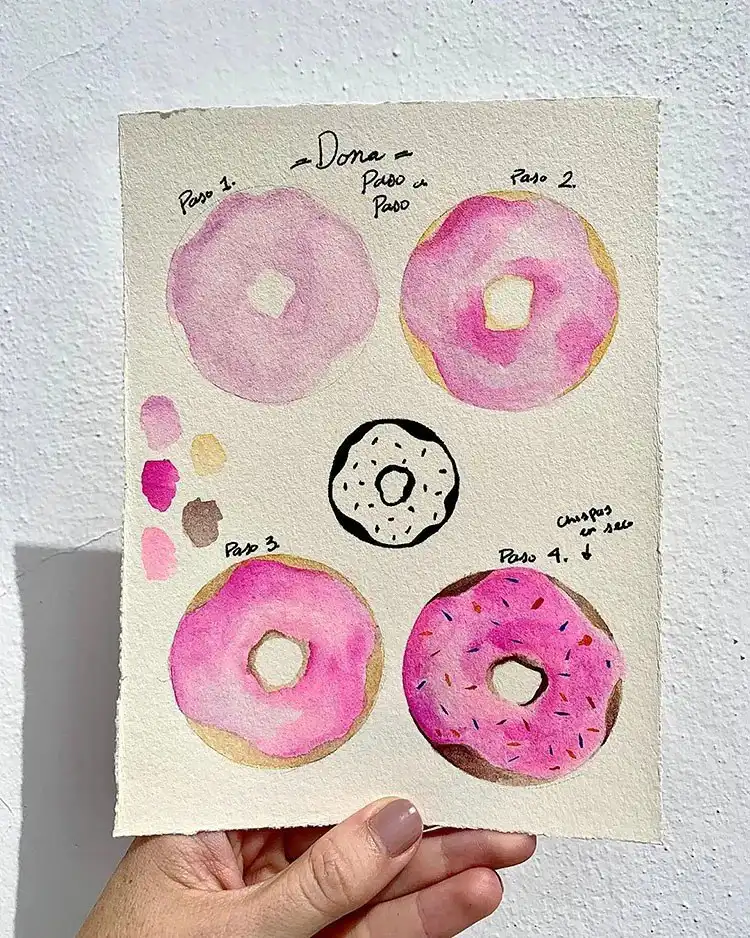
How to Paint a Donut
Painting delicious food items is always enjoyable, and this watercolor donut tutorial is a perfect fit for exploring glazes and textures. The circular form offers a chance to practice smooth color transitions and shading for a plump, inviting shape.
Use any color you like for the icing—bright pink, rich chocolate, or a classic glaze. Focus on making the icing look smooth and slightly glossy, contrasting with the soft, bready texture of the donut itself. Add sprinkles or drizzles for extra visual appeal.
With these tutorial ideas, you can truly hone your watercolor painting skills and enjoy the boundless creative freedom that art brings. Each food item presents its unique challenges and joys, so don’t hesitate to experiment, mix colors, and add your signature touch to every piece. Happy painting!


